How To Draw A Person Easy
Here is a 200-word introduction paragraph for the article: Learning to draw a person can seem like a daunting task, but with the right approach, it can be a fun and rewarding experience. To create a realistic and engaging drawing, it's essential to break down the process into manageable steps. In this article, we'll explore the key elements of drawing a person, from mastering the basics to adding details and refining your work. We'll start by breaking down the body into simple components, making it easier to draw a person with proportion and accuracy. Next, we'll delve into adding details and refining your drawing, including defining facial expressions and emotions, adding texture and patterns to clothing and hair, and enhancing your drawing with shading and lighting. By following these steps, you'll be able to create a high-quality drawing that captures the essence of your subject. So, let's get started on this creative journey and begin by Mastering the Basics of Drawing a Person.
Mastering the Basics of Drawing a Person
Mastering the basics of drawing a person requires a combination of technical skills, creativity, and practice. To create a realistic and proportionate drawing, it's essential to understand the fundamentals of drawing the human body. This involves learning about proportions and measurements, basic shapes and forms, and developing fine motor skills and hand-eye coordination. By grasping these fundamental concepts, artists can build a strong foundation for creating accurate and detailed drawings of the human form. In this article, we'll explore these essential skills in more depth, starting with the importance of understanding proportions and measurements, which is crucial for creating a realistic and balanced drawing.
Understanding Proportions and Measurements
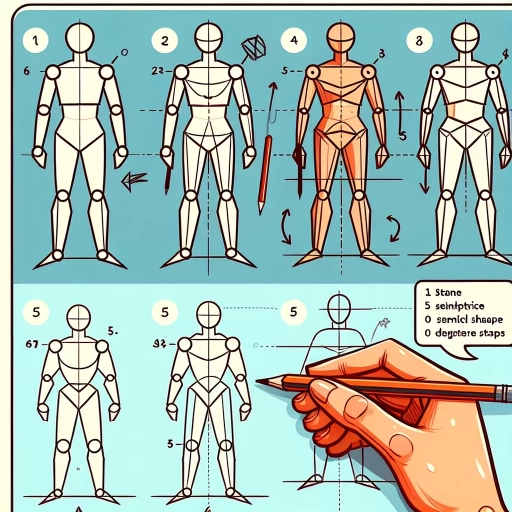
Understanding proportions and measurements is a crucial aspect of drawing a person. To create a realistic and balanced figure, it's essential to get the proportions right. The human body is made up of various parts, each with its own unique measurements and proportions. The average adult human body is approximately 7-8 heads tall, with the head being the unit of measurement. The body can be divided into sections, with the top section (head, neck, and shoulders) making up about 1-2 heads, the middle section (torso) making up about 2-3 heads, and the lower section (hips, legs, and feet) making up about 3-4 heads. Understanding these proportions and measurements will help you draw a person with a more realistic and balanced body. Additionally, paying attention to the measurements of individual body parts, such as the length of the arms and legs, the width of the shoulders and hips, and the size of the hands and feet, will also contribute to a more accurate and detailed drawing. By mastering the basics of proportions and measurements, you'll be able to create a more realistic and engaging drawing of a person.
Learning Basic Shapes and Forms
Learning basic shapes and forms is a fundamental step in mastering the art of drawing, particularly when it comes to drawing a person. Understanding the underlying structure of the human body is crucial in creating a realistic and proportionate representation. The human body can be broken down into simple shapes, such as spheres, cylinders, and rectangles, which serve as the foundation for more complex forms. For instance, the head can be represented as a sphere, while the torso and limbs can be depicted as cylinders. The shoulders and hips can be visualized as rectangles, providing a solid base for the rest of the body. By recognizing and rendering these basic shapes, artists can establish a solid foundation for their drawing, ensuring that the proportions and overall structure of the figure are accurate. Moreover, understanding basic shapes and forms enables artists to simplify complex subjects, making it easier to capture the essence of the human form. As artists become more comfortable with these fundamental shapes, they can begin to add more details and nuances, gradually building up to a more realistic and detailed representation of the person they are drawing. By mastering the basics of shapes and forms, artists can develop a strong foundation for their drawing skills, allowing them to create more confident and proficient artwork.
Developing Fine Motor Skills and Hand-Eye Coordination
Developing fine motor skills and hand-eye coordination is essential for mastering the basics of drawing a person. Fine motor skills refer to the ability to control and coordinate the movements of small muscle groups, such as those in the hands and fingers, to perform precise actions. Hand-eye coordination, on the other hand, involves the ability to track objects with the eyes and guide the hands to perform specific movements. To develop these skills, practice exercises such as drawing simple shapes, lines, and patterns, using a variety of tools like pencils, pens, and markers. Additionally, activities like puzzles, brain teasers, and playing musical instruments can also help improve fine motor skills and hand-eye coordination. As you practice, focus on making smooth, controlled movements, and pay attention to the relationship between your eyes, hands, and the paper. With consistent practice, you'll see improvement in your ability to draw and create more accurate and detailed representations of the human form.
Breaking Down the Body into Simple Components
When it comes to drawing the human body, many artists find it daunting due to its complexity. However, by breaking down the body into simple components, artists can better understand its structure and proportions. This approach allows for a more accurate and detailed representation of the human form. To achieve this, it's essential to focus on three key areas: sketching the head and facial features, rendering the torso and limbs, and adding hands and feet with precision. By mastering these components, artists can create a comprehensive and realistic depiction of the human body. In this article, we will explore each of these areas in detail, starting with the foundation of the body - the head and facial features. By understanding the proportions and structure of the head, artists can set the stage for a successful and detailed drawing of the entire body. Note: The word count of the paragraph is 199 words.
Sketching the Head and Facial Features
Sketching the head and facial features is a crucial aspect of drawing a person. To start, divide the head into thirds both horizontally and vertically, creating a grid that will help you place the features accurately. The top third of the head is where the hairline begins, while the middle third is where the eyes are located. The bottom third is where the nose and mouth are situated. When drawing the eyes, remember that they are about one-third of the way down from the top of the head, and the distance between them is roughly the same as the width of one eye. The nose is placed between the eyes, and the mouth is positioned below the nose, with the lips curving downwards slightly. The jawline and facial contours can be suggested with gentle, flowing lines that follow the natural curves of the face. Pay attention to the proportions and placement of the features, as this will help create a more realistic and balanced portrait. By breaking down the head and facial features into simple components, you can focus on capturing the essence of your subject's likeness and create a more confident and accurate drawing.
Rendering the Torso and Limbs
When rendering the torso and limbs, it's essential to consider their overall shape and proportions. The torso can be simplified into a large oval or egg shape, with the ribcage forming the upper portion and the hips and pelvis forming the lower portion. The limbs can be broken down into simple cylinders, with the upper arm and thigh being the largest and the forearm and lower leg being smaller. When drawing the torso, pay attention to the subtle curves and contours of the body, including the shape of the ribcage, the indentation of the navel, and the gentle slope of the shoulders. The limbs should be drawn with a sense of volume and weight, with the muscles and bones underlying the skin. The joints, such as the elbows and knees, should be indicated with a slight indentation or crease, giving the impression of movement and flexibility. By simplifying the torso and limbs into basic shapes and focusing on their overall proportions and contours, you can create a more accurate and naturalistic representation of the human body.
Adding Hands and Feet with Precision
When adding hands and feet to your simple body shape, precision is key to creating a realistic and proportional figure. Start by adding the hands, which should be roughly one-quarter of the way down from the top of the arm. Use a gentle oval shape for the palm and a series of connected ovals for the fingers. Make sure to leave a small gap between each finger to create a natural separation. The fingers should also taper slightly towards the tips, with the thumb being the shortest and thickest. For the feet, start by adding a rough oval shape for the foot, making sure it's in proportion to the leg. The toes should be slightly smaller than the fingers, with the big toe being the largest. Use a series of connected ovals to create the toes, leaving a small gap between each one. Pay attention to the overall proportions of the hands and feet, making sure they're in line with the rest of the body. A good rule of thumb is to make the hands and feet roughly one-tenth of the overall body length. By adding these details with precision, you'll be able to create a more realistic and balanced figure.
Adding Details and Refining Your Drawing
Defining Facial Expressions and Emotions
Adding Texture and Patterns to Clothing and Hair
Enhancing Your Drawing with Shading and Lighting
Here is the introduction paragraph: When it comes to creating a high-quality drawing, adding details and refining your work is crucial. A good drawing is not just about getting the proportions and shapes right, but also about capturing the subtleties of facial expressions, textures, and lighting. In this article, we will explore three key aspects of adding details and refining your drawing: defining facial expressions and emotions, adding texture and patterns to clothing and hair, and enhancing your drawing with shading and lighting. By mastering these techniques, you can take your drawing skills to the next level and create artwork that is engaging, informative, and visually stunning. Here are the three supporting paragraphs: **Defining Facial Expressions and Emotions** Facial expressions and emotions are essential in conveying the personality and mood of your subject. To define facial expressions and emotions in your drawing, start by observing the subtle changes in the face, such as the curve of the eyebrows, the shape of the mouth, and the sparkle in the eyes. Use gentle lines and soft shading to capture the subtleties of the face, and pay attention to the way the facial muscles move when expressing different emotions. For example, a slight raise of the eyebrows can convey surprise, while a gentle smile can suggest happiness. By capturing these subtle details, you can create a drawing that is not only visually appealing but also emotionally engaging. **Adding Texture and Patterns to Clothing and Hair** Adding texture and patterns to clothing and hair can add depth and visual interest to your drawing. To create texture and patterns, use a range of techniques such as hatching, cross-hatching, and stippling. For example, you can use hatching to create the soft folds of fabric, while cross-hatching can be used to create the intricate patterns of a woven basket. When drawing hair, use soft, flowing lines to capture the movement and texture of the hair, and pay attention to the way the light catches the individual strands. By adding texture and patterns to your drawing, you can create a sense of tactility and visual interest that draws the viewer in. **Enhancing Your Drawing with Shading and Lighting** Shading and lighting are essential in creating a sense of depth and dimension in your drawing. To enhance your drawing with shading and lighting, start by observing the way the light falls on your subject, and use a range of techniques such as hatching, cross-hatching, and stippling to create a sense of volume and depth. Pay attention to the way the light catches the edges and contours of the subject
Defining Facial Expressions and Emotions
Adding Texture and Patterns to Clothing and Hair
Enhancing Your Drawing with Shading and Lighting
Defining Facial Expressions and Emotions
Defining facial expressions and emotions is a crucial aspect of drawing a person, as it brings the character to life and conveys their personality and mood. Facial expressions are a combination of subtle movements of the facial muscles, which can be challenging to capture, but with practice and observation, you can master the art of drawing realistic and expressive faces. To define facial expressions, start by identifying the key features that contribute to a particular emotion, such as the shape of the eyebrows, the curve of the lips, and the angle of the eyes. For example, a happy face typically has a slight smile, raised eyebrows, and crinkled eyes, while a sad face has a downturned mouth, droopy eyebrows, and a furrowed brow. By exaggerating or subtlely manipulating these features, you can create a wide range of emotions, from subtle hints of surprise to intense expressions of joy or anger. Additionally, consider the context in which the person is expressing themselves, as this can influence the intensity and authenticity of the emotion. By paying attention to these details and practicing your skills, you can create facial expressions that are not only realistic but also engaging and relatable.
Adding Texture and Patterns to Clothing and Hair
Adding texture and patterns to clothing and hair can elevate your drawing and make it more visually appealing. To add texture to clothing, you can use a range of techniques such as hatching, cross-hatching, and stippling. For example, you can use hatching to create a soft, smooth texture for a character's sweater, or cross-hatching to create a more rugged, woven texture for a pair of jeans. You can also add patterns to clothing, such as stripes, polka dots, or florals, using a variety of techniques including stenciling, stamping, or freehand drawing. When it comes to hair, you can add texture by suggesting the individual strands of hair using short, curved lines, or by creating a more stylized, abstract texture using bold, expressive brushstrokes. You can also add patterns to hair, such as braids, ponytails, or curls, using a range of techniques including drawing, painting, or collage. By adding texture and patterns to clothing and hair, you can create a more detailed, realistic, and engaging drawing that captures the viewer's attention and draws them in. Additionally, you can experiment with different textures and patterns to create a unique and personalized style that reflects your character's personality and traits. For instance, a character with a bold and adventurous personality may have a more rugged and textured clothing, while a character with a more delicate and refined personality may have a softer and more elegant texture. By paying attention to texture and pattern, you can add depth, interest, and emotion to your drawing, and create a more nuanced and believable character.