How To Finger Knit A Blanket
Finger knitting is a fun and easy way to create a cozy blanket without the need for needles or a loom. With just your fingers and some yarn, you can create a beautiful and unique blanket that's perfect for snuggling up on the couch or as a thoughtful gift for a loved one. In this article, we'll take you through the process of finger knitting a blanket, from getting started with the basics to mastering the techniques and creating a stunning finished product. We'll begin by covering the essential steps to get started with finger knitting, including choosing the right yarn and creating a slip knot. From there, we'll dive into the basic finger knitting techniques you'll need to know, such as the knit stitch and the purl stitch. Finally, we'll show you how to use these techniques to create a beautiful finger knitted blanket that's sure to impress. So, let's get started with finger knitting and begin our journey to creating a cozy and comforting blanket.
Getting Started with Finger Knitting
Finger knitting is a fun and easy way to create a blanket without the need for needles or a loom. To get started, it's essential to understand the basics of finger knitting, including the different stitches and techniques involved. Choosing the right yarn for your blanket is also crucial, as it can affect the texture, warmth, and overall appearance of your finished product. Additionally, preparing your workspace for finger knitting can help you stay organized and focused throughout the process. By mastering these fundamental aspects, you'll be well on your way to creating a beautiful and cozy blanket. In this article, we'll delve into the basics of finger knitting, exploring the different stitches and techniques that will help you get started on your project.
Understanding the Basics of Finger Knitting
Finger knitting is a simple and fun technique that allows you to create a variety of projects, from scarves to blankets, using just your fingers and some yarn. To get started, it's essential to understand the basics of finger knitting. The first step is to choose the right yarn, which should be soft, lightweight, and easy to work with. Acrylic or cotton yarns are excellent choices for beginners. Next, you'll need to create a slip knot on your non-dominant hand, which will serve as the foundation for your project. To do this, hold the yarn in your non-dominant hand, make a loop with the yarn, and then pass the end of the yarn through the loop. Pull the yarn gently to tighten the knot. Now, you're ready to start finger knitting. Begin by inserting your dominant hand into the slip knot and pulling up a loop of yarn. You'll then use your fingers to manipulate the yarn, creating rows of interconnected loops. As you work, keep the tension even and not too tight, as this can cause the fabric to pucker. With practice, you'll develop a rhythm and be able to create a beautiful, textured fabric. Understanding the basics of finger knitting is the key to creating a stunning blanket, and with these simple steps, you'll be well on your way to getting started.
Choosing the Right Yarn for Your Blanket
Choosing the right yarn for your blanket is a crucial step in finger knitting. The type of yarn you select will determine the texture, warmth, and overall look of your finished blanket. Consider the season and intended use of the blanket when selecting a yarn. For a warm and cozy winter blanket, choose a thick and plush yarn with good insulation properties, such as wool or fleece. For a lightweight and breathable summer blanket, opt for a cotton or linen yarn. If you're looking for a versatile yarn that can be used for both warm and cool weather, consider a blend of fibers like acrylic and wool. Additionally, think about the color and texture of the yarn. If you want a subtle and classic look, choose a solid-colored yarn with a smooth texture. If you want to add some visual interest to your blanket, opt for a variegated or self-striping yarn with a bit of texture. It's also important to consider the weight of the yarn, as it will affect the drape and density of the finished blanket. A heavier yarn will produce a thicker and more dense blanket, while a lighter yarn will result in a more open and airy texture. Finally, make sure to choose a yarn that is soft and comfortable to work with, as you'll be handling it extensively during the finger knitting process. By selecting the right yarn for your blanket, you'll be able to create a beautiful and functional piece that will provide years of warmth and comfort.
Preparing Your Workspace for Finger Knitting
Preparing your workspace for finger knitting is a crucial step to ensure a comfortable and enjoyable experience. To start, choose a quiet and distraction-free area where you can sit comfortably without interruptions. Consider using a lap tray or a small table to keep your yarn and other supplies within easy reach. A good lighting source is also essential, as it will help you see the stitches and colors more clearly. Natural light is ideal, but if you're knitting in the evening, invest in a good quality lamp that provides soft, warm light. Next, gather all the necessary supplies, including your yarn, scissors, and a measuring tape or ruler. It's also a good idea to have a small basket or container to store your yarn balls and keep them organized. Finally, take a few minutes to tidy up your workspace, removing any clutter or distractions that might interfere with your knitting. By preparing your workspace in this way, you'll be able to focus on your finger knitting and enjoy the process of creating something beautiful and cozy.
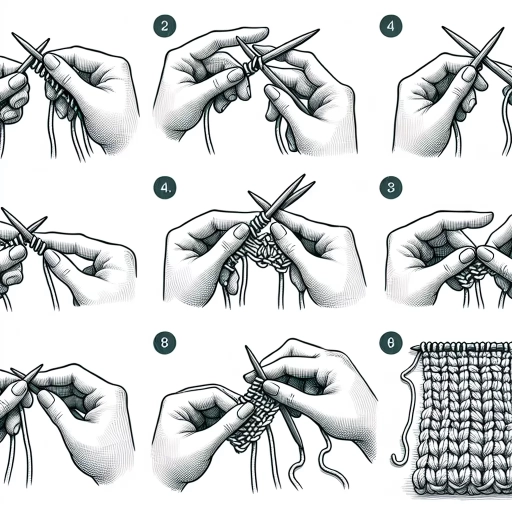
Basic Finger Knitting Techniques
Finger knitting is a fun and easy way to create simple knitted items without the need for needles. To get started, it's essential to learn the basic finger knitting techniques that will serve as the foundation for more complex projects. This includes mastering the art of casting on and off, understanding how to count and keep track of stitches, and learning the basic finger knitting stitch. By grasping these fundamental skills, you'll be able to create a wide range of items, from scarves and hats to blankets and more. In this article, we'll delve into the world of finger knitting and explore the essential techniques you need to know to get started. We'll begin by learning the basic finger knitting stitch, which is the building block of all finger knitting projects.
Learning the Basic Finger Knitting Stitch
Learning the basic finger knitting stitch is a fundamental step in mastering the art of finger knitting. To begin, hold the working yarn in your non-dominant hand, with the end of the yarn closest to your body. Use your dominant hand to create a slip knot on your index finger, leaving a small loop. Next, take the working yarn and wrap it around your middle finger, moving it from the front of your hand to the back. Then, take the yarn and pass it through the loop on your index finger. You will now have one loop on your middle finger and one on your index finger. To complete the stitch, take the yarn and pull it gently to tighten the loop on your middle finger. Repeat this process, moving the yarn from your middle finger to your ring finger, and then to your pinky finger, creating a row of interconnected loops. As you become more comfortable with the basic finger knitting stitch, you can experiment with different yarns, colors, and patterns to create unique and personalized blankets. With practice, you'll be able to create a beautiful and cozy blanket using this simple yet effective technique.
Mastering the Art of Casting On and Off
Mastering the art of casting on and off is a crucial step in finger knitting a blanket. Casting on refers to the process of creating the initial row of stitches on your fingers, while casting off involves securing the final row of stitches to complete your project. To cast on, start by creating a slipknot on your non-dominant hand, then use your dominant hand to pull the yarn to create a loop. Place the loop on your non-dominant hand, and use your dominant hand to pull the yarn to create another loop. Continue this process until you have the desired number of stitches. To cast off, start by knitting the first stitch on your non-dominant hand, then use your dominant hand to pass the second stitch over the first stitch. Continue this process until you have one stitch left, then pull the yarn to secure it. It's essential to keep the tension even while casting on and off to ensure a smooth and professional finish. With practice, you'll be able to master the art of casting on and off, and your finger-knitted blanket will be complete in no time.
Understanding How to Count and Keep Track of Stitches
Understanding how to count and keep track of stitches is a crucial skill for finger knitting a blanket. To start, it's essential to know how to count the number of stitches on your fingers. Begin by holding up your non-dominant hand with your fingers spread apart, and use your dominant hand to count the stitches on each finger. Start with the pinky finger and work your way up to the thumb, counting each stitch as you go. You can use a stitch marker or a small piece of paper to keep track of the number of stitches on each finger. As you add or remove stitches, make sure to update your count accordingly. Another way to keep track of stitches is to use a row counter, which is a small tool that helps you keep track of the number of rows you've completed. You can also use a piece of paper and a pencil to keep track of your stitches and rows. It's also helpful to use a consistent method of counting, such as counting the stitches on each finger from pinky to thumb, to avoid confusion. By keeping track of your stitches, you'll be able to ensure that your blanket is even and symmetrical, and you'll be able to make adjustments as needed. Additionally, counting stitches can help you to identify any mistakes or errors, allowing you to fix them before they become a bigger problem. With practice, counting and keeping track of stitches will become second nature, and you'll be able to focus on the creative process of finger knitting your blanket.
Creating a Beautiful Finger Knitted Blanket
Creating a beautiful finger knitted blanket is a fun and rewarding project that can add a personal touch to any room. To get started, it's essential to have a clear plan in place, which is where designing a pattern for your blanket comes in. A well-designed pattern will help you achieve the desired look and ensure that your blanket is the perfect size. In addition to designing a pattern, adding texture and interest to your blanket can elevate it from a simple blanket to a stunning piece of home decor. This can be achieved through the use of different stitches, colors, and techniques. Finally, once your blanket is complete, it's crucial to finish and block it properly to give it a professional finish. By following these steps, you can create a beautiful finger knitted blanket that will be treasured for years to come. Let's start by exploring the first step: designing a pattern for your finger knitted blanket.
Designing a Pattern for Your Finger Knitted Blanket
Designing a pattern for your finger knitted blanket is an exciting step in the creative process. To start, consider the overall aesthetic you want to achieve, such as a simple and subtle design or a bold and colorful statement piece. Think about the colors you want to use and how they will work together to create a cohesive look. You can choose a single color, a limited palette, or a vibrant mix of hues. Next, decide on the type of pattern you want to create, such as stripes, chevrons, or a geometric design. You can also experiment with different textures by incorporating varying stitch patterns or using different yarn weights. To visualize your design, sketch out a rough outline or use a digital tool to create a mockup. This will help you see how the different elements will work together and make any necessary adjustments before you start knitting. Additionally, consider the size of your blanket and how the pattern will repeat across the fabric. You can use a simple repeat or create a more complex design that evolves as you knit. By taking the time to design a thoughtful and intentional pattern, you'll be able to create a beautiful and unique finger knitted blanket that reflects your personal style.
Adding Texture and Interest to Your Blanket
Adding texture and interest to your finger knitted blanket can elevate it from a simple, cozy throw to a stunning piece of home decor. One way to add texture is by incorporating different stitches, such as the herringbone or chevron pattern, which create a visually appealing and tactile experience. You can also experiment with varying yarn weights and colors to create a unique and eye-catching design. For example, combining a chunky yarn with a finer yarn can create a beautiful contrast in texture and visual interest. Additionally, you can add embellishments such as tassels, fringe, or appliques to give your blanket a personalized touch. Another way to add interest is by creating a gradient effect, where you gradually transition from one color to another, creating a beautiful ombre effect. You can also try adding a subtle pattern, such as a subtle stripe or a gentle wave, to add visual interest without overwhelming the senses. By incorporating these techniques, you can create a finger knitted blanket that is not only cozy and functional but also a beautiful work of art that adds texture and interest to any room.
Finishing and Blocking Your Completed Blanket
Finishing and blocking your completed blanket is a crucial step in the finger knitting process. Once you've completed knitting your blanket, it's essential to weave in any ends and trim them close to the work to prevent them from coming loose over time. Next, block your blanket by wetting it, stretching it out to the desired shape, and pinning it in place. This process helps to even out the stitches, relax the fibers, and give your blanket a professional finish. To block your blanket, start by submerging it in cold water, then gently squeeze out excess water without wringing or twisting the blanket. Lay the blanket flat on a towel, smoothing out any wrinkles or creases, and use pins to hold it in place. Allow the blanket to air dry completely, which may take several days, depending on the thickness of the blanket and the ambient temperature and humidity. Once the blanket is dry, remove the pins and admire your beautifully finished and blocked finger knitted blanket. Regular blocking can also help to maintain the blanket's shape and prevent it from becoming misshapen over time. By following these simple steps, you can ensure that your finger knitted blanket looks its best and remains a cozy and comforting companion for years to come.