How To Tie Karate Belt
Here is the introduction paragraph: Tying a karate belt is an essential skill for any martial artist, but it can be intimidating for beginners. A properly tied belt not only looks neat and tidy, but it also serves as a symbol of respect and discipline. However, with so many different ways to tie a karate belt, it can be difficult to know where to start. In this article, we will break down the process of tying a karate belt into three key components: understanding the basics of karate belt tying, a step-by-step guide to tying a karate belt, and troubleshooting common issues with karate belt tying. By mastering these three areas, you will be able to tie your karate belt with confidence and precision. To begin, let's start with the foundation of karate belt tying: understanding the basics. Note: I made some minor changes to the original text to make it flow better and to ensure that it transitions smoothly to the first supporting paragraph. Let me know if you have any further requests!
Understanding the Basics of Karate Belt Tying
Here is the introduction paragraph: Karate, a martial art that originated in Japan, is not just about physical movements and techniques, but also about discipline, respect, and self-control. One of the most recognizable symbols of karate is the belt, which is worn by practitioners to signify their level of expertise and commitment to the art. However, tying the karate belt is not just a simple task, it requires a certain level of understanding and technique. To master the art of karate belt tying, one must first familiarize themselves with the karate belt, knowing its different types and significance in the martial art. By understanding the basics of the karate belt, one can then move on to learning the proper techniques of tying it, which is essential for any karate practitioner. In this article, we will delve into the basics of karate belt tying, exploring the fundamentals of the karate belt, its different types, and its significance in the martial art, ultimately leading to a deeper understanding of the art of karate belt tying.
1. Familiarizing yourself with the karate belt
. Familiarizing yourself with the karate belt is the first step in mastering the art of tying it. The karate belt, also known as an obi, is a long, narrow piece of fabric that is wrapped around the waist to secure the karate uniform, known as a gi. The belt is typically made of cotton or a cotton-polyester blend and is available in various colors, each representing a different level of proficiency in karate. The most common colors are white, yellow, orange, green, blue, brown, and black, with black being the highest rank. Understanding the significance of each color and the belt's design is essential in tying it correctly. The belt usually has a distinctive pattern of stripes or markings that indicate the wearer's rank and style of karate. By familiarizing yourself with the belt's design and colors, you'll be able to tie it with confidence and precision, which is essential for any karate practitioner. Additionally, knowing the belt's history and cultural significance can deepen your appreciation for the art of karate and enhance your overall training experience. So, take the time to study the karate belt, its colors, and its design, and you'll be well on your way to mastering the art of tying it.
2. Knowing the different types of karate belts
. Knowing the different types of karate belts is essential for any practitioner, as it not only signifies their level of expertise but also serves as a visual representation of their journey. The most common types of karate belts include the white belt, which symbolizes innocence and purity, and is typically worn by beginners. As practitioners progress, they can earn higher-ranking belts, such as the yellow, orange, green, blue, and brown belts, each representing a different level of skill and knowledge. The black belt, which is often considered the pinnacle of achievement, signifies mastery and expertise. However, it's worth noting that some karate styles, such as Shotokan and Kyokushin, have additional belt colors and ranks, such as the red and black belt, which represents a higher level of mastery. Understanding the different types of karate belts not only helps practitioners set goals and track their progress but also fosters a sense of community and respect among fellow karateka. By recognizing and respecting the different belt colors and ranks, practitioners can develop a deeper appreciation for the art and its rich history. Moreover, knowing the different types of karate belts can also help practitioners choose the right belt for their needs, whether it's for training, competition, or ceremonial purposes. Ultimately, understanding the different types of karate belts is an essential part of the karate journey, and can help practitioners navigate the complexities of this ancient and revered martial art.
3. Understanding the significance of the belt in karate
. The belt in karate is more than just a piece of cloth wrapped around the waist; it holds significant meaning and symbolism in the martial art. The belt system, also known as the "dan" system, is a way to measure a practitioner's progress and skill level. The different colors of the belt represent various stages of development, with each color signifying a specific level of proficiency. The most common colors are white, yellow, orange, green, blue, brown, and black, with black being the highest rank. The belt is not just a physical representation of a practitioner's skill level, but also a symbol of their dedication, hard work, and perseverance. In karate, the belt is also seen as a reminder of the practitioner's journey, with each knot and fold representing a specific aspect of their training. For example, the knot in the front of the belt represents the connection between the practitioner's body and mind, while the fold at the back represents the connection between the practitioner and their community. Understanding the significance of the belt in karate is essential for practitioners to appreciate the true value of their training and to approach their practice with the right mindset. By recognizing the belt as a symbol of their progress and dedication, practitioners can cultivate a deeper sense of respect for themselves, their instructors, and the art of karate as a whole. Ultimately, the belt serves as a powerful reminder of the transformative power of karate, and the impact it can have on one's life.
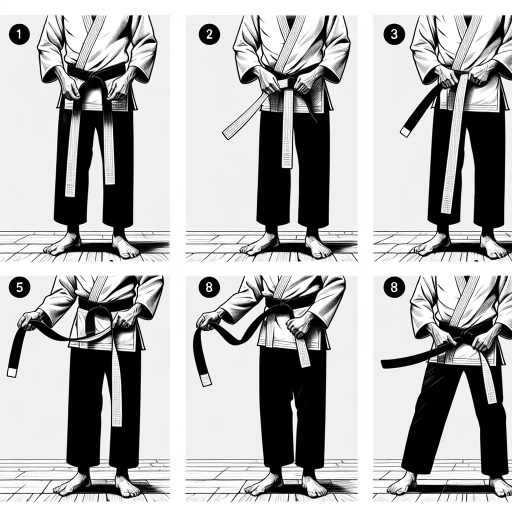
Step-by-Step Guide to Tying a Karate Belt
Here is the introduction paragraph: Tying a karate belt is an essential skill for any martial artist, as it not only represents a symbol of their rank and dedication but also serves as a reminder of the discipline and respect that comes with the practice. Mastering the art of tying a karate belt requires patience, attention to detail, and a clear understanding of the step-by-step process involved. In this article, we will break down the process into three key components: placing the belt around your waist, creating the initial knot, and tightening and adjusting the belt. By following these simple yet crucial steps, you will be well on your way to tying a karate belt like a pro. Understanding the basics of karate belt tying is not only a matter of aesthetics but also a reflection of one's commitment to the martial art. Please let me know if you need any further assistance.
1. Placing the belt around your waist
. To begin tying your karate belt, start by placing the belt around your waist, ensuring it is centered and the ends are even. The belt should be snug but not too tight, allowing for a comfortable range of motion. As you position the belt, take note of the label or the seam, which should be facing upwards. This is a crucial detail, as the label or seam serves as a guide for the subsequent steps in tying the belt. With the belt in place, you can now proceed to the next step, which involves crossing the right end over the left end, forming an "X" shape. This initial step sets the foundation for the rest of the tying process, so it's essential to get it right. By placing the belt correctly around your waist, you'll be able to achieve a secure and balanced knot that will stay in place throughout your karate practice.
2. Creating the initial knot
. Creating the initial knot is a crucial step in tying a karate belt. To start, hold the belt in front of you with the ends facing away from your body. Cross the right end over the left end, forming an "X" shape. Take the right end and pass it under the left end, then bring it up and over the top of the knot. You should now have a loop forming on the right side of the belt. Take the left end and pass it through the loop you just created. Pull the left end gently to tighten the knot. You should start to see the beginnings of the karate belt knot take shape. Make sure the knot is snug but not too tight, as you will need to adjust it later. The initial knot should be centered and even, with the ends of the belt hanging evenly on either side. If the knot is not centered, you can adjust it by gently tugging on the ends of the belt. Once you have the initial knot in place, you can move on to the next step in tying your karate belt.
3. Tightening and adjusting the belt
. Here is the paragraphy: Tightening and adjusting the belt is a crucial step in tying a karate belt. Once you have passed the belt around your waist and through the loop, you need to pull it tight to secure it in place. Start by pulling the belt tight with both hands, making sure it is snug but not too tight. You should be able to fit two fingers under the belt comfortably. Next, adjust the belt so that it is centered and the ends are even. You can do this by tugging gently on both ends of the belt. Make sure the belt is not twisted or bunched up, as this can be uncomfortable and affect your performance during training. Finally, give the belt a final tug to make sure it is secure and in place. You should feel a sense of confidence and readiness to train with your belt properly tied. By following these steps, you can ensure that your belt is tied correctly and you are ready to take on your karate training with confidence and focus.
Troubleshooting Common Issues with Karate Belt Tying
Here is the introduction paragraph: Karate belt tying is an essential skill for any martial artist, but it can be frustrating when things don't go as planned. Whether you're a beginner or a seasoned practitioner, common issues with karate belt tying can be a major distraction from your training. In this article, we'll explore three common problems that can arise when tying your karate belt, and provide you with practical solutions to overcome them. First, we'll tackle the issue of a belt that's too long or too short, and show you how to adjust it to the perfect length. Next, we'll address the problem of a belt that's uneven or twisted, and provide tips on how to fix it. Finally, we'll share some expert advice on how to prevent your belt from coming undone during training, so you can focus on perfecting your techniques. By understanding and resolving these common issues, you'll be able to tie your karate belt with confidence and move on to more advanced techniques, starting with Understanding the Basics of Karate Belt Tying.
1. Dealing with a belt that's too long or too short
. Dealing with a belt that's too long or too short can be frustrating, especially when you're trying to perfect your karate belt tying technique. If your belt is too long, it can be difficult to achieve a neat and secure knot, while a belt that's too short may not be able to wrap around your waist comfortably. To address this issue, you can try a few adjustments. For a belt that's too long, you can try folding the excess length in half and tucking it under the main part of the belt before tying the knot. This will help to shorten the belt and create a more manageable length. Alternatively, you can try using a belt clip or a small piece of tape to secure the excess length and keep it from getting in the way. On the other hand, if your belt is too short, you can try using a belt extender or a longer belt to give yourself more length to work with. You can also try adjusting the position of the belt on your waist, moving it slightly higher or lower to find a more comfortable and secure fit. By making these adjustments, you can ensure that your belt is the right length and that you can tie it securely and confidently. With a little practice and patience, you'll be able to master the art of tying your karate belt, even with a belt that's a little too long or too short.
2. Fixing a belt that's uneven or twisted
. If your karate belt is uneven or twisted, it can be frustrating and affect your overall performance. To fix this issue, start by holding the belt in front of you with the ends hanging evenly. Identify the twisted or uneven section and gently pull on the belt to loosen it. Next, take the end of the belt that is twisted and pass it under the other end, then bring it up and over the top of the belt. This will help to untwist the belt and even it out. If the belt is still uneven, you can try adjusting the length of the belt by pulling on one end or the other. Make sure to keep the belt snug but not too tight, as this can cause discomfort and affect your movement. Once you have adjusted the belt to your liking, tie it securely using the standard karate belt-tying technique. It's also a good idea to check the belt regularly to ensure it remains even and untwisted, as this can affect your overall performance and appearance. By following these simple steps, you can fix an uneven or twisted karate belt and ensure you look and feel your best during training and competition.
3. Preventing the belt from coming undone during training
. To prevent the belt from coming undone during training, it's essential to tie it correctly and securely. One common mistake is tying the belt too loosely, which can cause it to come undone with even the slightest movement. To avoid this, make sure to tie the belt snugly around your waist, with the ends tucked in tightly. You can also try using a belt with a built-in stopper or a small knot at the end to prevent it from coming undone. Additionally, you can use a bit of belt wax or resin to help keep the belt in place. This will provide extra grip and prevent the belt from slipping out of place during training. It's also a good idea to check your belt regularly during training to make sure it's still secure. If you notice it starting to come undone, you can quickly adjust it to prevent it from coming completely undone. By taking these precautions, you can ensure that your belt stays securely in place throughout your training session, allowing you to focus on your techniques without distraction.