How To Descale Keurig 2.0
Here is the introduction paragraph: If you're a Keurig 2.0 owner, you're likely no stranger to the convenience and delicious coffee it provides. However, to keep your machine running smoothly and prevent any potential issues, it's essential to descale it regularly. But before you start the descaling process, it's crucial to understand why it's necessary and how to prepare your machine. In this article, we'll delve into the importance of descaling your Keurig 2.0, guide you through the preparation process, and provide a step-by-step tutorial on how to descale your machine. By the end of this article, you'll be equipped with the knowledge to keep your Keurig 2.0 in top condition. So, let's start by understanding the importance of descaling your Keurig 2.0.
Understanding the Importance of Descaling Your Keurig 2.0
Here is the introduction paragraph: Descaling your Keurig 2.0 is a crucial maintenance task that is often overlooked, but it plays a significant role in ensuring the longevity and performance of your coffee maker. By descaling your Keurig 2.0, you can prevent mineral buildup and scale formation, which can lead to a range of problems, including clogged water lines and poor-tasting coffee. Regular descaling can also ensure optimal performance and taste, as well as extend the life of your Keurig 2.0. In this article, we will explore the importance of descaling your Keurig 2.0, starting with the prevention of mineral buildup and scale formation.
Preventing Mineral Buildup and Scale Formation
Preventing mineral buildup and scale formation is crucial to maintaining the performance and longevity of your Keurig 2.0. Mineral deposits, such as calcium and lime, can accumulate inside the machine over time, leading to clogs, reduced water flow, and even machine failure. To prevent this, it's essential to descale your Keurig 2.0 regularly, ideally every 3-6 months, depending on usage. You can also take preventative measures by using a water filter, which can help reduce mineral content in the water. Additionally, using a mixture of equal parts water and white vinegar as a cleaning solution can help dissolve mineral deposits and prevent scale formation. Regular cleaning and maintenance can also help prevent bacterial growth and mold, which can thrive in the moist environment of the Keurig 2.0. By taking these steps, you can ensure your Keurig 2.0 continues to function optimally and provide you with great-tasting coffee for years to come.
Ensuring Optimal Performance and Taste
Ensuring optimal performance and taste of your Keurig 2.0 requires regular maintenance, and descaling is a crucial part of it. Mineral buildup from water can affect the machine's ability to heat water efficiently, leading to longer brewing times and a less flavorful cup. Moreover, limescale deposits can clog the machine's tubes and pipes, causing it to malfunction or even break down. By descaling your Keurig 2.0 regularly, you can prevent these issues and ensure that your coffee or tea tastes its best. Additionally, descaling can also help to remove any bacteria or mold that may be growing inside the machine, which can affect the taste and quality of your beverages. To ensure optimal performance and taste, it's recommended to descale your Keurig 2.0 every 3-6 months, depending on usage. By doing so, you can enjoy a perfectly brewed cup every time and extend the lifespan of your machine.
Extending the Life of Your Keurig 2.0
To extend the life of your Keurig 2.0, it's essential to perform regular maintenance tasks, including descaling, cleaning, and replacing worn-out parts. Descaling your Keurig 2.0 every 3-6 months is crucial to remove mineral deposits that can clog the machine and affect its performance. Use a Keurig-approved descaling solution and follow the manufacturer's instructions to ensure the process is done correctly. Additionally, run a cleaning cycle with a mixture of equal parts water and white vinegar every 1-2 months to remove any built-up debris and bacteria. Replace the water filter every 6 months or as recommended by the manufacturer to ensure the best-tasting coffee. Regularly wipe down the exterior and interior of the machine with a damp cloth to prevent dust and splatters from building up. Also, check and replace the K-cup holder and funnel every 6-12 months, as they can become worn out and affect the machine's performance. By following these simple maintenance tasks, you can extend the life of your Keurig 2.0, prevent common issues, and enjoy great-tasting coffee for years to come.
Preparing for the Descaling Process
Preparing for the descaling process is a crucial step in maintaining your Keurig 2.0's performance and longevity. To ensure a successful descaling, it's essential to gather the necessary materials and equipment, choose the right descaling solution, and understand the descaling cycle and process. By doing so, you'll be able to remove mineral deposits and prevent future buildup, ultimately extending the life of your machine. In this article, we'll delve into the specifics of each step, starting with the importance of gathering the necessary materials and equipment. This will ensure you have everything you need to complete the descaling process efficiently and effectively. By having the right tools and supplies on hand, you'll be able to tackle the descaling process with confidence, setting yourself up for success in the subsequent steps of choosing the right descaling solution and understanding the descaling cycle and process. With the right preparation, you'll be well on your way to a successful descaling and a well-maintained Keurig 2.0. So, let's begin by gathering the necessary materials and equipment.
Gathering the Necessary Materials and Equipment
When preparing for the descaling process, it's essential to gather the necessary materials and equipment to ensure a smooth and effective process. To start, you'll need a Keurig-approved descaling solution, which can be purchased from the Keurig website or other authorized retailers. This solution is specifically designed to remove mineral deposits and scale buildup from your Keurig 2.0 machine. You'll also need a large cup or container to catch the water and solution as it flows through the machine during the descaling process. Additionally, a paper clip or other small tool may come in handy to help remove any stubborn mineral deposits from the machine's tubes and pipes. It's also a good idea to have a clean, dry cloth on hand to wipe down the machine and remove any excess solution or water. Finally, make sure you have access to fresh, cold water to rinse the machine thoroughly after the descaling process is complete. By gathering these materials and equipment, you'll be well-prepared to tackle the descaling process and get your Keurig 2.0 machine running like new again.
Choosing the Right Descaling Solution for Your Keurig 2.0
When it comes to choosing the right descaling solution for your Keurig 2.0, there are several options available in the market. Keurig's official descaling solution is a popular choice among users, as it is specifically designed for Keurig machines and is easy to use. However, it can be a bit pricey. Another option is citric acid, a natural and non-toxic descaling solution that is also environmentally friendly. Citric acid is a cost-effective option and can be found in most grocery stores. Vinegar is also a popular choice, as it is a natural and non-toxic descaling solution that is also inexpensive. However, it may not be as effective as other options and can leave a strong smell. It's also important to note that some descaling solutions may not be compatible with your Keurig 2.0, so be sure to check the manufacturer's instructions before making a purchase. Additionally, some descaling solutions may require multiple uses to fully descale your machine, so be sure to follow the instructions carefully. Ultimately, the best descaling solution for your Keurig 2.0 will depend on your personal preferences and needs. Be sure to do your research and choose a solution that is safe, effective, and easy to use.
Understanding the Descaling Cycle and Process
The descaling cycle and process is a crucial step in maintaining your Keurig 2.0's performance and longevity. Descaling involves removing mineral deposits, also known as limescale or scale buildup, that can accumulate inside the machine over time. These deposits can cause problems such as clogged water flow, reduced water pressure, and even affect the taste of your coffee. The descaling process typically involves running a descaling solution through the machine, which helps to break down and remove the mineral deposits. The solution is usually a mixture of water and a descaling agent, such as citric acid or vinegar, which is designed to target and dissolve the mineral deposits. During the descaling cycle, the machine will run the solution through its internal components, including the water reservoir, tubes, and heating element, to remove any built-up scale. The process can take anywhere from 30 minutes to several hours, depending on the severity of the scale buildup and the type of descaling solution used. It's essential to follow the manufacturer's instructions for the descaling process, as using the wrong solution or not following the correct procedure can damage the machine. Regular descaling, usually every 3-6 months, can help prevent scale buildup and keep your Keurig 2.0 running smoothly and efficiently.
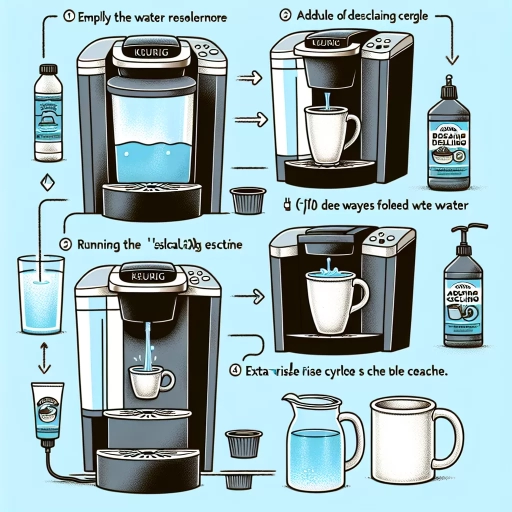
Step-by-Step Guide to Descaling Your Keurig 2.0
Descaling your Keurig 2.0 is a crucial maintenance task that ensures the longevity and optimal performance of your coffee maker. Over time, mineral deposits can build up inside the machine, leading to reduced water flow, poor taste, and even complete system failure. To prevent these issues, it's essential to descale your Keurig 2.0 regularly. In this article, we'll provide a step-by-step guide on how to descale your Keurig 2.0, covering the entire process from initiating the descaling cycle to reactivating and testing your machine. We'll start by walking you through the process of initiating the descaling cycle and running the solution, which is the first crucial step in removing mineral deposits from your Keurig 2.0. By following these steps, you'll be able to keep your coffee maker in top condition and enjoy great-tasting coffee for years to come. So, let's get started with initiating the descaling cycle and running the solution.
Initiating the Descaling Cycle and Running the Solution
Initiating the Descaling Cycle and Running the Solution: To begin the descaling process, start by ensuring your Keurig 2.0 is turned off and unplugged. Next, pour the descaling solution into the water reservoir, making sure to follow the instructions provided with the solution for the correct dosage. Replace the water reservoir and plug in your Keurig. Turn it on and select the "Hot Water" option, then choose the largest cup size. Place a cup under the spout to catch the solution as it dispenses. Run the descaling solution through the machine, repeating the process until the reservoir is empty. This may take several cycles, depending on the size of your reservoir. As you run the solution, you may notice the machine making unusual noises or producing a strong smell, but this is normal. Once the reservoir is empty, discard the solution and rinse the cup thoroughly. Your Keurig 2.0 is now ready for the next step in the descaling process.
Rinsing and Cleaning the Keurig 2.0 After Descaling
After descaling your Keurig 2.0, it's essential to rinse and clean the machine thoroughly to remove any remaining descaling solution and mineral deposits. Start by rinsing the water reservoir with fresh water to remove any residual descaling solution. Then, run 2-3 cycles of just water through the machine to flush out the system. Next, mix equal parts water and white vinegar in the reservoir and run 2-3 more cycles to help remove any remaining mineral deposits and descaling solution. Finally, run a few more cycles of just water to rinse the machine and remove any vinegar taste. It's also a good idea to wipe down the exterior of the machine with a damp cloth to remove any splatters or spills. Additionally, you can use a soft brush to clean the K-cup holder and funnel to remove any built-up debris. By following these steps, you'll be able to ensure your Keurig 2.0 is clean and free of any descaling solution residue, and it will be ready to use again.
Reactivating and Testing Your Keurig 2.0
If your Keurig 2.0 has been descaled, but you're still experiencing issues, it's time to reactivate and test it. Start by plugging in your Keurig and turning it on. Allow it to heat up for a few minutes, then run a hot water cycle through the machine to ensure it's functioning properly. Next, insert a K-cup and brew a cup of coffee or tea to test the machine's performance. If the brew is weak or the machine is not dispensing the correct amount of water, you may need to adjust the settings or consult the user manual for troubleshooting tips. Additionally, check the water reservoir and ensure it's filled to the recommended level, as low water levels can affect the machine's performance. If you're still experiencing issues, try resetting the machine by unplugging it, waiting for 30 seconds, and plugging it back in. This can often resolve any software glitches or errors. By reactivating and testing your Keurig 2.0, you can ensure it's working efficiently and effectively, providing you with a perfect cup of coffee or tea every time.