How To Remove Tub Drain Plug
Removing a tub drain plug can be a daunting task, especially if you're not familiar with the process. However, with the right tools and a bit of knowledge, it can be done efficiently and effectively. In this article, we'll guide you through the steps to remove a tub drain plug, from preparation to troubleshooting and maintenance. To start, it's essential to understand that preparation is key to a successful removal process. Before you begin, you'll need to gather the necessary tools and materials, and take a few precautions to avoid any potential issues. In the following sections, we'll dive deeper into the preparation process, followed by a step-by-step guide on removing the tub drain plug, and finally, we'll discuss some common troubleshooting and maintenance tips to keep your tub drain running smoothly. So, let's get started with the first crucial step: Preparation is Key.
Preparation is Key
When it comes to tackling a home improvement project, preparation is key to ensuring a successful outcome. One of the most critical aspects of preparation is having the right mindset and approach. This involves understanding the scope of the project, identifying potential challenges, and developing a plan to overcome them. In this article, we will explore three essential steps to help you prepare for your next home improvement project. First, we will discuss the importance of turning off the water supply to prevent any unexpected leaks or floods. We will also cover the need to gather the necessary tools and materials to ensure that you have everything you need to complete the project. Finally, we will examine the importance of protecting the surrounding area to prevent damage and ensure a safe working environment. By following these steps, you can set yourself up for success and avoid costly mistakes. So, let's start by turning off the water supply.
Turn Off the Water Supply
To remove a tub drain plug, it's essential to turn off the water supply to the tub. This is a crucial step that should not be overlooked, as it will prevent any accidental water flow or flooding during the removal process. Locate the shut-off valves for the hot and cold water lines that supply the tub, usually found near the water supply lines or at the water shut-off valves for the entire house. Turn both valves clockwise to shut off the water supply. Open the faucet to drain the water from the pipes, and then close the faucet. This simple yet vital step will ensure a safe and mess-free removal of the tub drain plug.
Gather the Necessary Tools
To remove a tub drain plug, you'll need to gather the necessary tools to make the process smooth and efficient. Start by collecting a drain wrench, also known as a drain key, which is specifically designed to fit into the drain's cross-shaped slots. You may also need a basin wrench, which is a long, curved tool that allows you to reach into tight spaces. Additionally, a pair of needle-nose pliers can come in handy for gripping small parts or removing any debris that may be obstructing the drain. A screwdriver, either flathead or Phillips, may be required to remove any screws that hold the drain assembly in place. It's also a good idea to have a bucket or container on hand to catch any water that may spill out when you remove the plug. Finally, consider wearing a pair of gloves to protect your hands from any sharp edges or rough surfaces. By having all the necessary tools within reach, you'll be able to tackle the job with confidence and avoid any unnecessary delays or complications.
Protect the Surrounding Area
When removing a tub drain plug, it's essential to protect the surrounding area to prevent damage and make the process easier to clean up. Start by laying down a drop cloth or old towels around the drain to catch any water or debris that may spill out during the removal process. This will also protect the tub's surface from any scratches or stains. Additionally, consider using a drain removal tool with a built-in splash guard to contain any mess. If you're using a chemical drain remover, be sure to wear protective gloves and eyewear to prevent skin and eye irritation. It's also a good idea to remove any nearby items, such as soap dishes or towels, to prevent them from getting in the way or getting damaged. By taking these precautions, you can ensure a safe and mess-free removal process.
Removing the Tub Drain Plug
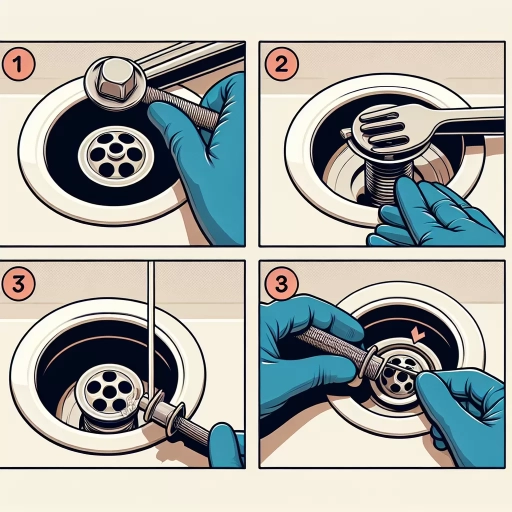
Removing a tub drain plug can be a daunting task, especially if it's been stuck in place for a long time. However, with the right tools and techniques, it can be done easily and efficiently. To start, it's essential to understand the different methods that can be used to remove a tub drain plug. Three effective methods include using a drain key or T-handle tool, applying penetrating oil to loosen the plug, and using a basin wrench for hard-to-reach plugs. By understanding these methods, you can choose the best approach for your specific situation. In this article, we will explore each of these methods in more detail, starting with the use of a drain key or T-handle tool, which is often the most straightforward and effective approach.
Use a Drain Key or T-Handle Tool
When dealing with a stubborn tub drain plug, a drain key or T-handle tool can be a lifesaver. These tools are specifically designed to provide extra leverage and grip, making it easier to remove the plug. A drain key is a long, flexible rod with a hook or claw on the end, which is inserted into the drain and hooked onto the plug. The T-handle tool, on the other hand, is a long handle with a T-shaped end that fits into the drain and provides a secure grip on the plug. Both tools work by allowing you to apply more force and control to the plug, making it easier to break free from any corrosion or mineral buildup that may be holding it in place. To use a drain key or T-handle tool, simply insert the tool into the drain and hook or grip the plug, then twist and pull the tool to loosen and remove the plug. It's often helpful to apply some penetrating oil or lubricant to the plug and surrounding area before attempting to remove it, as this can help loosen any corrosion and make the process easier. With a drain key or T-handle tool, you should be able to remove even the most stubborn tub drain plug with ease.
Apply Penetrating Oil to Loosen the Plug
Applying penetrating oil to loosen the plug is a crucial step in removing a stubborn tub drain plug. Before attempting to remove the plug, spray a generous amount of penetrating oil, such as WD-40 or Liquid Wrench, directly onto the plug and surrounding area. Allow the oil to sit for several hours or overnight, giving it ample time to seep into the threads and loosen any corrosion or mineral buildup. This will help break the bond between the plug and the drain, making it easier to remove. It's essential to be patient and let the oil do its job, as rushing the process can lead to further damage or stripping of the threads. Once the oil has had time to penetrate, use a wrench or pliers to gently attempt to loosen the plug. If it still doesn't budge, repeat the process and let the oil sit for a longer period before trying again. By applying penetrating oil, you'll increase the chances of successfully removing the plug without causing damage to the surrounding area.
Use a Basin Wrench for Hard-to-Reach Plugs
When dealing with hard-to-reach plugs, a basin wrench is an indispensable tool. This long-handled, adjustable wrench is specifically designed to reach into tight spaces, making it perfect for removing tub drain plugs that are located in confined areas. The basin wrench's unique design allows it to pivot and adjust to fit into small spaces, giving you the leverage you need to loosen even the most stubborn plugs. To use a basin wrench, simply adjust the jaws to fit the plug, then insert the wrench into the space and turn it clockwise to loosen the plug. The basin wrench's long handle provides extra torque, making it easier to break loose stuck plugs. Additionally, the basin wrench is often used in conjunction with a channel-type pliers or a drain key to provide extra grip and leverage. By using a basin wrench, you can avoid damaging the surrounding area or stripping the plug, making it a must-have tool for any DIY plumber or homeowner.
Troubleshooting and Maintenance
Effective troubleshooting and maintenance are crucial for ensuring the optimal performance of your plumbing system. A well-maintained drain can help prevent clogs, backups, and other issues that can cause significant damage to your property. To keep your drains running smoothly, it's essential to identify and address potential problems before they become major issues. One of the most common causes of clogged drains is mineral buildup or debris accumulation. This can be caused by hard water, soap scum, and other substances that can leave behind residue. To prevent this, it's recommended to regularly check for mineral buildup or debris in your drains. By doing so, you can take proactive steps to clear any blockages and maintain the health of your plumbing system. In this article, we will explore three key strategies for troubleshooting and maintaining your drains, starting with checking for mineral buildup or debris.
Check for Mineral Buildup or Debris
Mineral buildup or debris in the drain can prevent the plug from being removed. To check for mineral buildup or debris, start by visually inspecting the drain and plug area. Look for any visible signs of mineral deposits, such as white or off-white stains, or debris like hair or soap scum. If you notice any buildup, try to remove it using a soft brush or a cloth. If the buildup is severe, you may need to use a drain cleaning product or a mixture of baking soda and vinegar to help break it down. Once you've removed any visible buildup, try to remove the plug again. If it still doesn't budge, you may need to use a more heavy-duty cleaning method or seek the help of a professional plumber. Additionally, to prevent mineral buildup in the future, consider using a water filter or a drain maintenance product on a regular basis. Regular cleaning and maintenance can help prevent mineral buildup and keep your drain flowing freely.
Use a Drain Snake to Clear Clogs
When dealing with clogged drains, a drain snake, also known as an auger, is a valuable tool to have in your arsenal. This long, flexible rod is designed to navigate through the twists and turns of your drain pipes, breaking up and removing any blockages that may be causing water to back up. To use a drain snake, start by removing any visible debris from the drain, such as hair or soap scum. Next, feed the snake into the drain, rotating it as you push it further into the pipe. This will help the snake to navigate through any tight spaces and reach the clog. Once you feel resistance, which indicates that the snake has reached the blockage, hold the snake in place and twist it back and forth to break up the clog. Finally, remove the snake and test the drain to ensure that the water is flowing freely. If the clog persists, you may need to use a more heavy-duty snake or call a professional plumber for assistance. Regular use of a drain snake can help to prevent clogs from forming in the first place, making it an essential tool for maintaining your tub's drain and keeping it flowing smoothly.
Regularly Clean and Maintain the Drain
Regularly cleaning and maintaining the drain is essential to prevent clogs and ensure smooth water flow. Start by removing any visible debris, such as hair and soap scum, from the drain cover or grate. Use a soft brush or cloth to wipe away any remaining residue. Next, pour 1-2 cups of baking soda down the drain, followed by 1-2 cups of hot water. Let the mixture sit for 30 minutes to an hour, allowing the baking soda to break down any tough blockages. After the sitting time has passed, pour 1-2 cups of white vinegar down the drain, and let it sit for another 30 minutes. The acid in the vinegar will help break down any remaining mineral deposits and debris. Finally, pour hot water down the drain to rinse away any remaining residue. For tougher clogs, consider using a drain snake or plumber's auger to remove any blockages. Regular maintenance, such as cleaning the drain every 1-2 months, can help prevent clogs and keep your drain flowing smoothly. Additionally, consider using a drain screen or filter to catch hair and other debris before they go down the drain, making cleaning and maintenance even easier. By following these simple steps, you can keep your drain clean and functioning properly, and avoid the hassle and expense of calling a plumber to fix a clogged drain.