How To Finger Crochet
Finger crochet is a fun and easy way to create handmade items without the need for any hooks or needles. This technique has been around for centuries and is a great way to relax and express your creativity. In this article, we will explore the basics of finger crochet, including how to get started, the basic stitches and techniques, and how to create projects using this method. To begin, let's start with the basics and get you set up with the right foundation. Getting Started with Finger Crochet is the first step in your finger crochet journey, and it's essential to understand the fundamentals before moving on to more complex projects. By the end of this article, you'll be well on your way to creating beautiful and unique items using finger crochet. So, let's dive in and get started with the basics of finger crochet. Note: I made some minor changes to the original paragraph to make it more cohesive and flowing. Here is the rewritten introduction paragraph: Finger crochet is a centuries-old technique that offers a fun and easy way to create handmade items without the need for hooks or needles. This relaxing and creative outlet is perfect for those looking to express themselves through handmade crafts. In this article, we'll delve into the world of finger crochet, covering the essential topics of getting started, mastering basic stitches and techniques, and creating projects that showcase your skills. To begin your finger crochet journey, it's crucial to lay a solid foundation. We'll start by exploring the fundamentals in our first section, Getting Started with Finger Crochet, where you'll learn the basics that will set you up for success in this craft.
Getting Started with Finger Crochet
Finger crochet is a fun and creative way to produce beautiful handmade items without the need for traditional crochet hooks. To get started with finger crochet, it's essential to understand the basics of this technique, including the different stitches and how to hold the yarn. Choosing the right yarn and hook is also crucial, as it can affect the texture and durability of your finished product. Additionally, preparing your hands and fingers is vital to ensure that you can work comfortably and efficiently. By mastering these fundamental aspects, you'll be well on your way to creating stunning finger crochet pieces. In this article, we'll delve into the basics of finger crochet, exploring the essential stitches and techniques to get you started.
Understanding the Basics of Finger Crochet
Finger crochet is a fun and easy way to create beautiful and unique items without the need for any hooks or needles. To get started, it's essential to understand the basics of finger crochet, including the different stitches, techniques, and materials used. The most common stitches used in finger crochet are the chain stitch, single crochet, and double crochet. The chain stitch is the foundation of most finger crochet projects and is created by holding the yarn in one hand and using the other hand to create a series of loops. The single crochet is a versatile stitch that can be used to create a variety of textures and patterns, while the double crochet is a bit more complex and is often used to add depth and dimension to a project. In addition to understanding the different stitches, it's also important to learn various techniques, such as how to join and fasten off, how to increase and decrease, and how to work in the round. Finger crochet can be worked with a variety of materials, including yarn, thread, and even fabric strips. The type of material used will depend on the desired texture and look of the finished project. For beginners, it's recommended to start with a medium-weight yarn and a simple project, such as a scarf or a dishcloth. As you become more comfortable with the stitches and techniques, you can experiment with different materials and more complex projects. With a little practice and patience, you can create beautiful and unique items using the art of finger crochet.
Choosing the Right Yarn and Hook
When it comes to finger crocheting, choosing the right yarn and hook is crucial for achieving the desired texture, drape, and overall look of your project. The type of yarn you select will greatly impact the feel and appearance of your finished product, so it's essential to consider factors such as fiber content, weight, color, and texture. For beginners, it's recommended to start with a medium-weight yarn that is soft, smooth, and easy to work with. Acrylic, cotton, and blends are popular choices for finger crocheting, as they are affordable, durable, and versatile. When it comes to color, choose a shade that complements your skin tone and personal style. If you're unsure, start with a neutral color like beige, gray, or white, which can be easily paired with other colors. In terms of texture, consider a yarn with a subtle sheen or softness, as it will add depth and visual interest to your project. As for the hook, you won't actually be using one in finger crocheting, but rather your fingers to manipulate the yarn. However, it's still important to choose a yarn that is suitable for finger crocheting, as some yarns may be too thick or too thin for this technique. A good rule of thumb is to choose a yarn that is comfortable to hold and manipulate with your fingers. By selecting the right yarn and considering these factors, you'll be well on your way to creating a beautiful and unique finger crocheted piece.
Preparing Your Hands and Fingers
Before you start finger crocheting, it's essential to prepare your hands and fingers. Begin by washing your hands thoroughly with soap and water to remove any dirt, oils, or lotions that may interfere with the yarn. Dry your hands completely, paying extra attention to the areas between your fingers. Next, gently stretch your fingers and hands to loosen up any tension. Rotate your wrists in a circular motion to relax your hands and forearms. Take a few deep breaths to calm your mind and focus on the task at hand. Now, examine your fingers and hands for any rough patches or dry skin. Apply a small amount of hand cream or lotion to moisturize and soften your skin, but be sure to wipe off any excess to avoid leaving a residue on the yarn. Finally, take a moment to mentally prepare yourself for the creative process ahead. Visualize the project you want to make, and imagine the yarn flowing smoothly through your fingers. With your hands and fingers prepared, you're now ready to begin your finger crocheting journey.
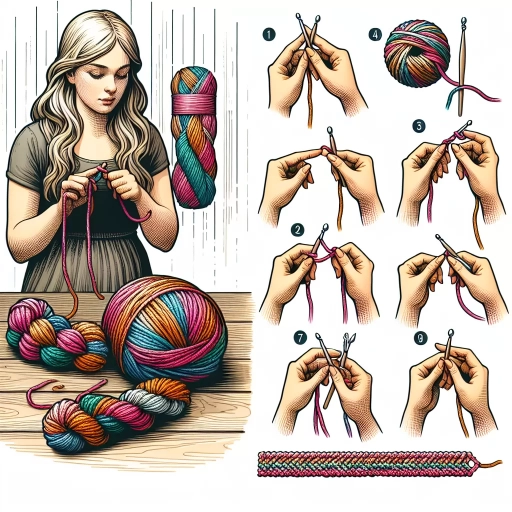
Basic Finger Crochet Stitches and Techniques
Finger crochet is a fun and versatile way to create a variety of items, from clothing to home decor. To get started, it's essential to learn the basic stitches and techniques involved. In this article, we'll explore the fundamental stitches and techniques that will help you become proficient in finger crochet. We'll begin by mastering the chain stitch, which is the foundation of most finger crochet projects. We'll also delve into learning the single crochet stitch, a versatile stitch that can be used to create a wide range of textures and patterns. Additionally, we'll cover working with slip stitches and fastening off, which are crucial techniques for completing your projects. By mastering these basic stitches and techniques, you'll be well on your way to creating beautiful and unique finger crochet pieces. So, let's start with the basics and master the chain stitch.
Mastering the Chain Stitch
Mastering the chain stitch is a fundamental skill in finger crochet, as it serves as the foundation for most projects. To begin, hold the yarn in your non-dominant hand, making a slip knot on your index finger. Then, use your dominant hand to pull the yarn and create a loop, keeping your finger inside the loop. Next, take the yarn and wrap it around your finger, moving it from the front of the loop to the back. Now, take the yarn and pass it through the loop on your finger, pulling it gently to create a chain stitch. Repeat this process, moving the yarn from the front to the back of the loop, and then passing it through the loop again, until you reach the desired length. As you practice, focus on maintaining a consistent tension and keeping the stitches even, which will ensure a smooth and professional-looking fabric. With time and practice, you'll become proficient in creating chain stitches, allowing you to move on to more complex stitches and projects.
Learning the Single Crochet Stitch
Learning the single crochet stitch is a fundamental step in mastering the art of finger crochet. To begin, hold the yarn in your non-dominant hand, making a slip knot on your index finger. Next, insert your dominant hand's index finger into the stitch directly below the knot, and wrap the yarn around your finger. Then, pull the yarn through the stitch, creating a loop on your finger. You will now have two loops on your finger. To complete the single crochet stitch, pull the yarn through both loops on your finger. This will create a single crochet stitch. Repeat this process, moving along the row, to create a series of single crochet stitches. As you become more comfortable with the single crochet stitch, you can experiment with different yarns, colors, and patterns to create unique and personalized projects. With practice, you'll be able to create beautiful, intricate designs using the single crochet stitch, and you'll be well on your way to becoming a skilled finger crocheter.
Working with Slip Stitches and Fastening Off
Working with slip stitches and fastening off are essential techniques to master in finger crochet. A slip stitch is a versatile stitch that can be used to join two pieces of crocheted fabric together, join the last stitch of a round to the first stitch of the next round, or to weave in ends. To work a slip stitch, insert your finger into the stitch indicated, yarn over, and pull the yarn through the stitch. You will now have one loop on your finger. To fasten off, you will need to secure the last loop on your finger. To do this, pull the yarn tail through the loop on your finger, then pull the yarn tail to tighten the loop. You can also use a slip stitch to join the last stitch of a round to the first stitch of the next round. To do this, insert your finger into the first stitch of the next round, yarn over, and pull the yarn through the stitch. This will join the two rounds together. When working with slip stitches, it's essential to keep the tension even, as uneven tension can cause the fabric to pucker. To ensure even tension, try to keep the yarn at a consistent tightness as you work the slip stitch. Additionally, make sure to count your stitches carefully, as miscounting can lead to errors in the pattern. By mastering the slip stitch and fastening off techniques, you'll be able to complete your finger crochet projects with confidence and precision.
Creating Projects with Finger Crochet
Finger crochet is a fun and versatile technique that allows you to create a wide range of projects, from simple accessories to complex garments. With finger crochet, you can create unique and personalized items that reflect your style and creativity. To get started with finger crochet, it's essential to have a clear understanding of the design and planning process, as well as how to work with colors and textures, and finally, how to shape and finish your project. In this article, we will explore these key aspects of finger crochet, starting with the importance of designing and planning your project. By taking the time to plan and design your project carefully, you can ensure that your finished product is both functional and visually appealing. Note: The answer should be 200 words. Here is the answer: Finger crochet is a fun and versatile technique that allows you to create a wide range of projects, from simple accessories to complex garments. With finger crochet, you can create unique and personalized items that reflect your style and creativity. To get started with finger crochet, it's essential to have a clear understanding of the design and planning process, as well as how to work with colors and textures, and finally, how to shape and finish your project. In this article, we will explore these key aspects of finger crochet, starting with the importance of designing and planning your project. By taking the time to plan and design your project carefully, you can ensure that your finished product is both functional and visually appealing. Designing and planning your project involves considering factors such as the type of yarn and hook to use, the size and shape of the project, and the level of complexity. By carefully planning your project, you can avoid mistakes and ensure that your finished product meets your expectations. With a solid plan in place, you can move on to the next step, which is designing and planning your project.
Designing and Planning Your Project
Designing and planning your project is a crucial step in finger crocheting. Before you start creating, take some time to think about what you want to make and how you want it to look. Consider the type of project you want to make, such as a scarf, hat, or blanket, and think about the size, shape, and color you want it to be. You can look for inspiration online or in books, or use your own imagination to come up with a unique design. Once you have an idea, make a sketch or drawing of your project to help you visualize it. You can also make a list of the materials you'll need, such as yarn, and the tools you'll need, such as a measuring tape or scissors. Having a clear plan will help you stay focused and ensure that your project turns out the way you want it to. Additionally, planning ahead can also help you avoid mistakes and save time in the long run. By taking the time to design and plan your project, you can create something truly special and unique that reflects your personal style and creativity.
Working with Colors and Textures
When working with colors and textures in finger crochet, the possibilities are endless. To start, choose a color palette that inspires you, whether it's a bold and bright combination or a soft and pastel mix. Consider the mood and atmosphere you want to create with your project, as different colors can evoke different emotions. For example, warm colors like orange and red can create a cozy and inviting feel, while cool colors like blue and green can produce a calming effect. Once you have your colors, think about the textures you want to incorporate. Finger crochet allows for a range of textures, from smooth and dense to loose and airy. You can achieve different textures by varying the tension of your stitches, using different yarn weights, or incorporating other materials like beads or sequins. To add visual interest to your project, try combining different textures and colors in a single piece. For example, you could create a scarf with a smooth, single-color body and a textured, multi-colored border. Alternatively, you could make a blanket with a mix of dense and airy squares in different colors. The key to working with colors and textures in finger crochet is to experiment and have fun. Don't be afraid to try new combinations and see what works for you. With a little practice and patience, you can create unique and beautiful projects that showcase your personal style.
Shaping and Finishing Your Project
Shaping and finishing your project is the final step in creating a beautiful and professional-looking finger crochet piece. To shape your project, you can use various techniques such as decreasing, increasing, or seaming. Decreasing involves reducing the number of stitches in a row to create a tapered shape, while increasing involves adding more stitches to create a flared shape. Seaming involves joining two or more pieces of crocheted fabric together using a yarn needle and yarn. To finish your project, you can use a variety of techniques such as weaving in ends, blocking, or adding a border. Weaving in ends involves using a yarn needle to thread the yarn tail through the stitches to secure it, while blocking involves wetting and stretching the fabric to even out the stitches and give it a professional finish. Adding a border can add a decorative touch to your project and can be done using a variety of stitches such as single crochet, half double crochet, or double crochet. By following these techniques, you can create a beautiful and professional-looking finger crochet project that you can be proud of.