How To Tape A Thumb
 Taping a thumb correctly can make a world of difference between a quick recovery and an extended, painful condition that never seems to heal. But how does one ensure that they are using the right technique? This imperative question is what we'll attempt to answer in this comprehensive guide. This article unfolds in three crucial parts. First, we'll dive deep into understanding thumb injuries and how proper taping plays a pivotal role in the healing process -a bit of knowledge that’s surprisingly overlooked. Next, we'll provide a detailed outline on how to prepare your thumb for taping and pick the right tape, key factors that significantly affect how well your thumb heals. Lastly, but most crucially, we will guide you through a step-by-step process of taping your thumb in multiple effective ways, so you can choose what suits you best and tackle your thumb injury head-on. So, let’s delve into the first part - understanding your thumb injuries and the importance of taping.
Understanding Thumb Injuries and the Importance of Taping
Understanding thumb injuries and appreciating the significance of taping requires an insightful dig into the world of hand anatomy, treatment techniques, and preventive measures. Customarily overlooked, our thumb plays an integral role in our daily activities, making it susceptible to different types of injuries. This article will guide you through the complex structure of our thumb, emphasizing its common injuries. It will also shed light on the objectives and benefits of thumb taping, a common yet effective method of managing thumb injuries. We will further delve into the diverse types of thumb tapes available in the market, scrutinizing their unique features and functionality. This knowledge will not only heighten your awareness of thumb injuries but also equip you with necessary preventive measures and recovery steps. The article begins by examining an integral facet of this subject - The Anatomy and Common Injuries of the Thumb. The understanding of which is not only fascinating but requisite to comprehend thumb injuries and the importance of taping fully.
The Anatomy and Common Injuries of the Thumb
Organizing the complex network of bones, ligaments, tendons, and muscles inside our thumb, the thumb is both a marvel of biological engineering and vulnerable to a variety of injuries. At the heart of its structure are three phalanges or bones: the distal phalanx (tip of the thumb), the proximal phalanx (middle section), and the First Metacarpal bone that connects to our wrist. A pair of joints, the Interphalangeal (between the two phalanges) and the Metacarpophalangeal (where the thumb joins the hand), enable its wide range of motion. Covering this bone framework are ligaments and tendons that provide control and stability. Among the most significant are the two collateral ligaments at the thumb base that limit its sideways motion, preventing dislocation. Here also, you can find the key flexor and extensor tendons that allow us to bend and straighten the thumb, an essential contributor to our grip. Considering its high use and complexity, the thumb is susceptible to various injuries. The most common among them is the sprain, especially the "Skier's Thumb" or "Gamekeeper's Thumb" - caused when the thumb is stretched backward or sideways. This injury often damages the Ulnar Collateral Ligament within the Metacarpophalangeal joint, causing pain and difficulty in thumb movement. Other common thumb injuries include fractures or broken bones, generally resulting from direct impact, and tendonitis, a painful inflammation, and swelling of tendons often due to overuse or repetitive motion. The severe form of it, called De Quervain's Tenosynovitis, involves the two tendons running along the thumb side of the wrist, creating a painful "catch" or "snap" when the thumb is moved. Understanding these intricacies of thumb anatomy and injuries is of utmost importance for effective taping. The taping techniques aim to provide stability, limit harmful movements, and allow for the rest and recovery of injured structures, inherently respecting the thumb's anatomical engineering. Be it preventing sprain's lateral movement, supporting the inflamed tendons in tendonitis, or immobilizing a broken bone, the appropriate taping method can significantly aid in the healing process and minimize the risk of further injury.
Objectives and Benefits of Taping Your Thumb
The objectives and benefits of taping your thumb are numerous and can drastically improve the recovery process of thumb injuries. The overarching goal is to provide structure and support to the injured digit, mitigating further damage and expediting the healing process. This practice aids in reducing any possible inflammation by limiting the range of motion, thus minimizing the likeliness of re-injuring the affected area. Thumb injuries, whether they are sprains, strains, or fractures, can inhibit one's ability to perform everyday tasks, each presenting a different level of discomfort and requiring a varying degree of support provided by thumb taping. In the case of fractures, for instance, taping is widely used to immobilize the thumb, allowing the bone time to heal and regenerate without the stress of movement. On the other hand, for sprains and strains, the primary objective is to provide stability while still allowing some degree of flexibility. One significant benefit of thumb taping is the improved blood circulation it facilitates in the affected area. By applying gentle pressure, blood flow is enhanced, expediting the delivery of essential nutrients to the site of injury. This augmented circulation accelerates the healing process and aids in the quick removal of waste products, accumulated as the body's response to the injury. Moreover, thumb taping offers a mechanism of pain relief. By restricting excessive motion of the injured thumb, the associated pain stemming from movements that may exacerbate the injury is minimized. Taping consequently decreases the possibility of triggering further discomfort, enabling individuals to engage in their daily activities with less hindrance. The psychological benefits of thumb taping should also not be overlooked. Having a visibly tapped thumb can serve as a reminder to oneself and others to be mindful of the injured area. This subconscious reinforcement discourages overuse of the injured thumb, promoting healing. In summary, while thumb taping might seem like a simple and unimportant step in treating thumb injuries, its objectives and benefits extend far beyond initial impressions. From facilitating recovery through restricting movement and promoting blood flow, to managing pain and providing a psychological safety net, thumb taping is crucial within the broader context of understanding thumb injuries and their proper treatment.
Overview of Thumb Tapes: Types and Features
Thumb taping plays a crucial role in the management and prevention of thumb injuries, particularly in sports and athletic activities. However, it's important to understand that not all thumb tapes are created equal, and knowing exactly what to look for in a thumb tape is paramount. Generally, thumb tapes can be categorized into two types: Athletic tapes and Kinesiology tapes. Athletic tapes, known for their rigidity and strength, are often used to provide a high level of support and restrict motion preventing further injuries. They are typically non-elastic, making them great for stiff, non-moving support. On the other hand, Kinesiology tapes are elastic, flexible, and can conform to the body's contours. This type of tape allows for a greater range of motion, which makes it ideal for use during rehabilitation where gradual and controlled movement is necessary. However, there are also several key features to consider when choosing a thumb tape. The adhesive quality is a crucial factor; a good thumb tape should adhere well to the skin without causing irritation. It should also have the ability to withstand sweat and moisture, maintaining its grip even during intense physical activity. Durability is another essential feature; the tape should be strong enough to provide ample support and wouldn't easily fray or tear. Lastly, comfort shouldn't be forgotten. It should not hinder mobility and provide a comfortable fit, complementing the natural movement of the thumb. Knowing the different types and features of thumb tapes is a crucial part of understanding how taping contributes to thumb injury prevention and management. It helps you make a more informed decision, allowing you to choose the most suitable thumb tape that will offer you utmost support, comfort, and aid in faster recovery.
Preparing Your Thumb for Taping and Choosing the Right Tape
As a part of hand health, taking care of your thumb is critical, especially if you're dealing with an injury. This article guides you on how to prepare your thumb for taping and how to choose the right tape - two aspects of thumb care that often go unnoticed, yet are of paramount importance. First, we will shed light on the initial steps of thumb care: cleaning and drying your thumb. There's a lot to consider during this step, and understanding the best methods is crucial to prevent further damage. Following this, we delve into the details of choosing the right tape for your thumb injury. Selecting a tape that complements your injury type, enhances comfort, and promotes healing is vital. Lastly, we will explore the world of taping accessories - a few essentials that could make all the difference in your recovery journey. So, let's dive in and start our journey from scratch with the most crucial part: Preparing your thumb i.e., ensuring it's clean and thoroughly dried.
Initial Steps: Cleaning and Drying Your Thumb
Understanding the initial steps involved in preparing your thumb for taping is essential to achieving effective support and protection. Correct thumb-taping techniques start with proper cleaning and drying. Cleaning your thumb ensures that you eliminate all traces of dirt, grease, or sweat. Use a gentle, preferably unscented soap and warm water to clean your thumb thoroughly. This step is crucial as the presence of these substances can affect the adhesion of the tape, making it less effective in providing the necessary support and protection. You may also consider using an alcohol-based sanitizer, particularly if you have been involved in activities that might have exposed your thumb to excessive dirt or potential contaminants. The next step after cleaning is drying your thumb. Thoroughly drying your thumb ensures that the tape will stick effectively to your skin. Any traces of moisture can interfere with the tape's ability to adhere properly, potentially causing it to slip or come off prematurely. You can use a clean towel to pat your thumb dry gently, ensuring that you attend to all areas, including the spaces between your thumb and the rest of your fingers. It's worth noting that these foundational steps might seem inconsequential, but they play a significant role in the entire taping process. Actively investing time and effort into cleaning and drying your thumb can significantly enhance the effectiveness of the taping. Moreover, it can contribute to your overall hygiene and safety, preventing potential complications that could arise from trapping dirt or moisture beneath the tape. Lastly, understanding the steps involved in preparing, cleaning, and drying your thumb helps you choose the right kind of tape. The selection of tape can be influenced by factors such as the intensity of the pain, the level of support required, and the nature of your activities. A thorough cleaning and drying process allows you to better gauge the condition of your thumb, equipping you with more information to make an informed decision on the type of tape to use. In conclusion, cleaning and drying your thumb are steps that serve far beyond mere preparation. They form a critical part of the procedure, ensuring the tape's functionality while promoting hygiene and facilitating the right selection of tape. It is, therefore, evident that these steps are just as essential as the actual taping process in achieving a successful thumb-taping experience.
How to Choose the Right Tape for Your Thumb Injury
Choosing the right tape for your thumb injury is a fundamental part of the treatment and recovery process and it differs according to the extent and nature of your injury. There are several brands and types of tape available in the market, each with its unique properties. Understanding these characteristics and how they align with your specific needs is crucial. First, you need to consider the strength and rigidity of the tape. If your thumb injury is severe, choose a tape with high tensile strength. This type of tape provides firm and rigid support to completely immobilize the thumb, which is vital for healing severe injuries like fractures or dislocations. On the contrary, if your injury is not as critical, such as a sprain or strain, a semi-rigid or flexible tape is a more suitable choice. It delivers moderate support and allows a certain degree of motion that promotes healing and prevents muscle atrophy. The adhesive power of the tape is another factor to take into account. A high-quality tape should have a strong adhesive that securely sticks to your skin for hours without causing discomfort or skin reactions. But remember, it should not be too sticky to the extent it creates pain or discomfort during removal. The comfort of the tape is equally important. Choose a breathable tape that permits air flow to keep your skin dry and prevent sweating. Pick a tape that doesn't irritate your skin and is easy to apply and remove. Tapes that are hypoallergenic are considered most preferable for people with sensitive skin. The durability of the tape is a vital consideration as well. Athletes and individuals who lead physically active lifestyles should opt for a long-lasting tape that can resist intense movement and moisture without peeling off. Lastly, always seek advice from a health professional when choosing a tape for your thumb injury. They can guide you in making a choice based on your injury’s severity, your skin type, and your level of physical activity. Taken together, these factors and careful considerations will lead you to the right tape that ensures optimum support, comfort, and healing for your thumb. Remember, a well-chosen tape can make a significant difference to your recovery timeline and return to usual activities. In conclusion, choosing the right tape for a thumb injury is not a one-size-fits-all task. It requires a keen understanding of the tape’s properties, your injury specifics, and your personal preferences and lifestyle. Therefore, always prioritize researching and consulting with health professionals before making a decision.
Taping Accessories: What You Need and How to Use Them
When undertaking the crucial task of taping your thumb, it is essential to use high-quality Taping Accessories. Without the correct tools, it's impossible to ensure proper support and protection for your injured or vulnerable thumb. Let's start with an essential accessory: the sports tape. Used to provide support and limit the motion of the thumb, this high-strength adhesive is designed to adhere and contour to your skin ensuring firm but comfortable grip. Particular attention should be paid to the type of tape one chooses. For thumb taping, choose a rigid strapping tape that supports the joints without restricting their natural movement too much. The tape should be skin-friendly, causing no discomfort even after long hours of use. It should withstand moisture and perspiration without losing its adhesiveness. Two good options are zinc oxide tape, known for its excellent tensile strength and superior stickiness, and cohesive bandage, which adheres to itself and not to the skin or hair, minimizing the chances of skin irritation. Another must-have in your taping accessories kit is pre-tape underwrap. This lightweight foam provides a protective barrier between your skin and the adhesive tape, thus reducing the risk of skin chafing or blistering. It offers comfort and protection, especially when you need to tape your thumb for extended periods. Furthermore, to ensure a clean and precise application, invest in a top-quality tape cutter/scissors. These cutters are designed to easily slice through the sports tape without causing any form of discomfort or potential harm. The taping process itself requires precision. One would typically start by cleaning the area around the thumb to ensure a perfect adhesion. The pre-tape underwrap is then gently applied over the area where the sports tape will go. The sports tape should then be applied evenly, taking care not to leave any loose ends that could come undone during physical activity. Remember the rule of thumb when wrapping - not too tight to impede blood flow, but secure enough to prevent unnecessary thumb movement. Using these accessories for thumb taping doesn’t merely aid in speedy recovery but also guarantees the prevention of further injuries. Proper use of these taping accessories will also ensure your comfort, allowing you to perform your daily activities with minimal discomfort. Remember, while the process may seem complicated at first, correct use of taping accessories becomes intuitive over time. The key lies in using quality products and understanding the specific needs of your thumb injury or strain. With the appropriate taping accessories and their correct use, you will be back in action in no time.
Step-by-step Guide: Taping Your Thumb in Different Ways
In the quest to maintain a healthy lifestyle and engage in recreational activities without the risk of injury, it's essential to understand proper accident prevention measures and treatments. This comprehensive guide provides step-by-step instructions on how to tape your thumb in different ways. Here, we will explore three primary focus areas: Basic Thumb Taping Techniques for Common Injuries, Advanced Thumb Taping Procedures for More Serious Injuries, and Do's and Don'ts: Mistakes to Avoid When Taping Your Thumb. These pivotal points lay the groundwork for not just preventive measures but also corrective techniques used by professional athletes and health professionals worldwide. First, let's delve into the Basic Thumb Taping Techniques for Common Injuries. This section demystifies simple yet effective methods that provide an immediate solution to everyday sprains and strains, ensuring minimal disruption to your daily routine. With this knowledge, you'll have the tools to confidently navigate thumb injuries, ensuring you can return to your active lifestyle quickly and safely.
Basic Thumb Taping Technique for Common Injuries
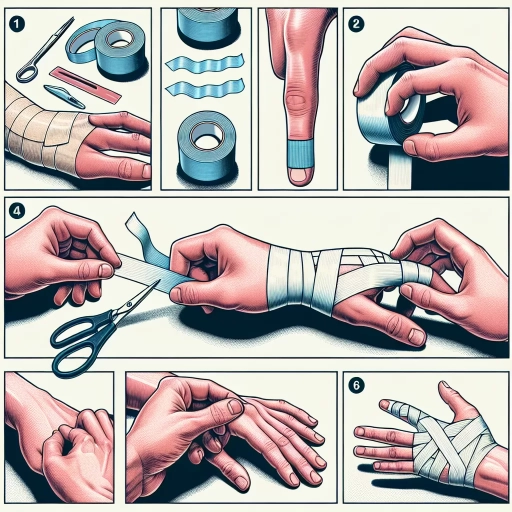
The Basic Thumb Taping Technique for Common Injuries not only safeguards you from further thumb damage but also contributes to the expedited healing of the injured area. The technique, when done correctly, effectively stabilizes your thumb, preventing unnecessary strain or movement that might impede recovery. It is simple to carry out and is a form of immediate treatment readily available regardless of your location. To get started, you need a rigid and an elastic adhesive bandage, scissors and, optionally, pre-tape underwrap for additional comfort. Begin by cutting a piece of rigid tape of around 20-30 cm length. With your thumb extended and relaxed, start by wrapping the tape around your wrist, ensuring it's very snug but not tight to cut off circulation. This serves as a supportive base for the rest of the taping process. Proceed by making a line of tape from your secured wrist, along the back of your hand, encircling the thumb and returning to the wrist. Doing so will create a kind of split for the thumb, enabling limited movement, which is crucial for the healing process. You should do this twice for maximum support. Next, cut a shorter piece of rigid tape, approximately 10-15 cm in length. This piece is to bind around your thumb, starting from the base and encircling it twice ending at the thumb joint. This creates a 'cap' for your thumb, crucial for preventing hyperextension or over-flexion, common causes of thumb injuries. To finish, apply the elastic bandage, starting at your wrist and continuously wrap it going upward to cover the area with the rigid tape. This step will not only fasten the taping but also provide a compression effect, which assists in reducing swelling and pain. Taking the time to learn the Basic Thumb Taping Technique is an investment in your wellbeing. This simple, yet highly effective method can provide immediate relief and safeguard you from exacerbating common thumb injuries. In sports and daily life activities alike, this basic knowledge could come in handy at the most unexpected moments. Knowledge is power, and this meticulously explained, step-by-step guide is ultra-important when it’s about avoiding unnecessary pain and accelerating recovery.
Advanced Thumb Taping Procedures for More Serious Injuries
Thumb taping is a vital procedure, especially in the case of serious injuries. This involves a more intricate and elaborate process as compared to standard taping. Advanced thumb taping techniques are directed towards providing optimal support to your thumb joint, rectifying the alignment, and facilitating swifter healing. They are significant especially in cases of severe sprains, dislocations or fractures. The process begins with the right kind of tape, preferably a zinc oxide tape, for stronger support. To increase comfort and avoid skin chafing, a pre-wrap is applied around the thumb. Now comes the critical part termed as "anchor taping". It requires creating an anchor around the wrist, ensuring it's neither too tight nor too loose. This acts as the base of our tape pattern and prevents tape from rolling up during movement. Next, drawing loops around the thumb joint forms the second round of reinforcement. This is commonly known as "figure eight" wrap, mimicking the number eight, around the thumb and wrist; it adds strength to the joint that has suffered injury. Repeat this step until you have minimum three layers of tape over the thumb, always applying with mild tension. The next technique is the 'spiral technique', a rotational wrap upwards, starting from the wrist to the tip of the thumb. The spiral wrap mimics how a barber's pole looks with its overlapping red and white stripes. Remember to cover two-thirds of the previous layer with the next one to offer uniform support throughout. The final step, often termed as "lock-off", is implemented to certify the tape stays in place. This involves wrapping round the thumb and the wrist one more time, essentially locking down the tape. It ensures longevity and strength and keeps all earlier applied tape layers intact. In advanced cases, a 'thumb spica' can be added, this is a custom-made brace that offers additional support and protection without hindering mobility. This advanced thumb taping procedure ensures therapeutic relief and allows the damaged structures in your thumb to heal without hindering daily activities. With the aid of these methodologies, you can alleviate pain, lessen swelling, and gradually regain your thumb's strength and mobility. This detailed process, while it may seem daunting at first, is a cautious blend of science, technique, and attentiveness to the body’s needs. The ultimate goal is functional thumb stability during the healing phase, promoting a speedy and healthy recovery.
Do's and Don'ts: Mistakes to Avoid When Taping Your Thumb
As you navigate through the step-by-step guide on how to tape a thumb, understanding the do's and don'ts of the process can greatly enhance your skills and help prevent further injuries. When taping your thumb, most common mistakes can be easily avoided with the right knowledge. Do remember to keep the thumb in a neutral position when taping. This reduces the risk of muscle straining or spraining. Don't bend or flex your thumb as it can limit the effectiveness of the taping job. Similarly, do apply the tape smoothly and evenly to avoid any discomfort or irritation to the skin. It's important to ensure that the tape is firm but not too tight; a common mistake which can cause circulatory problems or numbness. One major don't is using adhesive on damaged or broken skin. It can lead to serious complications such as skin infections or allergic reactions. Do cleanse the area thoroughly before you start taping as it ensures that the adhesive sticks properly, and reduces the chances of bacterial growth. When it comes to the choice of tape, do use a high-quality, elastic sports tape, which provides support without restricting motion. Don't ever use duct tape or any non-medical tape as an alternative as this may cause skin irritation or may not provide the necessary support for the sprained thumb. Do tape your thumb if you have experienced minor sprains or strains or if you are seeking extra support while participating in sports or physical activities. In contrast, don't tape if the injury is severe, there is any bone misalignment, or you have any circulation issues. Seeking medical intervention in such cases is highly advised. Lastly, do remember that taping is a supportive measure, not a cure. Don't ignore the importance of rest, rehabilitation exercises, and professional medical advice during recovery. By heeding to these do's and don'ts, you can help aid a faster recovery, prevent further injury, and ensure the effectiveness of the taping procedure. Always keep in mind that taping serves as a supportive measure and should never replace proper medical care and advice.