How To Use A Pom Pom Maker
Pom pom makers are a fun and creative tool that can add a personal touch to various craft projects, from clothing and accessories to home decor and toys. With a pom pom maker, you can create colorful and fluffy pom poms in various sizes and shapes, adding a unique and playful element to your creations. However, using a pom pom maker can seem intimidating if you're new to crafting or haven't worked with one before. In this article, we'll take you through the basics of using a pom pom maker, provide a step-by-step guide on how to use it, and share some valuable tips and tricks to help you create perfect pom poms. To get started, let's first understand the basics of a pom pom maker, including its components and how it works, which will set the foundation for creating beautiful and professional-looking pom poms.
Understanding the Basics of a Pom Pom Maker
Pom pom makers are a fun and creative tool used to make colorful and fluffy pom poms for various craft projects. Understanding the basics of a pom pom maker is essential to get started with making your own pom poms. In this article, we will explore what a pom pom maker is and its uses, the different types of pom pom makers available in the market, and how to choose the right size of pom pom maker for your project. By the end of this article, you will have a clear understanding of how to use a pom pom maker and be ready to start creating your own colorful pom poms. So, let's start by understanding what a pom pom maker is and its uses.
What is a Pom Pom Maker and Its Uses
A Pom Pom Maker is a handy tool used to create fluffy, round pom poms, which are a popular embellishment in various crafts, such as knitting, crochet, and DIY projects. The device typically consists of a circular or oval-shaped frame with multiple notches or slots, where yarn or thread is wrapped around to create the pom pom. The maker comes in different sizes, allowing crafters to create pom poms of varying diameters. The primary use of a Pom Pom Maker is to simplify the process of making pom poms, which can be time-consuming and tedious when done by hand. With a Pom Pom Maker, crafters can quickly and easily create multiple pom poms in a uniform size and shape, making it an essential tool for anyone who enjoys working with yarn or thread. Additionally, the maker can be used to create different types of pom poms, such as fuzzy, chunky, or delicate ones, depending on the type of yarn or thread used. Overall, a Pom Pom Maker is a versatile and convenient tool that can add a professional touch to various craft projects.
Types of Pom Pom Makers Available in the Market
There are various types of pom pom makers available in the market, catering to different needs and preferences. The most common type is the plastic pom pom maker, which is affordable, easy to use, and comes in various sizes. Another popular option is the metal pom pom maker, which is more durable and can produce larger pom poms. For those who prefer a more eco-friendly option, there are wooden and bamboo pom pom makers available. Additionally, there are also pom pom makers made from recycled materials, such as cardboard and plastic. Some pom pom makers also come with adjustable sizes, allowing users to create pom poms of different sizes with a single tool. Furthermore, there are also electronic pom pom makers that can produce multiple pom poms at once, making it a great option for those who need to make a large quantity of pom poms quickly. Overall, the type of pom pom maker to choose depends on the user's specific needs, budget, and preferences.
Choosing the Right Size of Pom Pom Maker for Your Project
When it comes to choosing the right size of pom pom maker for your project, there are a few factors to consider. The size of the pom pom maker will determine the size of the pom poms it produces, so it's essential to choose a size that will give you the desired outcome. If you're making a small project, such as a keychain or a hair clip, a small pom pom maker (about 1-2 inches in diameter) would be suitable. For medium-sized projects, such as a scarf or a hat, a medium-sized pom pom maker (about 2-3 inches in diameter) would be a good choice. For larger projects, such as a blanket or a rug, a large pom pom maker (about 3-4 inches in diameter) would be necessary. Additionally, consider the type of yarn you're using and the desired fullness of the pom poms. Thicker yarns and fuller pom poms require larger pom pom makers, while thinner yarns and less full pom poms can be made with smaller makers. By choosing the right size of pom pom maker, you'll be able to achieve the desired size and fullness of your pom poms, ensuring a professional-looking finish to your project.
Step-by-Step Guide to Using a Pom Pom Maker
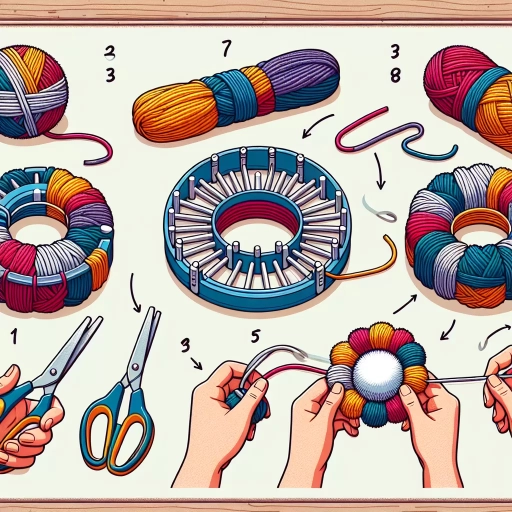
Using a pom pom maker is a fun and easy way to create colorful and fluffy pom poms for various craft projects. To get started, it's essential to follow a step-by-step guide to ensure that your pom poms turn out perfectly. The process involves three main steps: wrapping the yarn around the pom pom maker, cutting the yarn and securing the pom pom, and fluffing and shaping the pom pom to the desired size. By following these steps, you can create beautiful and uniform pom poms that can be used to decorate hats, scarves, and other accessories. In this article, we will take a closer look at each of these steps, starting with the first and most crucial step: wrapping the yarn around the pom pom maker.
Wrapping the Yarn Around the Pom Pom Maker
Wrapping the yarn around the pom pom maker is a crucial step in creating a full and fluffy pom pom. To start, hold the yarn in one hand and the pom pom maker in the other, with the maker's arms open. Begin wrapping the yarn around the maker, moving from one arm to the other in a circular motion. Make sure to keep the yarn taut, but not too tight, as this can cause the pom pom to become misshapen. As you wrap, try to maintain a consistent tension and keep the yarn evenly spaced to ensure a uniform pom pom. It's also essential to wrap the yarn in the same direction, either clockwise or counterclockwise, to prevent the pom pom from becoming twisted. Continue wrapping the yarn until the maker is fully covered, and the desired thickness is achieved. The amount of yarn needed will depend on the size of the pom pom maker and the desired fullness of the pom pom. A good rule of thumb is to wrap the yarn until it's about 1-2 inches thick, but this can vary depending on the specific project. Once the yarn is wrapped, use scissors to cut the yarn, leaving a small tail to secure the pom pom in place. With the yarn wrapped around the pom pom maker, you're now ready to move on to the next step: securing the yarn and trimming the pom pom.
Cutting the Yarn and Securing the Pom Pom
Cutting the yarn and securing the pom pom is a crucial step in the pom pom making process. To do this, you'll need to carefully cut the yarn, making sure to leave a small tail at the end. This tail will be used to tie a knot and secure the pom pom in place. It's essential to cut the yarn at the correct length, as cutting it too short can result in a pom pom that falls apart, while cutting it too long can leave excess yarn that's difficult to work with. Once you've cut the yarn, use the tail to tie a knot around the center of the pom pom, making sure it's snug and secure. You can then trim the excess yarn, leaving a small tail that can be tucked away or used to attach the pom pom to your desired project. By following these simple steps, you can ensure that your pom pom is securely attached and ready to use.
Fluffing and Shaping the Pom Pom to Desired Size
Fluffing and shaping the pom pom to the desired size is a crucial step in creating a perfectly rounded and full pom pom. To achieve this, start by gently pulling out the yarn strands from the center of the pom pom, working your way around the circumference. This will help to loosen and fluff out the yarn, creating a more even and rounded shape. Next, use your fingers or a blunt tool, such as a chopstick or pencil, to gently shape the pom pom into the desired size and shape. You can also use a small amount of yarn or a thread to tie off any stray strands or to secure the pom pom in place. It's essential to be gentle when handling the pom pom, as excessive pulling or tugging can cause the yarn to break or the pom pom to become misshapen. By taking your time and working carefully, you can create a beautifully rounded and full pom pom that is perfect for adding a decorative touch to your craft project.
Tips and Tricks for Creating Perfect Pom Poms
Pom poms are a fun and creative way to add a personal touch to various craft projects, from hats and scarves to home decor and accessories. To create perfect pom poms, it's essential to master a few key techniques. One crucial aspect is selecting the right type of yarn, as it can significantly impact the texture, size, and overall appearance of your pom poms. Additionally, adding a center to your pom pom can provide extra stability and prevent it from falling apart. Experimenting with different colors and patterns can also help you achieve unique and eye-catching designs. By following these tips and tricks, you can take your pom pom game to the next level. In this article, we'll dive deeper into the world of pom poms, starting with the importance of using the right type of yarn for your pom poms.
Using the Right Type of Yarn for Your Pom Poms
When it comes to creating perfect pom poms, using the right type of yarn is crucial. The type of yarn you choose can affect the size, texture, and overall appearance of your pom poms. For example, if you're looking to create small, delicate pom poms, a thin, lightweight yarn such as cotton or silk would be a good choice. On the other hand, if you want to create larger, fluffier pom poms, a thicker, more textured yarn such as wool or chunky acrylic would be more suitable. It's also important to consider the fiber content of the yarn, as some fibers may be more prone to shedding or tangling than others. For instance, yarns with a high percentage of synthetic fibers may be more durable and less prone to shedding, but may also be less soft and less breathable. Ultimately, the right type of yarn for your pom poms will depend on the specific project you're working on and the look you're trying to achieve. By choosing the right yarn, you can ensure that your pom poms turn out the way you want them to, and that they will be durable and long-lasting. Some popular types of yarn for making pom poms include acrylic, cotton, wool, and blends. Acrylic yarn is a popular choice because it is soft, lightweight, and easy to work with, while cotton yarn is a good choice for projects that require a more natural, textured look. Wool yarn is a good choice for projects that require a more rustic, homespun look, and blends can offer a good balance of texture and durability. By experimenting with different types of yarn, you can find the one that works best for you and your pom pom projects.
Adding a Center to Your Pom Pom for Extra Stability
Adding a center to your pom pom can provide extra stability and prevent it from coming apart. To do this, you can use a small piece of cardboard or a metal ring as the base of your pom pom. Simply wrap the yarn around the center, overlapping the strands as you go, and then tie a knot to secure it. This will create a sturdy base that will keep your pom pom from falling apart. Alternatively, you can use a small amount of hot glue to attach the yarn to a metal ring or a small piece of cardboard, creating a strong and stable center. This is especially useful if you're using a large amount of yarn or if you're making a pom pom that will be subject to a lot of wear and tear. By adding a center to your pom pom, you can ensure that it will remain intact and look great for a long time.
Experimenting with Different Colors and Patterns
Experimenting with different colors and patterns is a great way to add some personality to your pom poms. You can use a single color or mix and match different hues to create unique and eye-catching combinations. Try using complementary colors, such as blue and orange, to create a bold and contrasting look. Alternatively, you can use analogous colors, such as different shades of pink, to create a softer and more subtle effect. You can also experiment with different patterns, such as stripes or polka dots, by wrapping the yarn in a specific way or using a patterned yarn. Another idea is to use metallic or glitter yarn to add some extra sparkle to your pom poms. You can also use different textures, such as chunky or fuzzy yarn, to add some depth and interest to your pom poms. By experimenting with different colors and patterns, you can create a wide range of unique and personalized pom poms that reflect your style and creativity.