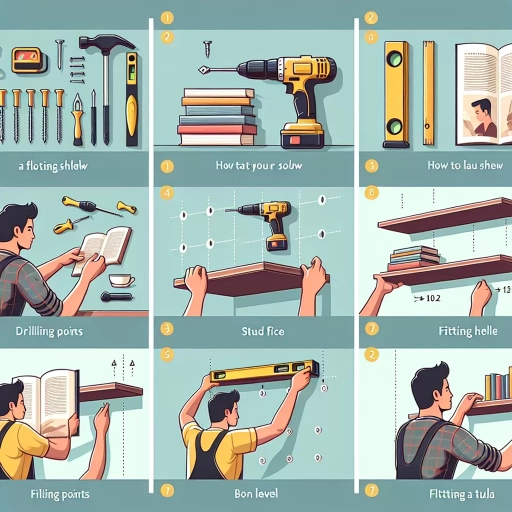
How To Install Floating Shelves
Floating shelves are a popular choice for home decor, offering a sleek and modern look that can elevate any room. However, installing them can be a daunting task, especially for those who are new to DIY projects. To ensure a successful installation, it's essential to plan carefully, prepare the wall and necessary tools, and execute the installation with precision. In this article, we will guide you through the process of installing floating shelves, starting with planning your installation. We will cover the importance of measuring your space, choosing the right materials, and determining the optimal shelf placement. By the end of this article, you will be equipped with the knowledge and confidence to install your own floating shelves. So, let's get started by planning your floating shelves installation.
Plan Your Floating Shelves Installation
Floating shelves can be a fantastic addition to any room, providing a sleek and modern way to display decorative items, books, and other household essentials. However, to ensure a successful installation, it's essential to plan carefully. This involves considering several key factors, including choosing the right location for your shelves, determining the number and size of shelves you need, and considering the weight capacity and material of your shelves. By taking the time to think through these details, you can create a beautiful and functional floating shelf installation that enhances the look and feel of your space. So, let's start by exploring the first crucial step: choosing the right location for your shelves.
Choose the Right Location for Your Shelves
When it comes to installing floating shelves, choosing the right location is crucial to ensure they are both functional and aesthetically pleasing. The first step is to identify the purpose of your shelves. Are you looking to display decorative items, store books, or showcase kitchenware? Once you have determined the purpose, consider the room's layout and the location of other furniture pieces. For example, in a living room, you may want to place your shelves near a seating area to create a cozy reading nook, while in a kitchen, you may want to install them near a countertop to provide additional storage for cookbooks or dishes. Additionally, think about the height at which you want to install your shelves. If you plan to store heavy items, it's best to install them at a lower height to prevent straining your back when lifting. On the other hand, if you want to display decorative items, installing them at a higher height can create a sense of grandeur and make the room feel more spacious. It's also essential to consider the location of any electrical outlets, windows, or doors, as you'll want to avoid obstructing them with your shelves. By carefully considering these factors, you can choose the perfect location for your floating shelves and create a functional and beautiful space that meets your needs.
Determine the Number and Size of Shelves You Need
To determine the number and size of shelves you need, start by measuring the wall space where you plan to install the shelves. Take into account the width, height, and any obstructions, such as electrical outlets or windows. Next, consider the items you want to display or store on the shelves, including their size, weight, and quantity. Think about the style and aesthetic you want to achieve, such as modern and minimalist or traditional and ornate. Decide on the shelf material, thickness, and color, as well as any additional features, like lip edges or decorative trim. With these factors in mind, calculate the number of shelves you need to accommodate your items, leaving enough space between each shelf for easy access and visual balance. Typically, shelves are spaced 8-12 inches apart, but this can vary depending on the size and type of items being stored. For example, if you're storing large books or decorative objects, you may want to space the shelves farther apart. Once you have a sense of the number of shelves you need, determine the size of each shelf based on the items you'll be placing on them. Consider the depth, width, and height of each shelf, as well as any lip edges or overhangs. A general rule of thumb is to make the shelves slightly deeper than the items being stored to create a sense of balance and visual harmony. By carefully considering these factors, you can determine the number and size of shelves you need to create a functional and visually appealing floating shelf installation.
Consider the Weight Capacity and Material of Your Shelves
When planning your floating shelves installation, it's crucial to consider the weight capacity and material of your shelves. The weight capacity of your shelves will determine how much weight they can hold, and the material will affect their durability and overall appearance. For instance, if you're planning to store heavy objects such as books or decorative items, you'll need shelves with a higher weight capacity. On the other hand, if you're looking to display lightweight items such as decorative vases or picture frames, you can opt for shelves with a lower weight capacity. In terms of material, you can choose from a variety of options such as wood, metal, or glass. Wood is a popular choice for floating shelves as it's durable and can be stained or painted to match your home's décor. Metal shelves are also a great option as they're sturdy and can be easily installed. Glass shelves, on the other hand, are perfect for displaying delicate items and can add a touch of elegance to your room. Ultimately, the material you choose will depend on your personal preference and the style of your home. By considering the weight capacity and material of your shelves, you can ensure that your floating shelves installation is both functional and aesthetically pleasing.
Prepare the Wall and Gather Necessary Tools
Before installing a wall decoration or a shelf, it is essential to prepare the wall and gather the necessary tools to ensure a successful and stress-free installation process. This involves several crucial steps that should not be overlooked. Firstly, it is vital to locate the wall studs and mark the spot for drilling to ensure that the screws or nails are securely fastened. Additionally, gathering all the necessary tools and materials for installation is crucial to avoid last-minute trips to the hardware store. Lastly, cleaning and preparing the wall surface for installation is also important to ensure a smooth and even finish. By following these steps, you can ensure a professional-looking installation that will last for years to come. In this article, we will explore the first step in detail, starting with locating the wall studs and marking the spot for drilling.
Locate the Wall Studs and Mark the Spot for Drilling
To locate the wall studs and mark the spot for drilling, start by using a stud finder to identify the position of the studs behind the drywall. Hold the stud finder flat against the wall and move it horizontally until it beeps or lights up, indicating the presence of a stud. Mark the spot with a pencil, making sure to note the location of the stud. You can also use a magnet to locate the studs, as they will be attracted to the metal screws or nails holding the drywall in place. Once you have identified the location of the studs, use a level to ensure the mark is straight and level. Then, use a pencil to draw a small "X" or a dot to mark the spot where you will drill. Make sure to mark the spot on both sides of the stud, about 1-2 inches apart, to ensure accurate placement of the shelf bracket. By marking the spot carefully, you can ensure that your floating shelf is securely attached to the wall and will hold the weight of the items you plan to display.
Gather All the Necessary Tools and Materials for Installation
To ensure a successful installation of your floating shelves, it's essential to gather all the necessary tools and materials beforehand. Start by collecting the shelves themselves, along with the wall anchors, screws, and any other hardware provided by the manufacturer. You'll also need a drill with screwdriver and drill bits, a level to ensure the shelves are straight, a stud finder to locate the wall studs, and a pencil to mark the wall. Additionally, have a tape measure, a hammer, and a screwdriver handy. If you're dealing with a particularly heavy shelf or a plaster wall, you may also need a wall anchor kit or a plaster anchor. Don't forget to gather any decorative items, such as wall caps or trim, to cover any gaps or edges. Having all the necessary tools and materials within reach will save you time and frustration during the installation process.
Clean and Prepare the Wall Surface for Installation
To ensure a successful floating shelf installation, it's crucial to clean and prepare the wall surface beforehand. Start by removing any dirt, grime, or old adhesive from the wall using a mixture of soap and water. Scrub the area gently with a soft-bristled brush or a non-abrasive scrubber, then rinse with clean water and let it dry completely. Next, inspect the wall for any holes or cracks and fill them with spackling compound or joint compound. Sand the area smooth once the compound is dry, feathering it out to blend with the surrounding surface. If you're dealing with a textured or uneven wall, consider applying a skim coat of joint compound to create a smooth surface. Additionally, if you're installing shelves on a wall with a glossy or semi-gloss paint finish, lightly sand the area to create a better bond between the wall and the shelf's mounting hardware. By taking the time to properly clean and prepare the wall surface, you'll ensure a strong and secure hold for your floating shelves.
Install the Floating Shelves
Installing floating shelves can be a great way to add storage and style to any room in your home. To achieve a professional-looking result, it's essential to follow a few key steps. First, you'll need to drill pilot holes and insert wall anchors to provide a secure base for your shelves. Next, you'll mount the shelf brackets and attach the shelves, making sure they're level and evenly spaced. Finally, you'll need to adjust and secure the shelves to ensure they're stable and can hold the weight of your belongings. By following these steps, you can create a beautiful and functional floating shelf system that enhances the look and feel of your home. To get started, let's take a closer look at the first step: drilling pilot holes and inserting wall anchors.
Drill Pilot Holes and Insert Wall Anchors
Drill pilot holes and insert wall anchors to ensure a secure hold for your floating shelves. To start, use a level to mark the spot where you want to place the shelf, taking into account the height and location of the wall studs. Next, use a drill bit to create a pilot hole that's slightly smaller than the anchor. The type of anchor you use will depend on the type of wall you have - for drywall, use a drywall anchor, while for plaster or concrete, use a molly bolt or toggle bolt. Once the pilot hole is drilled, insert the anchor into the hole and screw it into place. Make sure the anchor is seated properly and the screw is tightened securely. This will provide a sturdy base for your floating shelf to attach to, preventing it from tipping or falling. By taking the time to drill pilot holes and insert wall anchors, you'll be able to enjoy your new floating shelves with confidence, knowing they're safely and securely in place.
Mount the Shelf Brackets and Attach the Shelves
Mount the shelf brackets and attach the shelves. Begin by holding a shelf bracket against the wall and using a level to ensure it's straight. Mark the spot where the bracket will be attached with a pencil. Drill pilot holes into the wall at the marked spots, then screw the bracket into place. Repeat this process for the remaining brackets, making sure to space them evenly apart. Once the brackets are secure, place a shelf on top of them and attach it using the screws provided. Make sure the shelf is level and secure before moving on to the next one. Continue this process until all the shelves are attached.
Adjust and Secure the Shelves to Ensure Level and Stability
Adjust and Secure the Shelves to Ensure Level and Stability. Once the wall anchors are in place, carefully lift the shelf and align it with the marks made earlier. Gently push the shelf against the wall, ensuring it is level and plumb. Use a level tool to double-check the shelf's position, making any necessary adjustments. If the shelf is not level, loosen the screws and reposition it. Once the shelf is level, tighten the screws firmly to secure it to the wall. For added stability, consider using wall anchors with a built-in level or a laser level to project a level line onto the wall. This will help ensure the shelf is perfectly level and plumb. Additionally, if you're installing multiple shelves, make sure to space them evenly and use a level to ensure each shelf is aligned with the one below it. By taking the time to adjust and secure the shelves properly, you'll be able to enjoy your new floating shelves with confidence, knowing they are safe and stable.