How To Draw Godzilla
Understanding the Basics of Drawing Godzilla
Overview of Godzilla Design Evolution
Since its inception in 1954, the design of Godzilla has undergone significant modifications. Initially, Godzilla was depicted as a gigantic, dinosaur-like creature with rough, bumpy skin, a robust masculine body, and a distinctive dorsal plate. Over the years, the design evolved to portray a more terrifying and menacing appearance to resonate with the changing perceptions of horror and monster movies. Understanding these subtle changes in its design is crucial in accurately illustrating Godzilla.
Choosing the Right Art Supplies
The choice of art supplies significantly influences the final artwork. For a high-quality Godzilla sketch, professional-grade drawing tools are recommended. Use a variety of pencils with different hardness levels to create depth and texture, whereas high-quality erasers help in refining details and cleaning up the sketch. Consider using a good quality sketchbook that can tolerate erasures and different pencil pressure without tearing or smudging. Lastly, colored pencils or markers can be utilized to bring your Godzilla sketch to life.
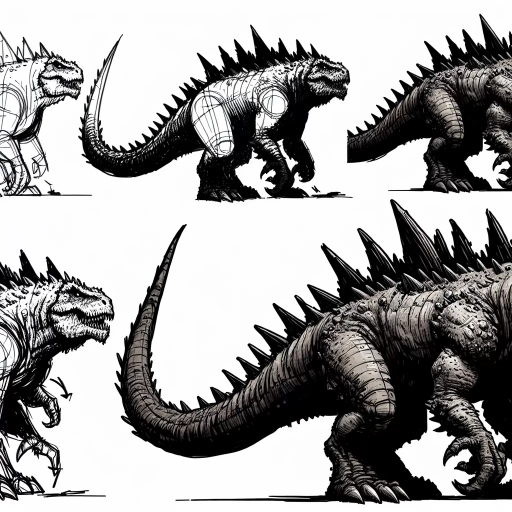
Understanding the Anatomy of Godzilla
The anatomy of Godzilla can seem complex due to its intricate details. Breaking down Godzilla's body into basic shapes can aid in the sketching process. The head can be visualized as a modified rectangular shape, the body a combination of cylindrical and oval shapes, the tail a long waved line, and the dorsal plates as triangles. Breaking down complex subjects into simpler shapes is a tried and tested method often employed by seasoned artists to effectively capture the essence of daunting subjects like Godzilla.
Step-By-Step Guide To Drawing Godzilla
Sketching the Basic Framework
Begin your Godzilla sketch by drawing the basic framework using simple shapes and lines. These shapes act as a guideline and helps you visualize the overall composition. It's important to keep the lines light so they can be erased later. This framework includes sketching the head, body, tail, legs, toes, hands, and dorsal plates of Godzilla using basic shapes like rectangles, cylinders, and triangles.
Refining the Sketch with Details
Once the basic framework is complete, refine the sketch adding more details to it. The shapes initially used should be gradually replaced by definite lines and contours. The head gets its Godzilla-like look by adding pointed teeth, intense eyes, and defined jawline. The body requires substantial work on the scales and muscle definition. The tail should be detailed to look scaly and sturdy. The most distinctive feature of Godzilla, the dorsal plates, added with precise size and shape, enhances its pedigree. This stage demands patience and meticulous detailing to bring out the visual depth and realism.
Adding Finishing Touches
The final stage of the Godzilla drawing includes adding shadows, highlights, and textures. Shadows and highlights play a pivotal role in bringing out three-dimensionality in the artwork. Understanding light sources will help create reasonable shadows and highlights. Adding textures is the final step that brings life to the drawing. Texture for Godzilla drawing is essentially making the scales on its body. Giving each scale a distinctive look and adding shadows and highlights to them boosts the realism. The finished Godzilla sketch should convey power, fear, and robustness apt for its destruction.
Adding Color to Godzilla Sketch
Choosing the Right Color Scheme
Picking the right color scheme is essential to create a visually appealing Godzilla drawing. Godzilla has been depicted in dark, usually monochrome, colors. Therefore, using shades of black, grey, and blue are highly recommended. However, experimenting with other colors like green is also permissible depending on style and preference. It's important to maintain harmony in the colors used to portray realistic lighting effects.
Applying Base Colors
Start by applying the base colors that act as the foundation for later colors. To prevent colors from spreading outside the lines, it's imperative to allow ample time for the base colors to dry. Taking the base color lightly allows you the freedom to work on multiple layers creating depth and highlights.
Adding Depth with Shadows and Highlights
Add darkness to areas such as under the chin, stomach, and slots between dorsal plates using darker tones of the base color. Conversely, highlights are added using lighter tones of the base color. It's crucial to maintain the same direction of light source established in the sketching stage across the coloring phase. Layering colors in shadows and highlights facilitates a more realistic and professional look to the Godzilla drawing.