How To Make A Bow Out Of Wrapping Paper
Here is the introduction paragraph: Making a bow out of wrapping paper is a fun and creative way to add a personal touch to gifts, decorations, and other items. With a few simple materials and some basic techniques, you can create beautiful and unique bows that will impress friends and family. In this article, we will explore the process of making a bow out of wrapping paper, from gathering the necessary materials and tools to constructing the bow and adding embellishments. We will start by discussing the materials and tools needed to get started, including the type of wrapping paper to use, the right scissors and glue, and other essential supplies. By following these steps and techniques, you will be able to create stunning bows that will elevate your gifts and decorations to the next level. So, let's get started by taking a look at the materials and tools needed to make a beautiful bow out of wrapping paper.
Materials and Tools Needed
Here is the introduction paragraph: When it comes to gift wrapping, having the right materials and tools can make all the difference in creating a beautifully presented and professional-looking gift. In this article, we will explore the essential materials and tools needed to achieve a polished and elegant finish. From selecting the perfect wrapping paper to mastering cutting techniques and choosing the right adhesives, we will cover it all. To start, let's dive into the first crucial step: selecting the right wrapping paper. Here is the 200 words supporting paragraph: When it comes to gift wrapping, the type of wrapping paper used can greatly impact the overall appearance of the gift. With so many options available, it can be overwhelming to choose the right one. However, by considering a few key factors, you can narrow down your options and select a wrapping paper that complements the occasion and the gift itself. First, consider the occasion and the recipient's personal style. For example, a bright and bold paper may be suitable for a birthday or holiday gift, while a more subdued and elegant paper may be better suited for a wedding or anniversary gift. Additionally, consider the color and texture of the gift itself, as well as any embellishments or ribbons that will be added. By taking these factors into account, you can choose a wrapping paper that not only looks great but also enhances the overall presentation of the gift. With the right wrapping paper in hand, you can move on to the next step: cutting it to the perfect size using the right scissors and techniques.
Wrapping Paper Selection
When it comes to selecting the perfect wrapping paper for your bow-making project, there are several factors to consider. First and foremost, choose a paper that complements the occasion and the gift itself. For example, a bright and playful design may be suitable for a child's birthday present, while a more elegant and sophisticated pattern may be better suited for a wedding or anniversary gift. Next, consider the texture and weight of the paper. A heavier, more textured paper will hold its shape better and create a more defined bow, while a lighter, smoother paper may be more prone to wrinkles and creases. Additionally, think about the color palette and how it will coordinate with the ribbon or embellishments you plan to use. A paper with a bold, contrasting color will create a striking visual effect, while a more muted, monochromatic design will produce a softer, more subtle look. Finally, consider the size of the paper and how it will wrap around your gift. A larger sheet of paper will provide more flexibility and allow for a more dramatic bow, while a smaller sheet may be better suited for a smaller gift or a more delicate design. By carefully considering these factors, you can select the perfect wrapping paper to create a beautiful, eye-catching bow that adds a special touch to your gift.
Scissors and Cutting Techniques
Here is the paragraphy: Scissors are a fundamental tool in crafting, and mastering various cutting techniques is essential for achieving professional-looking results. When it comes to cutting wrapping paper, it's crucial to use sharp scissors to prevent tearing or ripping the paper. Dull scissors can cause the paper to fray, leading to an uneven edge and a less polished finish. To ensure clean cuts, use scissors with a sharp blade and a comfortable grip, allowing for precise control and smooth cutting motions. For intricate cuts or curved lines, consider using scissors with a pointed tip or a pair of detail scissors. When cutting, always cut in a smooth, continuous motion, applying gentle pressure and following the desired pattern or shape. To achieve a crisp, straight edge, use a ruler or other straightedge as a guide, and for curved cuts, use a template or a stencil to help maintain the desired shape. By mastering various cutting techniques and using the right scissors for the job, you can create beautiful, professional-looking bows and other paper crafts with ease.
Adhesives and Fastening Options
Adhesives and fastening options play a crucial role in crafting a beautiful bow out of wrapping paper. When it comes to choosing the right adhesive, there are several options available, each with its own unique characteristics and advantages. Double-sided tape is a popular choice for its ease of use and minimal mess, while hot glue guns provide a strong and durable bond. White glue, also known as PVA glue, is another option that dries clear and is suitable for delicate papers. For a more temporary hold, adhesive dots or spray adhesive can be used. In addition to adhesives, fastening options such as staples, pins, or clips can be used to secure the bow in place. It's essential to choose the right adhesive and fastening option to ensure a professional-looking finish and to prevent the bow from coming undone. By selecting the appropriate adhesive and fastening method, crafters can create a stunning bow that adds a touch of elegance to any gift.
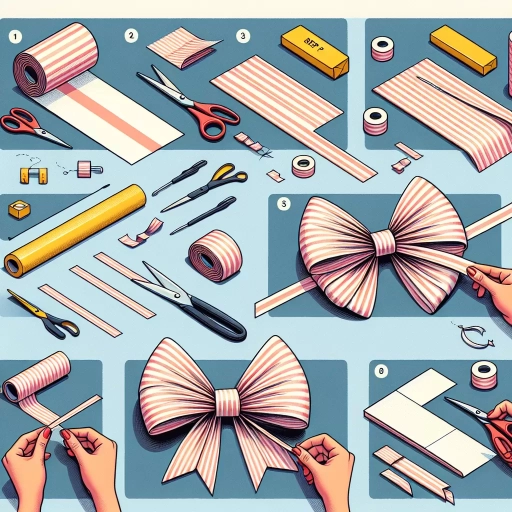
Basic Bow Construction Techniques
When it comes to creating beautiful and elegant bows, there are several basic construction techniques that can help you achieve professional-looking results. One of the key elements of bow construction is folding and creasing the paper, which provides the foundation for the entire bow. Additionally, creating the bow center is crucial in determining the overall shape and appearance of the bow. Finally, shaping and fluffing the bow is what brings the entire creation to life, adding volume and texture to the finished product. By mastering these three essential techniques, you can create stunning bows that add a touch of elegance to any gift, decoration, or accessory. In this article, we will explore each of these techniques in detail, starting with the first step: folding and creasing the paper.
Folding and Creasing the Paper
Folding and creasing the paper is a crucial step in creating a beautiful and sturdy bow. To start, take your wrapping paper and fold it in half lengthwise, creating a crease in the middle. This will help you find the center of the paper and create a symmetrical bow. Next, open the paper back up and fold the top right and left corners down so that they meet at the middle crease. This will create a 45-degree angle and help you achieve a neat and tidy bow. Then, fold the bottom right and left corners up so that they meet at the middle crease, making sure to align them with the top corners. This will create a compact and even base for your bow. Finally, take the top and bottom edges of the paper and fold them in towards the middle crease, making sure to create a crisp and sharp crease. This will help your bow hold its shape and give it a polished finish. By following these simple folding and creasing steps, you'll be well on your way to creating a stunning bow that will add a touch of elegance to any gift.
Creating the Bow Center
Here is the paragraphy: Creating the bow center is a crucial step in basic bow construction techniques. To start, you will need a small piece of wrapping paper, approximately 1-2 inches wide and 2-3 inches long. This piece will serve as the foundation of your bow, providing the necessary structure and support for the loops and tails. Begin by folding the paper in half lengthwise, creating a crease in the middle. This crease will help you find the center of the paper and ensure that your bow is symmetrical. Next, fold the paper in half again, this time widthwise, creating another crease that runs perpendicular to the first one. This second crease will help you create the bow's center knot. To create the knot, take the top layer of the paper and fold it back, creating a small triangle shape. Take the bottom layer of the paper and fold it up, creating another small triangle shape that meets the first one in the middle. You should now have a small, compact knot in the center of the paper. This knot will serve as the foundation of your bow, providing the necessary tension and structure for the loops and tails. By following these simple steps, you can create a sturdy and symmetrical bow center that will provide a solid base for your wrapping paper bow.
Shaping and Fluffing the Bow
Here is the paragraphy: Shaping and fluffing the bow is a crucial step in creating a beautiful and professional-looking bow. To shape the bow, start by holding the center of the bow with one hand and using the other hand to gently pull out the loops, working your way around the bow. This will help to create a symmetrical shape and prevent the loops from becoming tangled. As you pull out the loops, use your fingers to fluff out the edges of the bow, creating a soft and rounded shape. Be careful not to pull too hard, as this can cause the loops to become misshapen or the bow to become lopsided. Once you have achieved the desired shape, use a small amount of pressure to hold the bow in place, allowing the loops to relax and settle into their new shape. To add a finishing touch, use a pair of scissors to trim any stray edges or uneven loops, creating a clean and polished look. With a little practice, shaping and fluffing the bow becomes second nature, and you'll be creating beautiful bows in no time.
Adding Embellishments and Finishing Touches
Adding embellishments and finishing touches to a gift, craft, or decorative item can elevate its appearance and make it truly special. There are several ways to add embellishments, including using ribbon and twine, adding decorative elements, and securing the bow to a gift or surface. By incorporating these techniques, you can add a personal touch and create a unique and eye-catching piece. In this article, we will explore these methods in more detail, starting with the use of ribbon and twine embellishments, which can add a beautiful and delicate touch to any project.
Ribbon and Twine Embellishments
Here is the paragraphy: Ribbon and twine embellishments can add a beautiful, eye-catching touch to your gift wrapping. Ribbons come in a wide range of colors, patterns, and textures, making it easy to find the perfect match for your wrapping paper. You can use a single ribbon or layer multiple ribbons to create a unique and personalized look. Twine, on the other hand, adds a rustic and earthy feel to your gift. You can use twine to create a simple bow or wrap it around the gift multiple times for a more textured look. Both ribbons and twine can be used to add a pop of color and create a beautiful contrast with the wrapping paper. To add a ribbon or twine embellishment, simply tie a bow or wrap it around the gift, securing it with a small dot of glue or a pin. You can also use ribbons and twine to create more intricate designs, such as a rosette or a garland, to add an extra special touch to your gift. With a little creativity, ribbons and twine can elevate your gift wrapping from ordinary to extraordinary.
Adding Decorative Elements
Adding decorative elements to your wrapping paper bow can elevate its appearance and make it more visually appealing. One way to add decorative elements is by using ribbons or garlands. You can tie a ribbon around the center of the bow or use a garland to create a more elaborate design. Another option is to add embellishments such as bows, flowers, or other decorative items. You can also use stickers, stamps, or other craft supplies to add patterns and designs to your bow. Additionally, you can use natural elements such as leaves, twigs, or flowers to create a more rustic and earthy look. When adding decorative elements, it's essential to balance them with the rest of the bow's design to avoid overwhelming the overall appearance. By carefully selecting and placing decorative elements, you can create a unique and eye-catching bow that adds a personal touch to your gift.
Securing the Bow to a Gift or Surface
Securing the bow to a gift or surface is a crucial step in adding a professional finish to your beautifully crafted bow. To do this, you'll need a few simple tools and materials, including a hot glue gun, floral tape, or a strong adhesive such as double-sided tape or a glue stick. Begin by applying a small amount of glue or adhesive to the center of the bow, taking care not to apply too much, as this can create a mess. Next, attach the bow to the gift or surface, holding it firmly in place for a few seconds to ensure it adheres properly. If using floral tape, wrap the tape around the stem of the bow and the gift or surface, securing it tightly. For a more permanent hold, you can also use a hot glue gun to attach the bow to the gift or surface. Alternatively, you can use a strong adhesive such as double-sided tape or a glue stick to attach the bow to a flat surface. Regardless of the method you choose, make sure the bow is securely attached and evenly positioned to create a beautiful and polished finish.