How To Make A Slip Knot Crochet
Here is the introduction paragraph: The slip knot crochet is a fundamental technique in the world of crochet, allowing crafters to create a wide range of projects, from simple scarves to complex blankets. To master the slip knot crochet, it's essential to understand the basics of this technique, including the tools and materials needed, the different types of slip knots, and the basic stitches involved. In this article, we will provide a step-by-step guide on how to make a slip knot in crochet, covering the essential steps and tips to help you get started. Additionally, we will also discuss common issues that may arise when working with slip knot crochet and provide troubleshooting solutions to help you overcome them. By the end of this article, you will have a solid understanding of the slip knot crochet and be able to create beautiful projects with confidence. Let's start by understanding the basics of slip knot crochet.
Understanding the Basics of Slip Knot Crochet
Slip knot crochet is a fundamental technique that every beginner should master. To understand the basics of slip knot crochet, it's essential to start with the fundamentals. In this article, we will explore what a slip knot is in crochet, why it's essential, and the basic tools and materials needed to get started. By understanding these basics, you'll be able to create a wide range of projects, from simple scarves to complex blankets. So, let's dive in and start with the basics - what is a slip knot in crochet?
What is a Slip Knot in Crochet?
A slip knot in crochet is a fundamental technique used to create a loop on the hook, which serves as the foundation for starting a project. It is a temporary knot that is easily removable, allowing the crocheter to adjust the tension of the stitch as needed. To create a slip knot, the yarn is folded in half and the folded end is inserted into the hook, then the hook is pulled through the loop, creating a small knot. The slip knot is then pulled tight to secure it on the hook, but not so tight that it becomes difficult to remove. The slip knot is an essential skill for crocheters to master, as it is used to start most crochet projects, including scarves, hats, and blankets. By understanding how to create a slip knot, crocheters can ensure a secure and even foundation for their project, which is crucial for achieving the desired texture and drape. Additionally, the slip knot can be used to join two pieces of crocheted fabric together, making it a versatile technique that is useful in a variety of crochet applications.
Why is a Slip Knot Essential in Crochet?
A slip knot is a fundamental element in crochet, and its importance cannot be overstated. It is the foundation of every crochet project, and its proper execution is crucial for a successful outcome. A slip knot is essential in crochet because it allows the yarn to be securely attached to the hook, preventing it from coming loose while working on a project. This ensures that the stitches are even, consistent, and that the fabric of the project lies flat. Without a slip knot, the yarn can easily slip off the hook, causing the project to unravel or become misshapen. Furthermore, a slip knot provides a neat and tidy starting point for a project, making it easier to work with and allowing for a more professional finish. In addition, a slip knot is also essential for joining two pieces of crocheted fabric together, as it provides a secure and invisible join. Overall, a slip knot is a crucial component of crochet, and mastering its creation is essential for any crocheter looking to produce high-quality projects.
Basic Tools and Materials Needed for Slip Knot Crochet
To get started with slip knot crochet, you'll need some basic tools and materials. The essential tools include a crochet hook, which comes in various sizes and materials such as aluminum, steel, or wood. Choose a hook that feels comfortable in your hand and suits the type of yarn you're using. You'll also need a pair of scissors to cut the yarn as needed, a tapestry needle to weave in ends, and a stitch marker to keep track of your place in a pattern. As for materials, you'll need a ball of yarn that suits the project you want to make. Acrylic, cotton, and blends are popular choices for beginners. Make sure to choose a yarn with a smooth texture and a color that you like. Additionally, you may want to use a stitch dictionary or a pattern to guide you through your project. It's also a good idea to have a measuring tape or a ruler to measure your work as you go along. With these basic tools and materials, you'll be well on your way to creating beautiful slip knot crochet projects.
Step-by-Step Guide to Making a Slip Knot in Crochet
Here is the introduction paragraph: Mastering the slip knot is a fundamental skill for any crochet enthusiast, as it provides a secure and comfortable starting point for your projects. A well-made slip knot can make all the difference in the quality of your finished product, ensuring that your stitches are even and your tension is consistent. In this article, we will guide you through the step-by-step process of making a slip knot in crochet, covering the essential techniques of creating a slip knot with a hook, securing it in place, and adjusting it for a comfortable fit. By following these simple steps, you'll be able to create a reliable and adjustable slip knot that will elevate your crochet game. So, let's get started by learning how to create a slip knot with a hook.
Creating a Slip Knot with a Hook
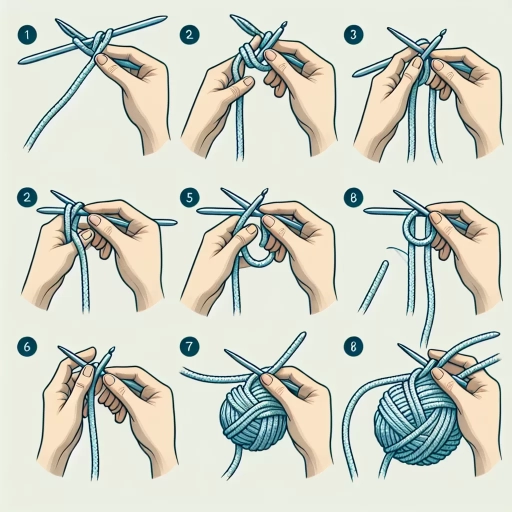
To create a slip knot with a hook, start by holding the yarn in your non-dominant hand, making a loop with the end of the yarn closest to your body. Insert the crochet hook into the loop, making sure the hook is fully seated within the loop. Next, take the yarn and wrap it around the hook, moving it from the front of the work to the back. This will create a small loop on the hook. Now, take the yarn and pass it through the loop on the hook. You should see the slip knot start to form. Gently pull the yarn to tighten the knot, making sure it's snug against the hook. Finally, pull the yarn tail to secure the knot in place. With the slip knot created, you can now begin your crochet project, using the hook to draw up loops and create the desired pattern. By following these simple steps, you can create a secure and reliable slip knot with a hook, setting the foundation for a beautiful and professional-looking crochet piece.
Securing the Slip Knot on the Hook
Securing the slip knot on the hook is a crucial step in ensuring that your crochet project starts off on the right foot. To do this, you'll want to gently pull the yarn tail to tighten the knot around the hook. Make sure not to pull too hard, as this can cause the knot to become too tight and potentially damage the hook or the yarn. Instead, aim for a snug fit that allows the yarn to move freely around the hook. Once you've achieved the right tension, use your non-dominant hand to hold the yarn tail in place while you use your dominant hand to begin crocheting. This will help prevent the knot from coming undone as you work. It's also a good idea to give the yarn a gentle tug every now and then to ensure that the knot remains secure. By taking the time to properly secure the slip knot on the hook, you'll be able to focus on the rest of your project with confidence, knowing that your foundation is strong and secure.
Adjusting the Slip Knot for a Comfortable Fit
Adjusting the slip knot for a comfortable fit is a crucial step in ensuring that your crochet project lies flat and even. To adjust the slip knot, start by gently tugging on the yarn tail to tighten or loosen the knot as needed. If the knot is too tight, it can cause the fabric to pucker, while a knot that is too loose can result in a sloppy, uneven edge. To achieve the perfect fit, try to adjust the knot so that it is snug but not constricting. You can also use a tapestry needle to gently tease out any excess yarn or tighten the knot further. It's also important to note that the type of yarn and hook you are using can affect the size of the slip knot, so be sure to adjust accordingly. For example, if you are using a bulky yarn, you may need to make a slightly larger slip knot to accommodate the thicker yarn. By taking the time to adjust the slip knot, you can ensure that your crochet project is comfortable, even, and professional-looking.
Troubleshooting Common Issues with Slip Knot Crochet
When working with slip knot crochet, it's not uncommon to encounter issues that can be frustrating and disrupt the flow of your project. One of the most common problems is a slip knot that is too tight, which can cause puckering or distortion in the fabric. On the other hand, a slip knot that is too loose can lead to a sloppy or uneven edge. Additionally, preventing slip knots from coming undone is crucial to maintaining the integrity of your work. In this article, we will explore these common issues and provide practical solutions to help you troubleshoot and overcome them. First, we will discuss how to resolve a slip knot that is too tight, a common problem that can be easily fixed with a few simple adjustments.
Resolving a Slip Knot that is Too Tight
When a slip knot becomes too tight, it can be challenging to work with, and if not resolved, it may lead to a distorted or uneven fabric. To resolve a slip knot that is too tight, start by gently tugging on the working yarn to loosen the knot. If this doesn't work, try inserting a crochet hook into the stitch directly below the knot and gently prying it open. Be careful not to pull too hard, as this can cause the knot to tighten further. If the knot is still too tight, you can try soaking the knot in warm water for a few minutes to help relax the fibers. Once the knot has loosened, use a yarn needle to gently tease out any remaining tangles or twists. If the knot is still too tight after trying these methods, it may be necessary to cut the yarn and start again. To prevent slip knots from becoming too tight in the future, make sure to keep a consistent tension while crocheting and avoid pulling the yarn too tightly. Regularly checking your work and adjusting the tension as needed can also help prevent slip knots from becoming too tight. By following these steps, you can resolve a slip knot that is too tight and continue crocheting with ease.
Fixing a Slip Knot that is Too Loose
When fixing a slip knot that is too loose, the first step is to identify the source of the looseness. If the knot is too loose due to an incorrect initial loop, gently pull on the yarn tail to tighten the loop. If the knot is too loose due to an incorrect wrap, carefully unwrap the yarn and rewrap it around the hook, making sure to maintain the correct tension. If the knot is still too loose after adjusting the loop or wrap, try gently tugging on the working yarn to tighten the knot. It's essential to be cautious not to pull too hard, as this can cause the knot to become too tight and potentially lead to a misshapen stitch. If the knot remains too loose, it may be necessary to start over with a new slip knot, ensuring to maintain the correct tension throughout the process. By carefully adjusting the loop, wrap, and tension, you can fix a slip knot that is too loose and achieve a secure and even foundation for your crochet project.
Preventing Slip Knots from Coming Undone
When working with slip knots in crochet, one of the most common issues that can arise is the knot coming undone. This can be frustrating, especially if you've spent a significant amount of time working on a project. To prevent slip knots from coming undone, there are a few key strategies you can employ. First, make sure to pull the yarn tail gently but firmly to secure the knot. This will help to tighten the knot and prevent it from coming loose. Additionally, you can try using a yarn needle to weave the yarn tail through the stitches on the wrong side of the work. This will help to anchor the knot in place and prevent it from coming undone. Another approach is to use a small stitch marker or a piece of scrap yarn to mark the spot where the knot is located. This will help you to keep track of the knot and prevent it from getting lost or coming undone. Finally, it's a good idea to work with a consistent tension when crocheting, as uneven tension can cause the knot to come loose. By following these tips, you can help to prevent slip knots from coming undone and ensure that your crochet project turns out smooth and even.