How To Grow Sprouts
Embarking on the journey of growing sprouts is an exciting and rewarding endeavor that can transform your culinary experiences and boost your health. These tiny, nutrient-packed powerhouses are not only delicious but also incredibly easy to cultivate in the comfort of your own home. In this comprehensive guide, we'll explore the art of sprouting, from selecting the right seeds to mastering advanced techniques for maximum flavor and nutrition. We'll begin by diving into the essential supplies and seed selection process, ensuring you have the perfect foundation for successful sprouting. Next, we'll walk you through a step-by-step guide to the sprouting process, demystifying each stage from soaking to harvesting. For those looking to take their sprouting game to the next level, we'll delve into advanced techniques that will help you maximize the nutritional content and flavor profile of your homegrown sprouts. Whether you're a health enthusiast, a culinary adventurer, or simply curious about this ancient practice, this article will equip you with all the knowledge you need to become a sprouting expert. So, let's begin our sprouting journey by exploring the essential supplies and seed selection process that will set you up for success.
Getting Started: Essential Supplies and Seed Selection
Embarking on the journey of sprouting your own seeds is an exciting and rewarding endeavor that can provide you with fresh, nutritious greens all year round. Whether you're a seasoned gardener or a curious beginner, understanding the essential supplies and selecting the right seeds are crucial first steps in your sprouting adventure. This comprehensive guide will walk you through the fundamental aspects of getting started, focusing on three key areas: choosing the right containers for sprouting, selecting high-quality seeds for optimal results, and gathering the necessary tools and materials. By mastering these elements, you'll be well-equipped to cultivate a thriving sprout garden in your own home. From compact jar systems to larger trays, we'll explore various container options to suit your space and needs. We'll also delve into the importance of seed selection, discussing factors such as germination rates, flavor profiles, and nutritional benefits. Additionally, we'll cover the essential tools and materials you'll need to ensure successful sprouting. With this knowledge in hand, you'll be ready to dive into the world of "Getting Started: Essential Supplies and Seed Selection" and begin your sprouting journey with confidence.
Choosing the right containers for sprouting
When embarking on your sprouting journey, selecting the right containers is crucial for success. The ideal sprouting vessel should provide adequate drainage, airflow, and space for your seeds to thrive. While specialized sprouting trays are available, many household items can serve as excellent alternatives, allowing you to start sprouting with minimal investment. Mason jars are a popular and versatile option for beginners. Their wide mouths make them easy to clean and fill, while their glass construction allows you to monitor your sprouts' progress. To use a mason jar for sprouting, simply cover the opening with a piece of cheesecloth or a sprouting lid, which provides the necessary drainage and air circulation. Alternatively, you can repurpose plastic containers by puncturing small holes in the lid for ventilation and drainage. For those seeking a more customized approach, sprouting bags made from natural, breathable materials like hemp or cotton offer an eco-friendly solution. These bags allow for excellent air circulation and are ideal for larger seeds or grains. They're also easy to rinse and hang, making the sprouting process even more convenient. If you're planning to grow microgreens or larger quantities of sprouts, consider investing in stackable sprouting trays. These trays are designed with built-in drainage systems and can be stacked vertically, maximizing your sprouting capacity while minimizing counter space. Some models even come with adjustable vents, allowing you to control humidity levels for optimal growth. For those who prefer a more hands-off approach, automatic sprouters are available. These devices regulate water flow and drainage, ensuring consistent moisture levels throughout the sprouting process. While more expensive, they can be a worthwhile investment for enthusiasts who sprout regularly. When choosing your sprouting container, consider the types of seeds you plan to grow. Smaller seeds like alfalfa or broccoli work well in jars or bags, while larger seeds such as mung beans or lentils may benefit from the extra space provided by trays. Additionally, think about the quantity of sprouts you want to produce and how frequently you'll be sprouting, as this will influence the size and number of containers you'll need. Regardless of the container you choose, ensure it's made from food-grade materials and is easy to clean and sanitize between uses. Proper hygiene is essential in preventing mold growth and contamination, so opt for containers that can be thoroughly washed and dried after each sprouting cycle. By carefully considering your sprouting goals and exploring the various container options available, you'll be well-equipped to create the perfect environment for your sprouts to flourish. Remember, the best container is one that fits your lifestyle, space constraints, and sprouting ambitions, allowing you to enjoy fresh, nutritious sprouts with minimal effort.
Selecting high-quality seeds for optimal results
Selecting high-quality seeds is a crucial step in the process of growing sprouts, as it directly impacts the success of your sprouting endeavors and the nutritional value of the final product. When choosing seeds for sprouting, it's essential to prioritize quality, freshness, and suitability for consumption. Look for seeds that are specifically labeled as "sprouting seeds" or "seeds for sprouting," as these are typically untreated and free from harmful chemicals or additives that could compromise your health. Opt for organic seeds whenever possible, as they are grown without the use of synthetic pesticides or fertilizers, ensuring a cleaner and more natural sprouting process. Organic seeds also tend to have higher germination rates and produce more flavorful sprouts. When purchasing seeds, always check the packaging for important information such as the harvest date, germination rate, and any certifications that validate the seeds' quality and safety. Consider the variety of seeds available for sprouting, as different types offer unique flavors, textures, and nutritional profiles. Popular choices include alfalfa, broccoli, radish, mung beans, and lentils. Each variety has its own sprouting time and specific requirements, so it's worth experimenting with different types to find your favorites. Some seeds, like alfalfa and broccoli, are known for their mild flavor and tender texture, making them versatile additions to salads and sandwiches. Others, such as radish sprouts, offer a spicier kick that can add zest to your dishes. When selecting seeds, pay attention to their appearance and aroma. High-quality seeds should be uniform in size and color, with no signs of damage, mold, or discoloration. They should also have a fresh, clean scent without any musty or off-putting odors. Avoid seeds that appear shriveled, cracked, or have a dull appearance, as these may have reduced viability and could result in poor sprouting performance. It's also important to consider the source of your seeds. Purchase from reputable suppliers who specialize in sprouting seeds or have a track record of providing high-quality products for home gardeners. These suppliers often have stringent quality control measures in place and can provide valuable information about the seeds' origin, growing conditions, and any specific sprouting instructions. Lastly, don't overlook the importance of proper storage for your sprouting seeds. Once you've acquired high-quality seeds, store them in a cool, dry place away from direct sunlight and moisture. Airtight containers or resealable bags are ideal for maintaining seed freshness and preventing contamination. Properly stored seeds can retain their viability for several months to a year, depending on the variety. By carefully selecting high-quality seeds and following proper storage practices, you'll set a strong foundation for successful sprouting and ensure that your homegrown sprouts are not only delicious but also packed with essential nutrients and free from potential contaminants.
Gathering necessary tools and materials
When embarking on your sprout-growing journey, gathering the necessary tools and materials is a crucial first step that sets the foundation for success. The beauty of growing sprouts lies in its simplicity, requiring only a few basic items that are likely already in your kitchen or easily obtainable. To begin, you'll need a suitable container for sprouting. While specialized sprouting jars are available, a simple wide-mouth mason jar works perfectly well. These jars allow for easy rinsing and draining, which are essential parts of the sprouting process. To complement your jar, you'll need a piece of breathable material to cover the mouth, such as cheesecloth, a fine mesh screen, or even a clean piece of pantyhose. This covering allows air circulation while keeping the seeds contained during rinsing and draining. A crucial element in your sprouting toolkit is a stand or rack to hold your jar at an angle. This positioning ensures proper drainage, preventing excess moisture that could lead to mold or bacterial growth. If you're feeling crafty, you can easily create a DIY stand using a dish drying rack or by repurposing a small cooling rack. For those who prefer a ready-made solution, purpose-built sprouting stands are widely available. In addition to these basic items, consider having a few extras on hand to make your sprouting experience more convenient. A small strainer can be helpful for rinsing smaller seeds, while a spray bottle allows for gentle misting of your sprouts. If you plan to grow various types of sprouts, labeling supplies such as markers and tape will help you keep track of different varieties and their sprouting stages. Cleanliness is paramount in sprout cultivation, so stock up on mild, unscented dish soap for cleaning your equipment. Some growers also opt for food-grade hydrogen peroxide or apple cider vinegar as natural disinfectants. A clean dish towel or paper towels are essential for drying your sprouts before storage or consumption. Lastly, don't forget about storage solutions for your harvested sprouts. Airtight containers or resealable bags are perfect for keeping your sprouts fresh in the refrigerator. By assembling these tools and materials, you're setting yourself up for a smooth and enjoyable sprouting experience. With your sprouting arsenal prepared, you'll be ready to dive into the exciting world of homegrown sprouts, nurturing these nutritional powerhouses from seed to plate with ease and confidence.
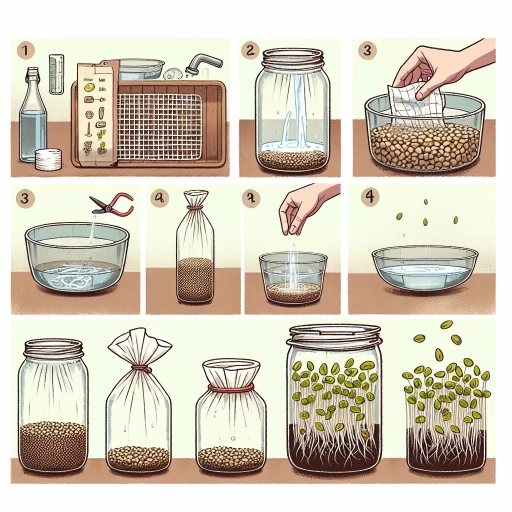
The Sprouting Process: Step-by-Step Guide
Embarking on the journey of sprouting your own seeds is an exciting and rewarding endeavor that brings fresh, nutrient-dense food right to your kitchen. This ancient practice has gained renewed popularity in recent years, as health-conscious individuals seek to incorporate more living foods into their diets. The sprouting process is a fascinating transformation that turns dormant seeds into vibrant, life-filled greens bursting with vitamins, minerals, and enzymes. In this comprehensive guide, we'll walk you through the step-by-step process of sprouting, covering everything from the initial soaking and rinsing techniques for various seed types to maintaining optimal moisture and drainage during growth. We'll also explore the crucial final steps of harvesting and storing your homegrown sprouts to ensure maximum freshness and longevity. Whether you're a seasoned sprouter or a curious beginner, this article will provide valuable insights to help you master the art of sprouting and enjoy the myriad health benefits of these tiny powerhouses. Before we dive into the specifics of the sprouting process, let's start by exploring the essential supplies you'll need and how to select the best seeds for your sprouting adventure.
Soaking and rinsing techniques for different seed types
Soaking and rinsing techniques play a crucial role in the sprouting process, as they help activate seeds and ensure optimal growth conditions. Different seed types require specific approaches to achieve the best results. Understanding these techniques is essential for successful sprouting and maximizing nutritional benefits. For small seeds like alfalfa, broccoli, and radish, a shorter soaking time of 4-6 hours is typically sufficient. These seeds absorb water quickly and can become waterlogged if soaked for too long. After the initial soak, drain the seeds thoroughly and rinse them 2-3 times daily with cool water. This frequent rinsing helps prevent mold growth and keeps the seeds moist without oversaturating them. Medium-sized seeds such as lentils, mung beans, and chickpeas benefit from a longer soaking period of 8-12 hours. This extended soak helps soften the seed coat and jumpstart the germination process. After soaking, rinse these seeds 3-4 times daily, ensuring that excess water is drained away to prevent bacterial growth. Some sprouters prefer to use a jar with a mesh lid for easy rinsing and draining. Larger seeds like pumpkin, sunflower, and almonds require the longest soaking time, typically 12-24 hours. These seeds have thicker outer shells and need more time to absorb water and begin the sprouting process. After the initial soak, rinse these seeds 2-3 times daily, being careful not to damage the delicate sprouts as they emerge. For mucilaginous seeds like chia, flax, and basil, traditional soaking methods are not recommended as they form a gel-like substance when exposed to water. Instead, these seeds are best sprouted using the "clay method" or by spreading them thinly on a damp paper towel or terra cotta plate. When rinsing seeds, always use clean, cool water to avoid introducing contaminants or shocking the sprouts with extreme temperatures. Some sprouters prefer to use filtered or spring water to ensure the best quality. It's also important to be gentle when rinsing to avoid damaging the delicate sprouts, especially as they begin to grow. For all seed types, proper drainage is crucial after rinsing. Seeds left sitting in standing water are prone to mold and bacterial growth, which can ruin the entire batch. Tilt your sprouting container at an angle or use a specialized sprouting tray to ensure excess water drains away completely. By tailoring your soaking and rinsing techniques to the specific needs of each seed type, you create an optimal environment for healthy sprout growth. This attention to detail not only improves the success rate of your sprouting endeavors but also enhances the nutritional value and flavor of the final product. As you gain experience, you'll develop a keen sense for the perfect balance of moisture and drainage that each seed variety requires, leading to consistently successful and delicious sprouts.
Maintaining proper moisture and drainage during growth
Maintaining proper moisture and drainage during growth is a critical aspect of the sprouting process that can significantly impact the quality and safety of your sprouts. Striking the right balance between providing enough water for germination and growth while preventing waterlogging is essential for successful sprouting. Excess moisture can lead to mold growth and bacterial proliferation, while insufficient water can result in stunted or failed sprouts. To achieve optimal moisture levels, it's crucial to rinse your sprouts thoroughly two to three times daily. This process not only provides the necessary hydration but also helps remove any potential contaminants and metabolic waste products. When rinsing, use clean, cool water and ensure that all sprouts are evenly moistened. After each rinse, it's vital to drain the sprouts thoroughly to prevent water accumulation, which can create an environment conducive to harmful microorganism growth. The choice of sprouting container plays a significant role in maintaining proper drainage. Many commercially available sprouting jars come equipped with mesh lids or screens that allow for easy rinsing and draining. If you're using a homemade setup, ensure that your container has adequate drainage holes or a fine mesh cover to facilitate water flow while keeping the seeds in place. After rinsing, invert the container at a slight angle to allow any excess water to drain away completely. Proper air circulation is another crucial factor in moisture management. Avoid sealing your sprouts in airtight containers, as this can trap moisture and heat, creating an ideal environment for mold and bacteria. Instead, use breathable covers or leave the container slightly open to promote air flow. This helps in evaporating excess moisture and maintaining a healthy growing environment. The ambient temperature and humidity of your sprouting area can also affect moisture levels. Ideally, sprouts should be grown in a cool, dry location away from direct sunlight. If you live in a particularly humid climate, you may need to rinse and drain your sprouts more frequently or use a small fan to improve air circulation around the sprouting container. As your sprouts grow, you may notice that their water requirements change. Newly germinated seeds typically require more frequent rinsing, while more mature sprouts may need less. Pay attention to the appearance and feel of your sprouts; they should be consistently moist but not sitting in standing water. If you notice any signs of mold, off-odors, or slimy texture, discard the batch immediately and start over with fresh seeds and a thoroughly cleaned container. By carefully managing moisture and drainage throughout the sprouting process, you can ensure healthy, vibrant sprouts that are safe to eat and packed with nutrients. This attention to detail will reward you with crisp, flavorful sprouts that enhance both the nutritional value and taste of your meals.
Harvesting and storing your homegrown sprouts
Harvesting and storing your homegrown sprouts is the final and most rewarding step in the sprouting process. After nurturing your sprouts through germination and growth, it's time to reap the benefits of your efforts. The key to successful harvesting is timing – you want to catch your sprouts at their peak of flavor and nutritional value. Most sprouts are ready to harvest within 2-7 days, depending on the variety. Look for sprouts that have developed their first set of true leaves and are about 1-2 inches long. Avoid letting them grow too large, as they can become bitter and lose their tender texture. To harvest, gently remove the sprouts from their growing container, being careful not to damage the delicate shoots. If you've been growing them in a jar or tray, you can simply tip them out onto a clean surface. For those using soil-based methods, carefully pull the sprouts up by their stems, shaking off any excess soil. Rinse the sprouts thoroughly under cool running water to remove any remaining seed hulls or debris. This also helps to crisp up the sprouts and remove any potential bacteria. After rinsing, it's crucial to dry your sprouts thoroughly. Excess moisture can lead to rapid spoilage and potentially harmful bacterial growth. Use a salad spinner to remove most of the water, then spread the sprouts on a clean kitchen towel or paper towels. Gently pat them dry or allow them to air dry for about an hour. Once dry, your sprouts are ready for immediate consumption or storage. For storage, place the sprouts in a clean, dry container lined with paper towels. Avoid sealing the container completely, as sprouts need some air circulation to stay fresh. A perforated plastic bag or a container with a loosely fitted lid works well. Store your sprouts in the refrigerator, where they can last for up to a week, though they're best consumed within 3-5 days for optimal freshness and nutritional value. It's important to inspect your sprouts regularly during storage. Remove any that show signs of wilting, discoloration, or unpleasant odors. If you notice any mold growth, it's best to discard the entire batch to avoid potential health risks. To maintain freshness, you can rinse and dry the sprouts every couple of days, replacing the paper towels in the storage container. Remember, homegrown sprouts are living foods that continue to grow and change even after harvesting. Their flavor and texture may evolve slightly during storage, so it's best to enjoy them as fresh as possible. By following these harvesting and storage guidelines, you can ensure that your homegrown sprouts remain crisp, flavorful, and nutritious, ready to add a healthy crunch to your meals whenever you desire.
Advanced Sprouting: Maximizing Nutrition and Flavor
Advanced sprouting is a fascinating and rewarding practice that allows you to cultivate nutrient-dense, flavorful sprouts right in your own kitchen. By mastering this technique, you can elevate your culinary creations and boost your health with minimal effort and resources. This article delves into the intricacies of advanced sprouting, exploring methods to maximize both nutrition and flavor in your homegrown sprouts. We'll examine three key aspects of this process: experimenting with various seed combinations to create unique flavor profiles and nutritional synergies, enhancing sprout nutrition through optimized growing conditions, and troubleshooting common sprouting problems to ensure consistent success. Whether you're a seasoned sprouter looking to refine your skills or a curious beginner eager to explore this nourishing practice, you'll find valuable insights and practical tips to take your sprouting game to the next level. By understanding these advanced techniques, you'll be able to cultivate a diverse array of sprouts that not only tantalize your taste buds but also provide a powerhouse of essential nutrients. Before we dive into these advanced strategies, let's start with the basics by exploring the essential supplies and seed selection process that form the foundation of successful sprouting.
Experimenting with various seed combinations
Experimenting with various seed combinations is an exciting way to elevate your sprouting game and create unique, flavorful, and nutritionally diverse blends. While single-seed sprouts are delicious on their own, combining different seeds can result in a symphony of tastes, textures, and health benefits. This practice allows you to tailor your sprouts to your personal preferences and nutritional needs, making each batch a custom creation. When selecting seeds for combination sprouting, consider factors such as germination time, flavor profiles, and nutritional content. For instance, pairing fast-sprouting seeds like alfalfa or radish with slower-sprouting varieties like mung beans or lentils can create an interesting mix of textures and ensure a more even growth rate. Flavor-wise, you might combine mild-tasting seeds like alfalfa or clover with more pungent options such as radish or mustard to achieve a balanced taste. Nutritionally, blending seeds can help you create a more complete protein profile. For example, combining legumes like lentils or chickpeas with seeds like sunflower or pumpkin can provide a wider range of essential amino acids. Additionally, mixing seeds with different vitamin and mineral contents can result in a more well-rounded nutritional profile. Some popular seed combinations to try include: 1. "Sandwich mix": alfalfa, radish, and mustard seeds for a zesty, crunchy blend 2. "Asian-inspired mix": mung beans, adzuki beans, and sesame seeds for a nutty, protein-rich combination 3. "Salad booster": broccoli, kale, and red clover seeds for a nutrient-dense, slightly spicy mix 4. "Protein powerhouse": lentils, chickpeas, and sunflower seeds for a hearty, filling blend When experimenting with seed combinations, start with small batches to test the flavors and textures. Keep a sprouting journal to record your favorite blends, noting the ratios of seeds used and any observations about taste, texture, or sprouting time. This will help you refine your combinations over time and create your own signature blends. It's important to note that different seeds may have varying soaking and rinsing requirements. When combining seeds, follow the guidelines for the seed with the longest soaking time, and be sure to rinse thoroughly to prevent any potential bacterial growth. Additionally, some seeds may sprout faster than others in the mix, so you may need to harvest your sprouts in stages to ensure optimal flavor and texture for each variety. By embracing the art of seed combination, you can transform your sprouting routine into a creative culinary adventure. Not only will you enjoy a wider range of flavors and textures, but you'll also benefit from an increased variety of nutrients in your diet. So don't be afraid to experiment – your perfect blend of sprouts is waiting to be discovered!
Enhancing sprout nutrition through growing conditions
Enhancing sprout nutrition through growing conditions is a fascinating aspect of advanced sprouting techniques that can significantly impact the nutritional value and flavor of your homegrown sprouts. By carefully manipulating various environmental factors, you can optimize the growth process and encourage the development of more nutrient-dense sprouts. One key factor in enhancing sprout nutrition is light exposure. While many sprouts can be grown in darkness, introducing controlled light exposure during the later stages of growth can stimulate the production of chlorophyll and other beneficial compounds. For example, exposing broccoli sprouts to light in the final 12-24 hours of growth can increase their sulforaphane content, a powerful antioxidant known for its potential cancer-fighting properties. Temperature also plays a crucial role in sprout nutrition. Maintaining an optimal temperature range, typically between 65-75°F (18-24°C), can promote faster growth and higher nutrient concentration. Some studies have shown that slightly cooler temperatures can enhance the production of certain beneficial compounds in sprouts, such as glucosinolates in cruciferous vegetable sprouts. The quality and composition of water used for sprouting can significantly impact nutritional outcomes. Using filtered or spring water can help avoid potential contaminants that might hinder growth or introduce unwanted elements. Some advanced sprouters even experiment with adding trace minerals to their sprouting water to enhance the mineral content of the final product. Proper air circulation is another critical factor in maximizing sprout nutrition. Ensuring adequate airflow around your sprouts can prevent the growth of mold and bacteria while promoting stronger, healthier sprouts. This can be achieved through the use of specially designed sprouting trays or by gently stirring or rotating your sprouts during the growing process. The timing of harvest can also influence the nutritional profile of your sprouts. Many sprouts reach their peak nutritional value just as their first true leaves begin to emerge. By closely monitoring the growth stages and harvesting at the optimal time, you can ensure that you're consuming sprouts at their nutritional zenith. Some advanced sprouters employ techniques such as "stressing" their sprouts to enhance nutrient production. This can involve brief periods of drought or exposure to slightly higher temperatures, which can trigger the sprouts to produce higher levels of protective compounds as a survival mechanism. Lastly, the choice of sprouting medium can affect nutritional outcomes. While many sprouts are grown using just water, some varieties benefit from being grown on soil or other organic matter, which can provide additional nutrients and beneficial microorganisms that enhance the overall nutritional profile of the sprouts. By carefully considering and manipulating these growing conditions, you can take your sprouting game to the next level, producing sprouts that are not only delicious but also packed with an optimized array of nutrients and health-promoting compounds.
Troubleshooting common sprouting problems
Troubleshooting common sprouting problems is an essential skill for any sprout enthusiast looking to maximize nutrition and flavor in their homegrown sprouts. Even experienced sprouters can encounter issues from time to time, but with the right knowledge and approach, these challenges can be easily overcome. One of the most common problems in sprouting is mold growth. This often occurs due to excessive moisture or poor air circulation. To prevent mold, ensure that you're rinsing your sprouts thoroughly but not leaving them too wet. Allow proper drainage after each rinse and consider using a fan to improve air circulation if you live in a humid climate. If you do notice any signs of mold, it's best to discard the entire batch to avoid potential health risks. Another frequent issue is sprouts failing to germinate or growing slowly. This can be caused by using old or low-quality seeds, incorrect temperature, or insufficient moisture. Always source your seeds from reputable suppliers and store them properly to maintain viability. Maintain a consistent temperature between 65-75°F (18-24°C) for optimal sprouting conditions. If your sprouts seem dry, increase the frequency of rinsing, but be careful not to overwater. Discoloration or yellowing of sprouts can be a sign of insufficient light exposure. While sprouts don't require direct sunlight, they do need some indirect light to develop chlorophyll and maintain their vibrant green color. Place your sprouting container in a well-lit area, but avoid direct sunlight, which can cause overheating. Unpleasant odors emanating from your sprouts can indicate bacterial growth. This is often due to poor hygiene practices or using contaminated water. Always use clean, chlorine-free water for rinsing and ensure that all your sprouting equipment is thoroughly cleaned and sanitized between batches. If you notice any foul smells, it's safer to discard the sprouts and start fresh. Sometimes, sprouts may develop long, stringy roots instead of compact, bushy growth. This is typically caused by insufficient light or overcrowding. Ensure that your sprouts are not too densely packed in the container and that they receive adequate indirect light. Gently mixing the sprouts during rinsing can also help promote more even growth. Lastly, if you find that your sprouts have a bitter or off-flavor, it could be due to allowing them to grow for too long or exposing them to high temperatures. Harvest your sprouts at the right time, usually when the first pair of leaves have fully developed, and keep them in a cool place to maintain their crisp texture and mild flavor. By being aware of these common sprouting problems and their solutions, you can troubleshoot issues quickly and effectively, ensuring a consistent supply of nutritious and flavorful sprouts for your culinary creations. Remember that practice makes perfect, and with each batch, you'll become more adept at recognizing and addressing potential problems before they affect your sprouts' quality.