How To Draw Frog
Here is the introduction paragraph: Drawing a frog can be a fun and creative activity, but it requires some knowledge of the animal's anatomy and some basic drawing skills. To create a realistic and detailed drawing of a frog, you need to understand the basic anatomy of the animal, including its body shape, facial features, and limbs. In this article, we will guide you through the process of drawing a frog, starting with understanding the basic anatomy of a frog, then sketching the frog's body and facial features, and finally adding final details and refining the drawing. By following these steps, you will be able to create a high-quality drawing of a frog that showcases its unique characteristics. So, let's start by understanding the basic anatomy of a frog.
Understanding the Basic Anatomy of a Frog
Frogs are fascinating creatures that have been on our planet for over 300 million years. To truly appreciate these amphibians, it's essential to understand their basic anatomy. By recognizing the key features of a frog's body, understanding the proportions of their head, body, and limbs, and noticing the texture and patterns on their skin, you'll gain a deeper appreciation for these incredible animals. In this article, we'll delve into the fundamental aspects of a frog's anatomy, starting with the key features that define their body. By identifying these features, you'll be able to distinguish between different species and gain a better understanding of their unique characteristics. So, let's begin by exploring the key features of a frog's body.
Identifying the Key Features of a Frog's Body
The key features of a frog's body include its smooth, moist skin, which helps with respiration and water absorption. The skin is also covered in tiny bumps and ridges, providing camouflage and protection. A frog's body is typically divided into three main parts: the head, thorax, and abdomen. The head features large, round eyes and a long, sticky tongue used for catching prey. The thorax contains the frog's vital organs, including the heart, lungs, and liver. The abdomen houses the digestive system and reproductive organs. Frogs also have four limbs, with the hind legs being significantly larger and more powerful than the front legs, allowing for impressive jumping abilities. The feet are webbed, providing additional propulsion and maneuverability in the water. Additionally, frogs have a distinctive life cycle, undergoing metamorphosis from egg to tadpole to adult, which is reflected in their unique body shape and features. By understanding these key features, artists can accurately depict the anatomy of a frog in their drawings.
Recognizing the Proportions of a Frog's Head, Body, and Limbs
The proportions of a frog's head, body, and limbs are crucial to capture accurately when drawing. A frog's head is typically about one-third the size of its body, with the eyes positioned on the top of the head, taking up about one-quarter of the head's surface area. The body is roughly oval in shape, with the chest area being slightly wider than the abdomen. The limbs are also proportionate to the body, with the front legs being slightly shorter than the hind legs. The front legs are usually positioned at a 45-degree angle to the body, while the hind legs are more horizontal. The feet are webbed, with the toes being relatively short and stumpy. When drawing a frog, it's essential to pay attention to these proportions to ensure that your drawing looks realistic and anatomically correct. By understanding the proportions of a frog's head, body, and limbs, you can create a more accurate and detailed drawing that captures the unique characteristics of these fascinating creatures.
Noticing the Texture and Patterns on a Frog's Skin
The skin of a frog is a fascinating feature that plays a crucial role in its survival and overall health. One of the most distinctive characteristics of a frog's skin is its texture and patterns. Upon closer inspection, you'll notice that a frog's skin is covered in tiny bumps, ridges, and folds, which provide protection and help to reduce friction. These bumps and ridges also aid in the frog's ability to climb and perch on various surfaces. The patterns on a frog's skin are equally impressive, with many species displaying vibrant colors and intricate designs. These patterns serve as camouflage, helping the frog to blend in with its surroundings and avoid predators. Some species of frogs also have specialized skin features, such as the red-eyed tree frog's bright red eyes and blue-striped skin, which play a role in communication and mating. When drawing a frog, it's essential to capture the texture and patterns of its skin accurately, as these features are a key part of its overall appearance and character. By paying attention to the intricate details of a frog's skin, you can create a more realistic and engaging drawing that showcases the unique characteristics of these fascinating creatures.
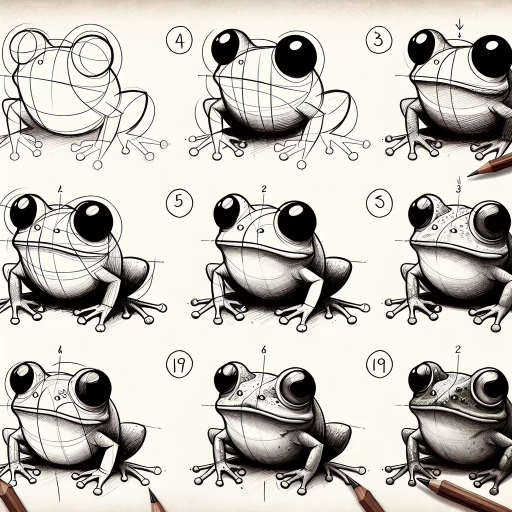
Sketching the Frog's Body and Facial Features
Sketching a frog's body and facial features can be a fun and creative activity, but it requires some skill and attention to detail. To bring your frog to life, you'll need to start with the basics and work your way up to the finer details. This involves using simple shapes to block out the frog's body, adding details to the eyes, nose, and mouth, and defining the facial expression and personality. By breaking down the sketching process into these manageable steps, you'll be able to create a realistic and engaging frog that captures the viewer's attention. In this article, we'll explore each of these steps in more detail, starting with the foundation of the frog's body. Let's begin by using simple shapes to block out the frog's body.
Using Simple Shapes to Block Out the Frog's Body
To block out the frog's body, start by sketching a rough outline using simple shapes. Begin with a large oval for the body, making sure it's tall rather than wide. The oval should be slightly tilted, with the top end leaning towards the left side of the paper. This will help create a sense of movement and balance in the drawing. Next, add a smaller oval for the head, connected to the top of the body by a neck. The head oval should be positioned at a slight angle, with the nose pointing towards the right side of the paper. Use a gentle, curved line to connect the head to the body, creating a smooth, flowing shape. For the legs, use long, thin rectangles that taper towards the feet. The front legs should be slightly shorter than the back legs, and should be positioned at a slight angle to create a sense of movement. The back legs should be longer and more muscular, with a slight bend at the knee. Finally, add a small, triangular shape for the nose, and a curved line for the mouth. By using simple shapes to block out the frog's body, you can create a solid foundation for your drawing and ensure that your proportions are accurate.
Adding Details to the Frog's Eyes, Nose, and Mouth
To add details to the frog's eyes, nose, and mouth, start by drawing two small circles for the eyes, making sure to leave a small gap between them. Add a tiny dot in the center of each circle to create the pupils, and then draw a curved line above each eye to form the eyelids. For the nose, draw a small oval shape, making sure it's centered between the eyes. The mouth can be drawn as a small, curved line that follows the natural curve of the frog's face. To add more detail, you can draw a series of small, curved lines around the mouth to create a sense of texture and depth. Additionally, you can add some subtle shading to the eyes and nose to give the frog a more lifelike appearance. By adding these details, you can bring your frog drawing to life and create a more realistic and engaging image.
Defining the Frog's Facial Expression and Personality
The facial expression and personality of a frog can be defined by its unique features and characteristics. A frog's face is typically rounded, with large, round eyes that are positioned on the top of its head, giving it a wide field of vision. The eyes are often bulging and expressive, conveying a sense of curiosity and alertness. The mouth is usually small and slightly curved, giving the frog a subtle, enigmatic smile. To define the facial expression and personality of a frog, start by sketching the overall shape of the face, using gentle, curved lines to capture its rounded contours. Pay attention to the placement and shape of the eyes, as these will be the focal point of the frog's expression. Use a range of values and shading techniques to add depth and dimension to the eyes, creating a sense of sparkle and life. The eyebrows and nose can be suggested with subtle, expressive lines, adding to the frog's overall personality and charm. By carefully defining the facial expression and personality of a frog, you can bring your drawing to life and capture the unique spirit of this fascinating creature.
Adding Final Details and Refining the Drawing
With the basic shape and proportions of the frog established, it's time to add the final details and refine the drawing. This stage is crucial in bringing the frog to life and creating a realistic representation. To achieve this, we'll focus on three key areas: enhancing the frog's skin texture and patterns, adding shading and dimension to the frog's body, and refining the frog's posture and movement. By paying attention to these details, we can create a drawing that is not only visually appealing but also accurate and engaging. Let's start by taking a closer look at the frog's skin texture and patterns, and how we can enhance them to create a more realistic and detailed drawing.
Enhancing the Frog's Skin Texture and Patterns
The frog's skin texture and patterns are crucial elements to enhance the overall realism and visual appeal of the drawing. To achieve this, start by adding subtle texture to the skin using short, curved hatching lines that follow the contours of the body. Vary the density and thickness of the lines to create a sense of depth and dimension. For a more realistic look, pay attention to the texture of the frog's skin, which is often smooth and slightly sticky. Use gentle, sweeping strokes to suggest the smoothness of the skin, and add tiny bumps and ridges to give it a more organic feel. Next, focus on the patterns and markings on the frog's skin, which can vary greatly depending on the species. Use a range of techniques, including hatching, cross-hatching, and stippling, to create intricate patterns and textures. For example, you can use short, curved lines to suggest the rounded spots on a leopard frog, or long, wavy lines to create the distinctive stripes on a poison dart frog. To add an extra layer of realism, pay attention to the way the patterns and markings interact with the surrounding skin texture. For instance, the spots on a frog's back may be slightly raised or depressed, creating a subtle sense of depth and dimension. By carefully observing and rendering the texture and patterns on the frog's skin, you can create a drawing that is not only visually striking but also highly realistic and engaging.
Adding Shading and Dimension to the Frog's Body
To add shading and dimension to the frog's body, start by identifying the areas where the light source is coming from and where the shadows would naturally fall. Typically, the light source is assumed to be coming from the top left or right, so the shadows would be cast on the opposite side. Use a range of pencils, from 2B to 6B, to create a gradual transition from light to dark. Begin by shading the areas that would be in shadow, such as the underside of the frog's body, the crevices between the legs, and the areas around the eyes and mouth. Use gentle, smooth strokes to build up the shading, gradually increasing the pressure and darkness of the pencil marks as you move from the lightest to the darkest areas. To create a sense of dimension and volume, pay attention to the way the light would wrap around the frog's body, creating subtle gradations of tone and texture. Use the white of the paper to your advantage, leaving some areas unshaded to create highlights and accents that will help the frog's body pop out from the page. As you work, step back regularly to evaluate the overall balance of light and dark, making adjustments as needed to create a cohesive and visually appealing image. By carefully building up the shading and dimension, you can bring your frog drawing to life and create a sense of depth and realism that will engage and delight the viewer.
Refining the Frog's Posture and Movement
Refining the Frog's Posture and Movement: To add a sense of life and realism to your frog drawing, focus on refining its posture and movement. Start by adjusting the frog's body language, making sure it appears relaxed and natural. Pay attention to the way the frog's legs are positioned, with the front legs slightly bent and the back legs stretched out. The frog's body should be slightly arched, with the head held high and the tail extended. Next, consider the movement of the frog, thinking about how it would naturally move in its environment. You can suggest movement by adding subtle lines and curves to the frog's body, such as the gentle curve of the back or the slight bend of the legs. Additionally, you can add texture and pattern to the frog's skin to give it a more organic and lifelike appearance. By refining the frog's posture and movement, you can create a drawing that is not only visually appealing but also engaging and dynamic.