How To Bead Earrings
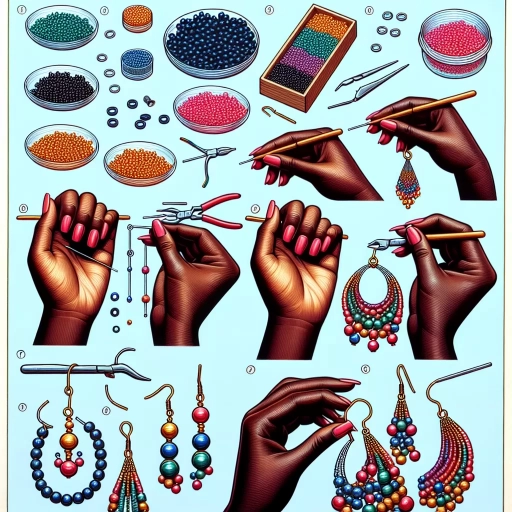
Here is a 200-word introduction paragraph for an article about how to bead earrings: Beaded earrings are a timeless and versatile accessory that can elevate any outfit. With a few simple materials and some basic techniques, you can create your own unique and eye-catching earrings. In this article, we'll take you through the step-by-step process of beading earrings, from gathering essential materials and tools to adding the finishing touches. We'll explore how to design and create the earring base, add embellishments and texture with bead weaving, and secure the earring backs to complete the design. Whether you're a beginner or an experienced beader, this guide will provide you with the skills and confidence to create beautiful beaded earrings that reflect your personal style. To get started, let's begin with the foundation of any beading project: gathering the essential materials and tools. With the right supplies, you'll be well on your way to creating stunning beaded earrings that you'll love wearing. In the next section, we'll dive into the specifics of what you'll need to get started.
Gathering Essential Materials and Tools
When it comes to beading, having the right materials and tools is crucial for creating beautiful and professional-looking pieces. To get started, it's essential to gather all the necessary components, including beads, findings, beading thread or wire, and various tools. Choosing the right beads and findings is a critical step, as it sets the tone for the entire project. Selecting the appropriate beading thread or wire is also vital, as it affects the durability and appearance of the finished piece. Additionally, preparing the workspace with necessary tools, such as wire cutters, pliers, and a beading mat, ensures a smooth and efficient beading process. By gathering all these essential materials and tools, beaders can focus on the creative process, experimenting with different techniques and designs. With the right materials and tools in hand, the possibilities are endless, and the beading journey can begin. First, let's take a closer look at choosing the right beads and findings.
Choosing the Right Beads and Findings
When it comes to choosing the right beads and findings for your beaded earrings, there are several factors to consider. First, think about the style and theme of your earrings. Do you want them to be bold and statement-making, or delicate and understated? This will help you decide on the type of beads to use, such as seed beads, gemstone beads, or crystal beads. Next, consider the color palette you want to work with. You can choose beads that match your favorite colors or go for a more neutral tone that will complement any outfit. It's also important to think about the texture and finish of the beads. Do you prefer smooth and shiny, or matte and rustic? Additionally, consider the size and shape of the beads. Will you be using small beads for intricate designs or larger beads for a more dramatic look? When it comes to findings, you'll need to choose the right type of earring hooks, head pins, and jump rings to complement your beads. Make sure to select findings that are sturdy and durable, as they will be holding the weight of the beads. You may also want to consider using charms or drops to add extra interest to your earrings. By taking the time to carefully choose the right beads and findings, you'll be able to create beautiful and unique beaded earrings that reflect your personal style.
Selecting the Appropriate Beading Thread or Wire
When it comes to selecting the appropriate beading thread or wire for your earring project, there are several factors to consider. The type of beads you are using, the desired drape and flexibility of the earrings, and the level of durability required all play a role in determining the best thread or wire to use. For seed beads, nylon or cotton threads are often preferred due to their thin diameter and flexibility, allowing for intricate stitching and a soft, flowing drape. For heavier beads or those with sharp edges, a sturdier thread such as waxed linen or leather cord may be more suitable. When working with wire, the gauge (thickness) and type of metal (copper, silver, or gold-plated) will impact the overall look and feel of the earrings. A thinner gauge wire (20-24) is ideal for delicate, intricate designs, while a thicker gauge wire (16-18) is better suited for statement pieces or those requiring more structure. Additionally, consider the color and texture of the thread or wire, as it can enhance or detract from the overall aesthetic of the earrings. By carefully selecting the right beading thread or wire, you can ensure a professional-looking finish and a durable, long-lasting pair of earrings.
Preparing the Workspace with Necessary Tools
When preparing the workspace with necessary tools, it's essential to have a well-organized and clutter-free area to ensure a smooth and enjoyable beading experience. Start by gathering all the necessary tools and materials, such as beading needles, threads, scissors, wire cutters, and pliers. A beading mat or a piece of cloth can help prevent beads from rolling away and make it easier to work on your project. A good lighting source, such as a desk lamp or natural light, is also crucial for seeing the small beads and threads. Additionally, a comfortable and ergonomic workspace, such as a beading desk or a lap tray, can help reduce fatigue and strain. Consider investing in a beading tool kit, which usually includes a variety of tools, such as needle threaders, bead crimpers, and wire strippers. Having all the necessary tools within reach can save time and frustration, allowing you to focus on creating your beautiful beaded earrings. By taking the time to prepare your workspace and gather the necessary tools, you'll be able to work efficiently and effectively, ensuring a successful and enjoyable beading experience.
Designing and Creating the Earring Base
Designing and creating the earring base is a crucial step in making unique and eye-catching earrings. This process involves several key considerations, including deciding on the earring style and pattern, measuring and cutting the beading thread or wire, and shaping the earring base with beads and findings. By carefully planning and executing these steps, jewelry makers can create a solid foundation for their earrings that showcases their creativity and attention to detail. In this article, we will explore each of these steps in depth, starting with the importance of deciding on the earring style and pattern, which sets the tone for the entire design process.
Deciding on the Earring Style and Pattern
When deciding on the earring style and pattern, consider the occasion, personal taste, and the type of beads used. For a formal event, opt for elegant and sophisticated designs, such as drop earrings or chandelier earrings, featuring intricate patterns and luxurious beads like crystals or pearls. For a casual, everyday look, simple stud earrings or hoop earrings with a minimalist design are suitable. If you're using bold, colorful beads, a statement earring design with a geometric pattern or a playful tassel can add a pop of personality to your outfit. Consider the shape and size of the beads, as well as their texture and color, to determine the best pattern and style to showcase their unique characteristics. You can also draw inspiration from nature, art, or cultural influences to create a unique and meaningful earring design. Ultimately, the earring style and pattern should reflect your personal style and complement your overall aesthetic.
Measuring and Cutting the Beading Thread or Wire
When measuring and cutting the beading thread or wire, it's essential to consider the desired length and thickness of the earring base. A general rule of thumb is to cut the thread or wire at least 2-3 times the length of the finished earring to allow for wrapping and securing the beads. For a standard earring, a 6-8 inch length of thread or wire is usually sufficient. However, if you're creating a more intricate design or using larger beads, you may need to cut a longer length. To ensure accuracy, use a ruler or measuring tape to measure the thread or wire against the earring design or a mockup. When cutting the thread or wire, use sharp scissors or wire cutters to prevent fraying or crushing the material. It's also a good idea to cut the thread or wire at an angle to prevent it from fraying or splitting. Additionally, if you're using a beading thread, you can use a thread conditioner or wax to help prevent tangling and knotting. By taking the time to accurately measure and cut the beading thread or wire, you'll be able to create a professional-looking earring base that will provide a sturdy foundation for your beading design.
Shaping the Earring Base with Beads and Findings
To shape the earring base with beads and findings, start by selecting a suitable beading pattern or design that complements the desired shape. For a simple drop earring, use a single-strand beading technique, while a more intricate design may require a multi-strand approach. Begin by threading a beading needle with the chosen beading thread or wire, and then pick up the first bead. Use a beading mat or surface to help keep the beads organized and prevent them from rolling away. As you add each bead, gently shape the earring base into the desired form, using a beading awl or a pair of flat-nose pliers to help guide the beads into place. For a more defined shape, use a beading pattern or template to help guide the beads. To add findings, such as earring hooks or posts, simply thread the beading thread or wire through the finding and secure it in place with a crimp bead or a knot. To finish the earring base, trim any excess beading thread or wire, and use a beading mat or surface to help shape the earring into its final form. By carefully shaping the earring base with beads and findings, you can create a beautiful and professional-looking earring that showcases your beading skills.
Adding Embellishments and Finishing Touches
Selecting and Attaching Dangles or Charms
Adding Texture and Dimension with Bead Weaving
Securing the Earring Backs and Completing the Design
Here is the introduction paragraph: When it comes to adding embellishments and finishing touches to your beaded earrings, the possibilities are endless. To take your designs to the next level, consider incorporating dangles or charms to add visual interest, texture, and movement. You can also experiment with bead weaving techniques to add depth and dimension to your earrings. Finally, don't forget to secure the earring backs and complete the design with a professional finish. In this article, we'll explore three key techniques for adding embellishments and finishing touches to your beaded earrings: selecting and attaching dangles or charms, adding texture and dimension with bead weaving, and securing the earring backs and completing the design. Here are the three supporting paragraphs: **Selecting and Attaching Dangles or Charms** When selecting dangles or charms for your beaded earrings, consider the overall theme and style of your design. Choose dangles or charms that complement the colors and textures of your beads, and that add visual interest to your earrings. To attach dangles or charms, use a jump ring or head pin to connect them to the earring finding or a bead. Make sure the jump ring or head pin is securely closed to prevent the dangle or charm from coming loose. **Adding Texture and Dimension with Bead Weaving** Bead weaving is a great way to add texture and dimension to your beaded earrings. By weaving beads together using a needle and thread, you can create intricate patterns and designs that add depth and interest to your earrings. To add texture and dimension with bead weaving, start by creating a foundation of beads, then weave additional beads into the design using a needle and thread. Experiment with different bead weaving techniques, such as peyote stitch or brick stitch, to create unique and interesting textures. **Securing the Earring Backs and Completing the Design** Once you've added embellishments and finishing touches to your beaded earrings, it's time to secure the earring backs and complete the design. To do this, attach the earring backs to the earring findings, making sure they are securely closed to prevent the earrings from coming loose. Finally, inspect your earrings for any loose threads or beads, and make any necessary adjustments to complete the design. With these final touches, your beaded earrings are now complete and ready to wear.
Selecting and Attaching Dangles or Charms
Adding Texture and Dimension with Bead Weaving
Securing the Earring Backs and Completing the Design
Selecting and Attaching Dangles or Charms
Here is the paragraphy: When it comes to adding the finishing touches to your beaded earrings, selecting and attaching dangles or charms can elevate the design and add a touch of personality. To start, choose dangles or charms that complement the color scheme and style of your earrings. Consider the texture, shape, and size of the dangles or charms and how they will interact with the rest of the design. For a more subtle look, opt for small, delicate dangles or charms, while larger, more statement-making pieces can add a bold touch. Once you've selected your dangles or charms, attach them to the earrings using a jump ring or head pin. Make sure the attachment is secure and won't come loose over time. You can also experiment with different attachment methods, such as wire wrapping or using a charm holder, to add more texture and interest to the design. Finally, consider adding a few strategically placed dangles or charms to create movement and visual interest, drawing the eye to different parts of the earring. By carefully selecting and attaching dangles or charms, you can add a professional finish to your beaded earrings and make them truly special.
Adding Texture and Dimension with Bead Weaving
Bead weaving is a versatile technique that can add texture and dimension to your beaded earrings. By incorporating different stitches, beads, and materials, you can create intricate and visually appealing designs. To add texture and dimension with bead weaving, start by selecting a stitch pattern that suits your design, such as the peyote stitch or the brick stitch. Choose beads that complement your earring design, considering factors like color, shape, and size. You can also experiment with different materials, like seed beads, gemstone beads, or even fabric, to add unique textures and interest. As you weave, pay attention to the tension of your stitches, ensuring that your design lies flat and even. To add dimension, try layering different stitches or using beads of varying sizes and shapes. You can also incorporate findings, like jump rings or head pins, to add movement and visual interest. By mastering the art of bead weaving, you can create earrings that are not only beautiful but also tactile and engaging. With practice and patience, you can develop your skills and create stunning beaded earrings that showcase your unique style and creativity.