How To Draw A Realistic
Drawing a realistic image requires a combination of technical skills, attention to detail, and a deep understanding of the subject matter. To achieve a high level of realism, artists must carefully consider the tools and materials they use, as well as the techniques they employ to create depth, texture, and dimension. This includes selecting the right pencils, papers, and other materials to suit the specific needs of the drawing, as well as mastering techniques such as layering and blending, hatching and cross-hatching, and atmospheric perspective. By understanding the fundamentals of realistic drawing, artists can build a strong foundation for creating highly realistic images. In this article, we will explore the key elements of realistic drawing, starting with the basics of understanding the fundamentals of realistic drawing.
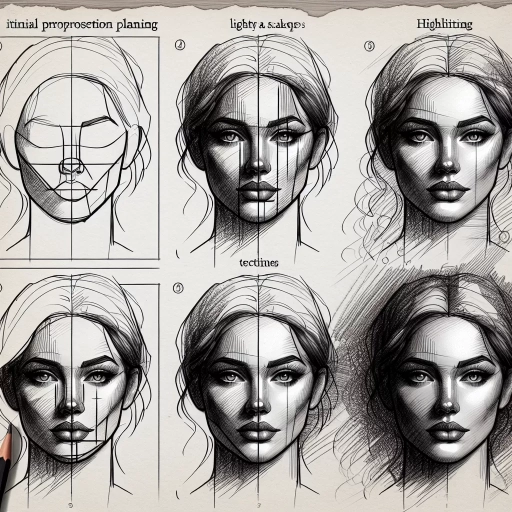
Understanding the Fundamentals of Realistic Drawing
Realistic drawing is a skill that requires patience, dedication, and a deep understanding of the fundamental principles that govern it. To create convincing and lifelike artwork, artists must master a range of techniques and concepts, from the basics of perspective and proportion to the subtleties of light and shadow. By developing an understanding of these core elements, artists can build a strong foundation for their work and unlock the secrets of realistic drawing. One of the key areas to focus on is mastering the basics of perspective and proportion, as this will provide a solid foundation for creating convincing and realistic artwork. By understanding how to use perspective and proportion effectively, artists can create a sense of depth and dimensionality in their work, drawing the viewer's eye into the composition and creating a sense of immersion. In the next section, we will explore the importance of mastering the basics of perspective and proportion in more detail.
Mastering the Basics of Perspective and Proportion
Mastering the basics of perspective and proportion is a crucial step in creating realistic drawings. Perspective refers to the way objects appear to shrink and converge as they recede into the distance, while proportion refers to the relationship between the size and scale of different elements in a drawing. To master perspective, artists must understand the concept of vanishing points, which are the points on the horizon line where parallel lines appear to converge. By using one, two, or three vanishing points, artists can create a sense of depth and distance in their drawings. Proportion, on the other hand, requires artists to accurately measure and render the relationships between different parts of a subject. This can be achieved by using techniques such as dividing the subject into simple shapes, measuring the proportions of each shape, and using a grid to ensure accuracy. By mastering perspective and proportion, artists can create drawings that are not only visually appealing but also convincingly realistic. With practice and patience, artists can develop the skills needed to accurately render the world around them, from the subtle curves of a landscape to the intricate details of a still life. By combining perspective and proportion with other fundamental skills, such as line, value, and texture, artists can create drawings that are truly lifelike and engaging.
Developing an Understanding of Light and Shadow
The interplay of light and shadow is a crucial aspect of realistic drawing, as it adds depth, dimension, and emotion to a piece of art. To develop an understanding of light and shadow, it's essential to observe the way light interacts with different objects and surfaces. Start by studying the basic properties of light, including its direction, intensity, and color. Notice how light can be soft and diffuse, or harsh and direct, and how it can create a range of values, from pure white to deep black. Observe how light falls on different textures, such as smooth, rough, or transparent surfaces, and how it affects the appearance of these textures. Pay attention to the way light creates shadows, including the shape, size, and intensity of these shadows. Shadows can be sharp and defined, or soft and subtle, and they can add a sense of volume and depth to a drawing. To practice drawing light and shadow, start by creating simple still-life compositions, using a single light source to create a range of values and shadows. Use a range of drawing tools, such as pencils, charcoal, and ink, to capture the subtleties of light and shadow. As you become more confident, move on to more complex subjects, such as landscapes, portraits, and figurative drawings. Remember to always observe the way light interacts with your subject, and to use this observation to create a sense of depth, dimension, and emotion in your drawings. By developing an understanding of light and shadow, you'll be able to create realistic drawings that capture the essence of the world around you.
Learning to Observe and Study Real-Life Subjects
Observing and studying real-life subjects is a crucial step in creating realistic drawings. To develop your observation skills, start by choosing a subject that interests you, such as a still life, a landscape, or a person. Take time to study the subject's overall shape, proportions, and details. Look for the relationships between different parts of the subject, such as the way the light falls on it, the textures, and the colors. Observe how the subject interacts with its environment and how it affects the surrounding space. Take note of the subtleties, such as the way the light catches the edges of objects or the way the colors gradate from one to another. To study your subject more effectively, try to observe it from different angles and distances. This will help you understand its three-dimensional form and how it changes as you move around it. You can also use reference images or real-life observations to study the subject's anatomy, structure, and details. By observing and studying real-life subjects, you will develop a deeper understanding of their forms, textures, and relationships, which will ultimately help you create more realistic and engaging drawings.
Choosing the Right Tools and Materials for Realistic Drawing
When it comes to creating realistic drawings, having the right tools and materials is crucial. A good drawing starts with a solid foundation, and that foundation is built on the quality of the tools and materials used. To achieve a realistic drawing, one must consider the characteristics of different drawing tools and mediums, as well as the importance of investing in essential drawing accessories and equipment. However, before delving into the specifics of tools and mediums, it is essential to start with the basics - selecting the appropriate drawing surface and paper quality. A high-quality paper can make all the difference in the final result, and understanding the different types of paper and their characteristics is vital in achieving a realistic drawing. By choosing the right paper, artists can ensure that their drawings have the desired texture, tone, and overall appearance, setting the stage for a successful and realistic piece of art.
Selecting the Appropriate Drawing Surface and Paper Quality
When it comes to creating realistic drawings, the surface on which you draw can greatly impact the final result. Selecting the appropriate drawing surface and paper quality is crucial to achieve the desired level of detail and texture. Look for paper with a smooth finish, as it will allow for more precise lines and subtle transitions between shades. A paper with a rough texture, on the other hand, can create unwanted texture and make it difficult to achieve smooth blends. The weight of the paper is also important, as heavier paper will be less prone to buckling and warping, allowing you to work with a range of mediums without worrying about the paper compromising your artwork. Additionally, consider the paper's tooth, which refers to its ability to hold graphite and other mediums. A paper with a good tooth will allow for rich, dark lines and subtle shading, while a paper with a poor tooth may result in faint, uneven lines. When choosing a drawing surface, consider the specific needs of your project and select a paper that will allow you to achieve the level of detail and realism you desire. For example, if you're working on a highly detailed portrait, look for a paper with a smooth finish and a good tooth, such as hot press watercolor paper or Bristol board. On the other hand, if you're creating a landscape with loose, expressive lines, a paper with a rougher texture, such as cold press watercolor paper or sketch paper, may be more suitable. Ultimately, the right drawing surface and paper quality can make all the difference in achieving a realistic and engaging drawing.
Understanding the Characteristics of Different Drawing Tools and Mediums
Understanding the characteristics of different drawing tools and mediums is crucial for creating realistic drawings. Graphite pencils, for instance, are ideal for creating a range of values and subtle transitions between shades, making them perfect for drawing realistic portraits and landscapes. Charcoal, on the other hand, is great for creating bold, expressive lines and loose, gestural drawings, but can be messy and difficult to control. Markers and colored pencils are excellent for adding vibrant colors and textures to drawings, but can be unforgiving and difficult to blend. Pastels are soft and delicate, making them perfect for creating soft, ethereal landscapes and portraits, but can be prone to smudging and fading. Ink is great for creating bold, precise lines and details, but can be difficult to correct mistakes. Understanding the strengths and weaknesses of each tool and medium allows artists to choose the right ones for their specific drawing goals and styles, and to achieve the desired level of realism and detail. By experimenting with different tools and mediums, artists can develop their skills and techniques, and create realistic drawings that showcase their unique style and vision.
Investing in Essential Drawing Accessories and Equipment
Investing in essential drawing accessories and equipment is a crucial step in creating realistic drawings. While it's possible to start with basic tools, having the right accessories can elevate your artwork and make the drawing process more efficient. A set of high-quality graphite pencils, for instance, can provide a range of tonal values and textures, allowing for more nuanced and detailed drawings. A sharpener and eraser are also must-haves, as they enable you to refine your lines and correct mistakes. Additionally, a drawing board or surface can provide a comfortable and stable workspace, reducing fatigue and allowing you to focus on your craft. Other essential accessories include a blending stump, tortillon, and fixative, which can help to smooth out transitions, create subtle gradations, and preserve your work. By investing in these essential drawing accessories and equipment, you'll be able to achieve more realistic and detailed drawings, and take your artistic skills to the next level.
Techniques for Achieving Realism in Your Drawings
Using Layering and Blending to Create Depth and Dimension
Employing Hatching and Cross-Hatching for Texture and Detail
Practicing Atmospheric Perspective for Realistic Backgrounds
Here is the introduction paragraph: Achieving realism in your drawings requires a combination of techniques that work together to create a convincing and immersive image. To create a realistic drawing, you need to consider the depth and dimension of your subject, the texture and detail of its surface, and the way it interacts with its environment. By using layering and blending to create depth and dimension, employing hatching and cross-hatching for texture and detail, and practicing atmospheric perspective for realistic backgrounds, you can create a drawing that looks and feels like a real-life scene. In this article, we will explore these techniques in more detail, starting with the use of layering and blending to create depth and dimension. Here is the 200 words supporting paragraph for Using Layering and Blending to Create Depth and Dimension: One of the most effective ways to create depth and dimension in your drawings is by using layering and blending. This technique involves building up layers of different values and textures to create a sense of depth and dimensionality. By layering different shades and textures, you can create a sense of distance and atmosphere in your drawing, drawing the viewer's eye into the image. To achieve this, start by creating a base layer of mid-tone values, and then gradually build up layers of lighter and darker values to create depth and dimension. You can also use blending to soften edges and create a sense of atmosphere, making your drawing look more realistic and immersive. By mastering the technique of layering and blending, you can create drawings that have a sense of depth and dimension, drawing the viewer into the image and creating a sense of realism. Here is the 200 words supporting paragraph for Employing Hatching and Cross-Hatching for Texture and Detail: Hatching and cross-hatching are two techniques that can be used to add texture and detail to your drawings. Hatching involves creating a series of closely spaced parallel lines that follow the contours of the subject, while cross-hatching involves layering hatching lines at different angles to create a more textured and detailed image. By using hatching and cross-hatching, you can create a range of different textures and details, from smooth and rounded to rough and angular. To achieve this, start by creating a series of hatching lines that follow the contours of the subject, and then gradually build up layers of cross-hatching lines to create texture and detail. You can also use different tools and techniques, such as pencils and pens, to create different textures and effects. By mastering the techniques of hatching and cross-hatching,
Using Layering and Blending to Create Depth and Dimension
Employing Hatching and Cross-Hatching for Texture and Detail
Practicing Atmospheric Perspective for Realistic Backgrounds
Using Layering and Blending to Create Depth and Dimension
Employing Hatching and Cross-Hatching for Texture and Detail
Practicing Atmospheric Perspective for Realistic Backgrounds
Using Layering and Blending to Create Depth and Dimension
Employing Hatching and Cross-Hatching for Texture and Detail
Practicing Atmospheric Perspective for Realistic Backgrounds
Using Layering and Blending to Create Depth and Dimension
Employing Hatching and Cross-Hatching for Texture and Detail
Practicing Atmospheric Perspective for Realistic Backgrounds
Using Layering and Blending to Create Depth and Dimension
Employing Hatching and Cross-Hatching for Texture and Detail
Practicing Atmospheric Perspective for Realistic Backgrounds
Using Layering and Blending to Create Depth and Dimension
Employing Hatching and Cross-Hatching for Texture and Detail
Practicing Atmospheric Perspective for Realistic Backgrounds
Using Layering and Blending to Create Depth and Dimension
Employing Hatching and Cross-Hatching for Texture and Detail
Practicing Atmospheric Perspective for Realistic Backgrounds
Using Layering and Blending to Create Depth and Dimension
Employing Hatching and Cross-Hatching for Texture and Detail
Practicing Atmospheric Perspective for Realistic Backgrounds
Using Layering and Blending to Create Depth and Dimension
Employing Hatching and Cross-Hatching for Texture and Detail
Practicing Atmospheric Perspective for Realistic Backgrounds
Using Layering and Blending to Create Depth and Dimension
Employing Hatching and Cross-Hatching for Texture and Detail
Practicing Atmospheric Perspective for Realistic Backgrounds
Using Layering and Blending to Create Depth and Dimension
EmployUsing Layering and Blending to Create Depth and Dimension
Using layering and blending techniques is a crucial step in creating depth and dimension in your drawings. By layering different shades and textures, you can achieve a sense of volume and three-dimensionality that draws the viewer's eye into the composition. Start by creating a base layer of mid-tones, using a range of pencils or markers to block in the overall shape and value structure of your subject. Then, gradually build up layers of darker and lighter shades, using hatching and cross-hatching techniques to create texture and detail. To blend these layers together seamlessly, use a blending stump or tortillon to soften and merge the edges, creating a smooth transition between shades. By carefully controlling the layering and blending process, you can create a sense of depth and dimension that makes your drawings feel incredibly realistic. Additionally, experimenting with different layering techniques, such as glazing or scumbling, can add an extra level of complexity and interest to your work, allowing you to achieve a wide range of subtle, nuanced effects that enhance the overall sense of realism.
Employing Hatching and Cross-Hatching for Texture and Detail
Employing hatching and cross-hatching techniques is a fundamental skill for creating texture and detail in your drawings. Hatching involves creating a series of closely spaced parallel lines that follow the contours of the subject, while cross-hatching involves layering hatching lines at different angles to create a more textured and dimensional appearance. By varying the density, thickness, and direction of the lines, you can achieve a range of values and textures, from smooth and delicate to rough and tactile. For example, hatching can be used to suggest the softness of skin or the roughness of tree bark, while cross-hatching can be used to create the intricate patterns of fabric or the rugged texture of stone. To master hatching and cross-hatching, practice creating different types of lines and experimenting with various tools, such as pencils, pens, and markers. Pay attention to the way the lines interact with each other and the paper, and don't be afraid to experiment and make mistakes. With patience and practice, you can develop the skills to create rich, detailed, and realistic textures that bring your drawings to life.