How To Fillet A Perch
Filletting a perch can be a daunting task, especially for those who are new to cooking fish. However, with the right techniques and a little practice, you can master the art of filleting a perch and enjoy a delicious and healthy meal. To fillet a perch successfully, it's essential to understand the preparation involved, the actual filleting process, and some valuable tips and variations to enhance your skills. Preparation is key to a smooth and efficient filleting process, and it's crucial to start with the right tools and a clean workspace. In this article, we will guide you through the steps to fillet a perch, starting with the importance of preparation.
Preparation is Key
Preparation is key to a successful fishing trip. Before you head out on the water, it's essential to have the right tools, prepare the perch, and understand the filleting process. Having the right tools will ensure that you can handle any situation that may arise while fishing. Preparing the perch will help you to secure a comfortable and stable position while fishing. Understanding the filleting process will allow you to clean and prepare your catch quickly and efficiently. In this article, we will explore each of these essential steps in more detail, starting with the importance of choosing the right tools.
Choose the Right Tools
Choosing the right tools is essential when it comes to filleting a perch. A good fillet knife is the most critical tool you'll need, and it's worth investing in a high-quality one. Look for a knife with a flexible blade, preferably made of stainless steel or high-carbon steel, which will allow for smooth and precise cuts. A sharp knife is also crucial, as it will make the filleting process much easier and safer. In addition to a fillet knife, you'll also need a pair of needle-nose pliers or forceps to remove the bloodline and any remaining bones or scales. A cutting board or other stable surface is also necessary to provide a clean and stable workspace. Finally, a container or tray to hold the fillets and any waste is also a good idea. By having the right tools on hand, you'll be able to fillet your perch quickly and efficiently, and ensure that you get the most out of your catch.
Prepare the Perch
When preparing the perch, it's essential to have a clean and stable workspace. Start by laying down a large cutting board or other stable surface that can withstand the mess of filleting. Next, gather all the necessary tools, including a sharp fillet knife, a pair of kitchen shears, and a container for the fillets. Rinse the perch under cold running water to remove any loose scales or debris, then gently pat it dry with a paper towel to prevent slipping. If the perch has been frozen, make sure it's completely thawed before proceeding. Remove any bloodlines or dark meat from the belly area, as these can give the fillets a bitter taste. Finally, position the perch on the cutting board, belly side up, and secure it in place with a non-slip mat or a damp paper towel to prevent it from moving around during the filleting process.
Understand the Filleting Process
Filleting a fish requires a good understanding of the anatomy of the fish and the filleting process. The first step is to make a shallow cut along the spine, starting from the head and working your way down to the tail. This cut should be just deep enough to expose the spine, but not so deep that it cuts into the flesh. Next, make a cut along the ribcage, starting from the head and working your way down to the belly. This cut should be deeper than the first cut, as it needs to cut through the ribcage and into the flesh. Once you have made these two cuts, you can begin to pry the fillet away from the bones. Start at the head and work your way down, using a gentle prying motion to loosen the fillet from the bones. As you pry the fillet away, use your knife to make small cuts along the bones to help release the fillet. Continue this process until you have removed the entire fillet from the bones. Repeat the process on the other side of the fish to remove the second fillet.
The Filleting Process
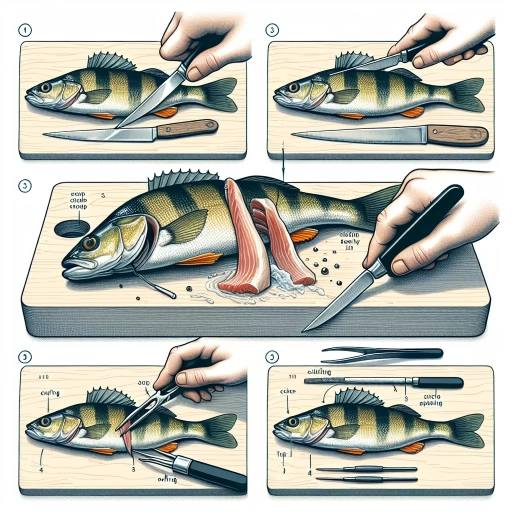
The filleting process is a crucial step in preparing fish for cooking, as it allows for the removal of bones, skin, and other unwanted parts, resulting in a clean and visually appealing final product. To achieve this, a series of precise cuts and manipulations are required. The process begins with making the initial incision, a delicate cut that sets the stage for the rest of the filleting process. This is followed by the removal of the fillets from the bones, a step that requires careful navigation around the skeletal structure. Finally, the bloodline and dark meat are removed, resulting in a pristine and flavorful fillet. By mastering these three key steps, individuals can ensure a successful filleting process and enjoy a delicious and healthy meal. To start, let's take a closer look at the first step: making the initial incision.
Make the Initial Incision
To make the initial incision, hold the perch firmly in place with one hand, and with your fillet knife in the other, locate the gill plate. Make a small, shallow cut just behind the gill plate, being careful not to cut too deeply and damage the gills or the surrounding flesh. The incision should be about 1/4 inch deep and should only be long enough to allow you to make the next cut. Next, insert the tip of the knife into the incision and carefully cut along the spine, using a gentle sawing motion to help guide the knife. Be careful not to apply too much pressure, as this can cause the knife to slip and make uneven cuts. As you cut, use your fingers to gently pry the fillet away from the bones, taking care not to tear the flesh. Continue to cut along the spine until you reach the tail, then use a pair of kitchen shears or scissors to cut through the rib cage and release the fillet. Repeat the process on the other side of the perch to remove the second fillet.
Remove the Fillets from the Bones
To remove the fillets from the bones, start by holding the perch firmly in place with one hand, and with your other hand, carefully insert the tip of your fillet knife into the cavity just behind the gill plate. Gently pry the fillet away from the bones, working your way down the length of the fish. Be careful not to apply too much pressure, as this can cause the fillet to tear. Instead, use a gentle sawing motion to help release the fillet from the bones. As you work your way down the fish, you'll start to see the fillet begin to separate from the bones. Continue to apply gentle pressure and use your knife to help guide the fillet away from the bones until it is completely removed. Repeat this process on the other side of the fish to remove the second fillet. It's also a good idea to remove the bloodline from the fillet, as this can give the fish a slightly bitter taste. To do this, simply make a shallow cut along the bloodline and use your knife to carefully remove it. With the fillets removed, you can now rinse them under cold water to remove any remaining scales or debris, and they're ready to be cooked.
Remove the Bloodline and Dark Meat
When it comes to filleting a perch, one of the most important steps is to remove the bloodline and dark meat. The bloodline is a darker, more vascular area that runs along the spine of the fish, and it can give the fillet a slightly bitter taste. The dark meat, on the other hand, is a layer of flesh that is found near the skin and can be a bit tougher and more prone to drying out. By removing both the bloodline and dark meat, you can create a cleaner, more tender, and more flavorful fillet. To do this, start by locating the bloodline and using a sharp fillet knife to carefully cut along both sides of it, being careful not to cut too deeply and damage the surrounding flesh. Once you have removed the bloodline, use the tip of your knife to gently pry the dark meat away from the rest of the fillet, working from the tail end towards the head. Be patient and take your time, as this can be a bit of a delicate process. With the bloodline and dark meat removed, your fillet is now ready to be rinsed under cold water and patted dry with a paper towel, ready to be cooked to perfection.
Tips and Variations
Filletting a perch can be a delicate process, but with the right techniques and variations, you can achieve professional-looking results. Whether you're looking to cook your perch with the skin on or use it for sushi or sashimi, there are specific methods to follow. In this article, we'll explore the different approaches to filleting a perch, including how to fillet with the skin on, how to prepare it for sushi or sashimi, and common mistakes to avoid. By mastering these techniques, you'll be able to enjoy your perch in a variety of ways. So, let's start with the basics and learn how to fillet a perch with the skin on.
How to Fillet a Perch with the Skin On
To fillet a perch with the skin on, start by making a small incision just behind the gill plate, being careful not to cut too deeply and damage the flesh. Next, make a shallow cut along the spine, starting from the head and working your way down to the tail. Be sure to keep your knife at a 45-degree angle and use a gentle sawing motion to avoid tearing the skin. Continue to make small, gentle cuts along the spine, gradually working your way around the ribcage and towards the belly. As you cut, use your fingers or the tip of your knife to gently pry the fillet away from the bones, taking care not to tear the skin. Once you have removed the first fillet, repeat the process on the other side of the fish. To remove the bloodline, make a small incision along the lateral line and use your knife to carefully scrape away the dark meat. Finally, rinse the fillets under cold water to remove any remaining scales or debris, and pat them dry with a paper towel to prepare them for cooking. Tips and Variations: For a crisper skin, pat the fillets dry with a paper towel and dust them with a small amount of cornstarch or flour before cooking. To add extra flavor, marinate the fillets in a mixture of olive oil, lemon juice, and herbs before cooking. For a more delicate flavor, cook the fillets with the skin side down in a hot skillet with a small amount of oil, then finish them in the oven with a squeeze of lemon juice and a sprinkle of parsley.
How to Fillet a Perch for Sushi or Sashimi
To fillet a perch for sushi or sashimi, start by preparing your tools and workspace. You'll need a sharp fillet knife, a cutting board, and a pair of tweezers or a deboning tool. Rinse the perch under cold water and pat it dry with a paper towel to remove any loose scales or debris. Lay the perch on its side on the cutting board, with the belly facing you. Make a small incision just behind the gill plate, being careful not to cut too deeply and damage the flesh. Continue to cut along the spine, using a gentle sawing motion to separate the fillet from the bones. As you cut, use your fingers or the deboning tool to gently pry the fillet away from the bones. Once you've removed the first fillet, repeat the process on the other side of the perch. To remove the bloodline, make a shallow cut along the center of each fillet, being careful not to cut too deeply and waste any of the delicate flesh. Use your tweezers or deboning tool to carefully remove the bloodline and any remaining bones or debris. Finally, rinse the fillets under cold water and pat them dry with a paper towel to remove any remaining moisture. Your perch fillets are now ready to be sliced into thin pieces for sushi or sashimi. For a more premium presentation, you can also remove the skin from the fillets by making a shallow cut along the edge of the skin and gently prying it away from the flesh. To add extra flavor and texture to your sushi or sashimi, you can also marinate the fillets in a mixture of soy sauce, sake, and sugar before slicing them. Alternatively, you can also add a squeeze of fresh yuzu juice or a sprinkle of grated daikon radish to the fillets for added flavor and texture.
Common Mistakes to Avoid
When filleting a perch, it's essential to avoid common mistakes that can result in wasted meat, uneven fillets, and a frustrating experience. One of the most critical errors is not making a deep enough incision along the spine, which can cause the fillet to tear or break apart. Another mistake is applying too much pressure, which can push the bones and bloodline into the fillet, making it difficult to remove them cleanly. Additionally, not using a sharp enough knife can lead to a sawing motion, causing the fillet to shred or tear. Failing to remove the bloodline and dark meat can also result in a less desirable flavor and texture. Furthermore, not patting the fillet dry before cooking can cause it to steam instead of sear, leading to a less crispy exterior. To avoid these mistakes, it's crucial to take your time, use the right tools, and follow proper techniques to ensure a successful filleting experience. By being mindful of these common mistakes, you can achieve perfectly filleted perch every time.