How To Draw A Nose
Understanding the Basics of Drawing
The Essence of Observation
In any form of drawing, observation plays an indispensable role. Particularly when it comes to drawing a nose - an integral part of the human face, a clear sense of observation can help you capture the nuanced characteristics and dimensions of the nose in an accurate fashion. Observation also allows you to understand how different elements of the nose (the bridge, nostrils, and tip) relate to each other in terms of orientation and position. Moreover, understanding the subtle changes in light and shade across different parts of the nose enhances the three-dimensional effect in your drawing. The ability to recreate these elements through observation not only improves your drawing skills but also boosts your ability to accurately draw other complex objects.
A Grip on the Sketching Tools
An in-depth knowledge of the sketching tools forms the bedrock of a skillful drawing. When it comes to drawing a nose, the choice of right tools is crucial. Pencils are primarily used for creating outlines and adding basic shading, while charcoal can be used to add deeper shades and dimensions to your drawing. You would also need blending tools (like stump or a tissue) to smoothly transition the shades and add a realistic effect to the nose. Knowing which tool to use at which stage of the drawing not only brings out the best results in your drawing, but also enhances your understanding of different sketching tools and how they can be used to attain different effects.
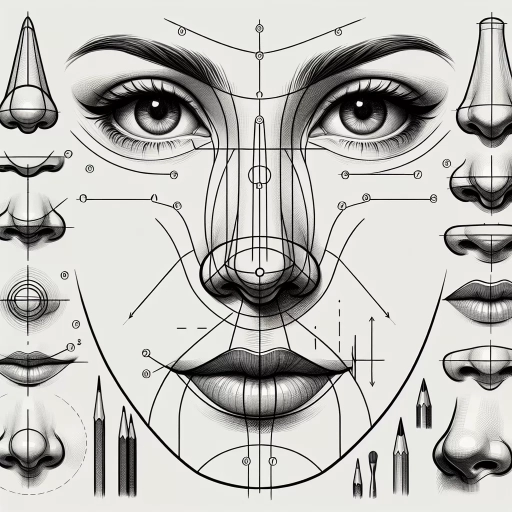
Understanding Anatomy of a Nose
Just like any other object, understanding the basic anatomy of a nose goes a long way in creating a realistic and accurate drawing. The structure of nose is defined by cartilage and not bones, which gives it a unique flexibility compared to other facial features. It starts with the narrow bridge, broadens into the ball or dome, and flips up or down at the tip. Nostrils are the hollow spaces on both sides of the ball. Being aware of these basic parts and how they construct the overall shape of the nose will serve as a guiding map while drawing. Furthermore, knowing the underlying anatomy of a nose boosts your confidence as an artist and allows you to experiment with different shapes and perspectives with ease.
Step-by-Step Process of Drawing a Nose
Initial Sketching
The first step to draw a nose involves initial sketching where you draw a simple outline of the nose without focusing on any details. This would include roughly sketching the bridge, the tip and the nostrils on a basic level. Such an initial sketch acts as a foundation on which further details can be added. Avoid pressing the pencil too hard in this stage as you may want to modify some lines as you progress with the drawing. Understanding and implementing this first step correctly can ensure that you have a solid start to your drawing.
Adding Details
Once you have the basic sketch, the next step is to add more details to your drawing. This is the phase where you bring in the unique characteristics of the nose by employing your observational skills. Pay attention to the unique shape of the nostrils, the way the bridge of the nose curves, the positioning of the tip of the nose etc. This adds a sense of life and realism to your drawing and effectively depicts the three dimensional nature of the nose.
Shading and Blending
Post initial sketching and adding details, the next phase involves adding shades to your drawing. The variation in light and shadow creates an illusion of depth and gives a three dimensional effect to the nose. Pay close observations to how the light falls on the nose, producing a range of tones on the surface. Using this understanding, you can employ your tools (like pencils or charcoals) to mimic these varying tones on your sketch. With the help of blending tools, you can smooth out the transition of these different tones, mimicking the way light falls on and diffuses from the surface of the nose. This gives your nose sketch a realistic look representing a live human feature.
Practising and Improving
Persistence and Patience
Art is a skill that flourishes with persistence and patience. It is essential for learners to understand that drawing a complex object like a nose would take time and multiple attempts. Each attempt helps you understand the elements of the art better and improves your drawing technique. It is also critical to appreciate that even within each unsuccessful attempt lies a lesson that can improve the next sketch out. Embracing patient perseverance in your drawing journey can hence ensure continuous improvement and eventual mastery.
Incorporating Feedback
Feedback is another powerful tool in improving your art skills. Be open to feedback from others (professionals or peers) and positively incorporate it into your practice. A third person perspective can often highlight overlooked details and therefore, enhance the overall depth of your artwork. Actively integrating feedback into your practice proves instrumental in refining your art and achieving excellence in your drawings.
Exploring Various Techniques
Finally, it always helps to explore various drawing techniques, styles and perspectives. The more versatile your practice, the more refined your skills become. Trying different techniques can also add a unique touch to your art. It allows you to break the monotony and enhances your creativity in drawing different types of noses. Engaging with different styles can make the art more exciting, and in turn, improve your motivation to learn and draw.