How To Draw A Hoodie
Drawing a hoodie can be a fun and creative activity, but it can also be intimidating if you're new to drawing. With the right techniques and guidance, you can create a realistic and stylish hoodie drawing. To get started, it's essential to understand the basics of drawing a hoodie, including its shape, structure, and proportions. Once you have a solid foundation, you can move on to sketching the hoodie's basic shape and structure, paying attention to the way the fabric folds and drapes. As you add more details and texture to your drawing, you can enhance the realism of your hoodie by adding pockets, zippers, and other functional details, as well as texture and patterns to the fabric. Finally, you can take your drawing to the next level by adding shading and lighting to create a more realistic and three-dimensional effect. In this article, we'll explore these techniques in more depth, starting with the basics of drawing a hoodie.
Understanding the Basics of Drawing a Hoodie
Drawing a hoodie can seem like a daunting task, especially for beginners. However, with a solid understanding of the basics, you can create a realistic and stylish illustration of this popular garment. To get started, it's essential to familiarize yourself with the anatomy of a hoodie, including its various components, such as the hood, sleeves, and body. Additionally, choosing the right drawing tools and materials can make a significant difference in the quality of your artwork. A set of high-quality pencils, markers, or paints can help you achieve the desired texture and detail. Furthermore, setting up your drawing space for comfort and efficiency is crucial for staying focused and productive. By considering these factors, you'll be well on your way to creating a fantastic drawing of a hoodie. In this article, we'll delve into the basics of drawing a hoodie, starting with the fundamentals of hoodie anatomy.
Familiarizing Yourself with Hoodie Anatomy
Familiarizing yourself with hoodie anatomy is crucial in drawing a realistic and accurate representation of this popular garment. A hoodie typically consists of several key components, including the body, sleeves, hood, and cuffs. The body of the hoodie is the main torso section, which can be either fitted or loose-fitting, depending on the style. The sleeves are usually long and extend from the shoulder to the wrist, with some hoodies featuring thumb holes for added warmth and comfort. The hood is a crucial feature of a hoodie, providing protection from the elements and adding a stylish touch to the overall design. It can be either fixed or adjustable, with some hoodies featuring a drawstring or Velcro closure. The cuffs are the narrow sections at the end of the sleeves, which can be either ribbed or plain, depending on the style. Additionally, some hoodies may feature a kangaroo pocket, which is a pouch-like pocket located on the front of the garment, often with a zip or Velcro closure. By understanding the different components of a hoodie and how they work together, you can create a more accurate and detailed drawing of this popular garment.
Choosing the Right Drawing Tools and Materials
When it comes to drawing a hoodie, having the right tools and materials can make all the difference in achieving a realistic and detailed illustration. To start, you'll need a pencil with a range of hardness levels, such as a set of graphite pencils (HB, 2B, 4B, 6B) or a sketching pencil with a built-in sharpener. This will allow you to create a variety of line weights and shading effects. A sharpener is also essential for keeping your pencils sharp and ready to use. In addition to pencils, a set of markers or colored pencils can be useful for adding color and texture to your drawing. Look for markers with a range of tip sizes and colors, such as Copic or Prismacolor markers. For a more realistic look, you can also use a blending stump or tortillon to smooth out shading and create subtle transitions between colors. A sketchbook or drawing paper with a smooth finish is also necessary for creating a high-quality drawing. Look for paper with a weight of at least 80 gsm and a smooth finish, such as hot press or vellum. Finally, a eraser, such as a kneaded eraser or a white vinegar eraser, is necessary for correcting mistakes and erasing guide lines. By investing in these basic drawing tools and materials, you'll be well on your way to creating a realistic and detailed drawing of a hoodie.
Setting Up Your Drawing Space for Comfort and Efficiency
Setting up your drawing space for comfort and efficiency is crucial for creating a productive and enjoyable drawing experience. To start, choose a quiet and dedicated area with minimal distractions, ensuring you can focus on your artwork. Invest in a comfortable and ergonomic chair, as well as a drawing table or desk that allows you to work at a comfortable height. Proper lighting is also essential, with natural light being ideal, but if not possible, invest in a high-quality desk lamp that provides soft, even illumination. Organize your drawing tools and materials within easy reach, using storage containers or a drawing cart to keep your workspace clutter-free. Consider investing in a drawing board or lap desk, which can provide a stable and portable surface for drawing. Additionally, keep a trash can and recycling bin nearby to maintain a clean and organized workspace. By setting up your drawing space with comfort and efficiency in mind, you'll be able to focus on creating your best work, including drawing a hoodie with precision and detail.
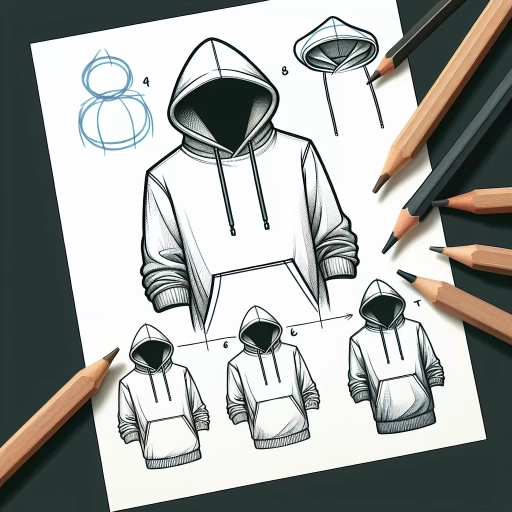
Sketching the Hoodie's Basic Shape and Structure
Sketching a hoodie's basic shape and structure is a fundamental step in creating a realistic and detailed drawing. To start, it's essential to understand the overall shape and proportions of the hoodie. This involves visualizing the garment as a whole, including its body, sleeves, hood, and other features. By breaking down the hoodie into its individual components, artists can ensure that their drawing is accurate and well-proportioned. In this article, we will explore the key elements of sketching a hoodie's basic shape and structure, including drawing the body and sleeves, adding the hood and its strings, and sketching the cuffs and hem. By mastering these fundamental skills, artists can create a solid foundation for their drawing and add details and textures later on. Let's start by examining the first step in sketching a hoodie: drawing the body and sleeves.
Drawing the Hoodie's Body and Sleeves
Drawing the hoodie's body and sleeves is a crucial step in creating a realistic and detailed illustration. To start, draw a large rectangle with rounded edges to represent the body of the hoodie. Make sure the rectangle is slightly wider at the bottom than at the top, as this will help create a more relaxed fit. Next, draw two long, curved lines extending from the top of the rectangle to create the sleeves. The sleeves should be slightly tapered, with the top being wider than the bottom. The curve of the sleeves should also be more pronounced at the top, gradually becoming less curved as they approach the cuff. To add some depth and dimension to the sleeves, draw a slight crease line running along the length of each sleeve, just above the cuff. This will help create a more realistic fold in the fabric. Additionally, draw a small cuff at the end of each sleeve, making sure it is slightly rounded and not too tight. The cuff should be in line with the bottom of the rectangle, creating a seamless transition from the sleeve to the body of the hoodie. By paying attention to these details, you can create a hoodie that looks comfortable, relaxed, and authentic.
Adding the Hood and Its Strings
Adding the hood and its strings is a crucial step in drawing a hoodie. To start, draw a semi-circular shape for the hood, making sure it is centered and aligned with the neckline of the hoodie. The hood should be slightly curved and rounded, with the edges being slightly rounded as well. Next, draw two long, thin rectangles for the strings, one on each side of the hood. The strings should be slightly curved and tapered, with the ends being rounded. Make sure the strings are evenly spaced and symmetrical on both sides of the hood. You can also add some texture to the strings to give them a more realistic look. Additionally, you can add some folds to the hood to give it a more dynamic and relaxed look. The folds should be soft and gentle, with the edges being slightly rounded. By adding the hood and its strings, you can add depth and dimension to your hoodie drawing, making it look more realistic and detailed.
Sketching the Cuffs and Hem
Sketching the cuffs and hem of the hoodie is a crucial step in adding details to the garment. Start by sketching the cuffs, which are the folded edges at the end of the sleeves. Typically, cuffs are about 1-2 inches wide and are folded upwards, creating a slight curve. To sketch the cuffs, draw a curved line at the end of each sleeve, making sure to keep the curve smooth and consistent. The cuff should be slightly thicker at the top and taper down towards the bottom. Next, sketch the hem of the hoodie, which is the bottom edge of the garment. The hem is usually slightly curved and can be anywhere from 1-3 inches wide. To sketch the hem, draw a curved line along the bottom edge of the hoodie, making sure to keep the curve smooth and consistent. The hem should be slightly thicker at the center and taper down towards the sides. When sketching the cuffs and hem, pay attention to the folds and creases of the fabric, as these can add texture and depth to the drawing. Additionally, consider the type of fabric the hoodie is made of, as this can affect the way the cuffs and hem are sketched. For example, a hoodie made of a thick, chunky fabric may have more pronounced folds and creases, while a hoodie made of a thin, smooth fabric may have a more streamlined appearance. By carefully sketching the cuffs and hem, you can add a level of detail and realism to your drawing that will make it stand out.
Adding Details and Texture to Your Hoodie Drawing
Drawing Pockets, Zippers, and Other Functional Details
Adding Texture and Patterns to the Hoodie's Fabric
Enhancing the Hoodie's Realism with Shading and Lighting
To take your hoodie drawing to the next level, it's essential to add details and texture that make it look realistic and visually appealing. One way to achieve this is by drawing pockets, zippers, and other functional details that give your hoodie a sense of authenticity. Additionally, adding texture and patterns to the fabric can add depth and interest to your drawing. Finally, enhancing the hoodie's realism with shading and lighting can make it look like it's jumping off the page. In this article, we'll explore these three key elements in more detail, starting with drawing pockets, zippers, and other functional details. Drawing Pockets, Zippers, and Other Functional Details When it comes to drawing a hoodie, the functional details are just as important as the overall shape and design. Pockets, zippers, and buttons can add a level of realism to your drawing that makes it look more authentic. To draw pockets, start by sketching the outline of the pocket and then adding the stitching and folds of the fabric. For zippers, pay attention to the shape and size of the zipper teeth and the way the zipper pull moves up and down. Buttons can be drawn as simple circles or ovals, but adding some texture and shading can make them look more realistic. Adding Texture and Patterns to the Hoodie's Fabric The fabric of a hoodie can be smooth and plain, but adding some texture and patterns can make it look more interesting. To add texture, you can use different shading techniques, such as hatching and cross-hatching, to create a rough or smooth surface. Patterns can be added using stripes, polka dots, or other designs that are commonly found on hoodies. You can also experiment with different fabrics, such as fleece or cotton, to create a unique texture and look. Enhancing the Hoodie's Realism with Shading and Lighting Shading and lighting can make or break the realism of your hoodie drawing. To create a realistic look, pay attention to the way the light falls on the fabric and the way the shadows are cast. You can use different shading techniques, such as chiaroscuro or sfumato, to create a sense of depth and volume. Additionally, adding some highlights to the fabric can make it look more reflective and shiny. By combining these techniques with the functional details and texture, you can create a hoodie drawing that looks incredibly realistic and visually appealing.
Drawing Pockets, Zippers, and Other Functional Details
Adding Texture and Patterns to the Hoodie's Fabric
Enhancing the Hoodie's Realism with Shading and Lighting
Drawing Pockets, Zippers, and Other Functional Details When it comes to adding functional details to your hoodie drawing, it's all about creating a sense of realism and authenticity. Start by drawing the pockets, making sure to capture their shape, size, and placement accurately. You can add some subtle folds and creases to give the pockets a more realistic appearance. Next, move on to the zippers, drawing the teeth and the slider in detail. Don't forget to add some texture to the zipper to give it a more tactile feel. Other functional details you can add include buttons, drawstrings, and cuffs. Remember to pay attention to the proportions and placement of these details to ensure they look realistic and balanced. Adding Texture and Patterns to the Hoodie's Fabric Adding texture and patterns to your hoodie drawing can add an extra layer of depth and visual interest. Start by adding some subtle texture to the fabric, using short, curved lines to suggest the weave of the material. You can also add some patterns, such as stripes or checks, to give the hoodie some visual interest. When adding patterns, make sure to pay attention to the scale and placement of the design elements to ensure they look balanced and harmonious. You can also experiment with different textures and patterns to create a unique and personalized look. Enhancing the Hoodie's Realism with Shading and Lighting Shading and lighting can make or break the realism of your hoodie drawing. Start by adding some basic shading to the hoodie, using gentle gradients to suggest the contours of the fabric. You can also add some deeper shadows to create a sense of depth and dimension. When it comes to lighting, think about the direction and intensity of the light source. You can use highlights and lowlights to create a sense of volume and texture, and to draw attention to specific details. Remember to keep your shading and lighting subtle and nuanced, as overdoing it can make the drawing look unnatural and cartoonish.
Drawing Pockets, Zippers, and Other Functional Details
Drawing functional details such as pockets, zippers, and buttons can add a level of realism to your hoodie drawing. To draw a pocket, start by sketching a rectangular shape with a slight curve to follow the contours of the hoodie. Add a small flap at the top of the pocket and a few stitches to indicate the seam. For a zipper, draw a long, thin rectangle with a series of small teeth along one edge. Add a small pull tab at the top of the zipper and a few stitches to secure it to the hoodie. To draw a button, simply sketch a small circle with a few stitches in the center to indicate the buttonhole. You can also add other functional details such as a drawstring or a hood clip to further enhance the realism of your drawing. By paying attention to these small details, you can create a more authentic and detailed hoodie drawing.
Adding Texture and Patterns to the Hoodie's Fabric
Adding texture and patterns to the hoodie's fabric can elevate your drawing to the next level. To achieve this, start by observing the different textures and patterns found on various hoodies. Notice how the fabric folds, creases, and drapes on the body. You can add texture by using different shading techniques, such as hatching and cross-hatching, to create a sense of depth and dimension. For patterns, you can use a variety of techniques, including stripes, polka dots, and geometric shapes. To add a more realistic touch, pay attention to how the patterns and textures interact with the folds and creases of the fabric. For example, a striped pattern may appear distorted as it wraps around the sleeve or hood. By incorporating texture and patterns into your drawing, you can create a more visually appealing and realistic representation of a hoodie. Additionally, you can experiment with different fabric types, such as fleece, cotton, or polyester, to add more variety to your drawing. By doing so, you can create a unique and personalized hoodie that reflects your artistic style.