How To Tie A Knot That Won't Slip
Here is the introduction paragraph: Tying a knot that won't slip is a crucial skill to master, whether you're a sailor, camper, or simply a DIY enthusiast. A secure knot can be the difference between safety and disaster, making it essential to learn the proper techniques. In this article, we'll explore the fundamentals of knot tying, providing you with a comprehensive guide on how to tie a knot that won't slip. We'll start by understanding the basics of knot tying, including the different types of knots and the materials used. From there, we'll move on to step-by-step instructions for tying a secure knot, covering the essential steps and techniques to ensure a reliable knot. Finally, we'll troubleshoot common issues with slipping knots, helping you to identify and fix any problems that may arise. By the end of this article, you'll be equipped with the knowledge and skills to tie a knot that won't slip, starting with a solid foundation in the basics of knot tying.
Understanding the Basics of Knot Tying
Knot tying is a fundamental skill that has been used for centuries in various aspects of life, from sailing and climbing to camping and everyday tasks. Understanding the basics of knot tying is essential for anyone who wants to master this skill. To start, it's crucial to choose the right type of knot for the task at hand, as different knots serve different purposes. Additionally, understanding the importance of tension is vital, as it can make or break the effectiveness of a knot. Familiarizing yourself with common knot terminology is also key, as it will help you to communicate with others and to understand instructions. By grasping these fundamental concepts, you'll be well on your way to becoming a proficient knot tier. In this article, we'll explore these concepts in more detail, starting with the importance of choosing the right type of knot.
Choosing the Right Type of Knot
Choosing the right type of knot is crucial to ensure that it serves its purpose effectively. With numerous types of knots available, selecting the most suitable one can be overwhelming, especially for beginners. To make an informed decision, consider the specific application, the type of material being used, and the desired level of security. For instance, if you're working with rope, a bowline knot or a sheet bend knot may be ideal for creating a secure loop or joining two ropes together. On the other hand, if you're dealing with fishing lines or nets, a blood knot or a barrel knot may be more suitable. Additionally, consider the level of tension and stress the knot will be subjected to, as well as any environmental factors such as water or extreme temperatures. By taking these factors into account, you can choose a knot that is reliable, efficient, and meets your specific needs. Furthermore, it's essential to practice tying different types of knots to develop muscle memory and improve your overall knot-tying skills. With experience and practice, you'll become more confident in your ability to choose the right knot for the job and tie it securely.
Understanding the Importance of Tension
Understanding the importance of tension is crucial when it comes to tying knots that won't slip. Tension refers to the amount of force or pressure applied to the knot, which determines its stability and security. A knot with insufficient tension is more likely to come undone, while a knot with excessive tension can be difficult to tie and may even damage the rope. The ideal tension for a knot depends on the type of knot, the material of the rope, and the intended use of the knot. For example, a knot used for climbing or sailing may require a higher tension than a knot used for camping or decorative purposes. Understanding the importance of tension allows you to adjust the knot accordingly, ensuring that it is secure and reliable. By applying the right amount of tension, you can prevent the knot from coming undone and ensure that it withstands the stresses and strains of its intended use. In addition, proper tension also helps to prevent rope damage, such as abrasion or wear, which can weaken the rope over time. By mastering the art of tension, you can tie knots that are not only secure but also durable and long-lasting.
Familiarizing Yourself with Common Knot Terminology
Familiarizing yourself with common knot terminology is essential to understanding the basics of knot tying. Knowing the different parts of a knot and the various techniques used to tie them will help you to better comprehend the instructions and diagrams that accompany each knot. The working end of a rope is the free end that is used to tie the knot, while the standing part is the longer, static portion of the rope. The turn is the curved section of the rope that forms the foundation of the knot, and the loop is the circular section of the rope that is created when the working end is passed through the turn. The bight is the curved section of the rope that is formed when the working end is passed under the standing part, and the tuck is the action of passing the working end under the standing part to secure the knot. Understanding these basic terms will help you to tie knots more efficiently and effectively, and will also enable you to communicate with others who use knots in their work or hobbies. By learning the common terminology used in knot tying, you will be able to follow instructions and diagrams with ease, and will be well on your way to becoming a proficient knot tier.
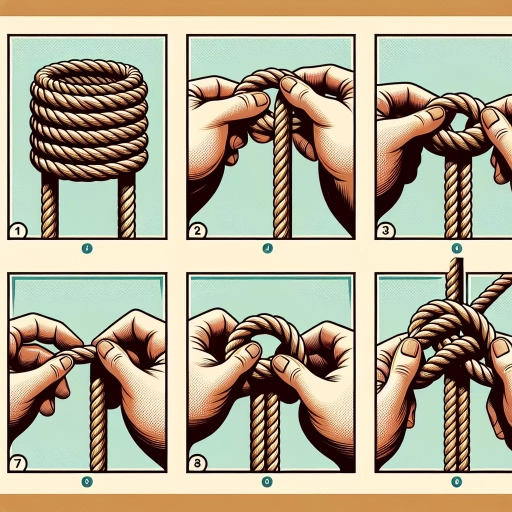
Step-by-Step Instructions for Tying a Secure Knot
Tying a secure knot is an essential skill that can be applied in various situations, from camping and sailing to everyday life. A well-tied knot can provide peace of mind and ensure safety, while a poorly tied one can lead to accidents and damage. In this article, we will provide step-by-step instructions on how to tie a secure knot, covering the three crucial steps: creating a foundation loop, wrapping and passing the working end, and securing the knot with a final tuck. By following these instructions, you will be able to tie a knot that is reliable and long-lasting. To start, let's begin with the first step: creating a foundation loop.
Creating a Foundation Loop
Creating a foundation loop is a crucial step in tying a secure knot. To start, hold the rope in your non-dominant hand, with the end of the rope facing away from you. Use your dominant hand to create a loop in the rope, keeping your hand inside the loop. The loop should be small enough to fit snugly around the object you're trying to secure, but not so small that it's difficult to work with. As you create the loop, make sure to keep the rope taut, but not too tight, as this can cause the knot to become misshapen. Once you have the loop in place, use your dominant hand to pass the end of the rope through the loop, creating a second loop on the other side. This second loop will serve as the foundation for the rest of the knot. By creating a solid foundation loop, you'll be able to build a secure and reliable knot that won't slip or come undone.
Wrapping and Passing the Working End
Wrapping and passing the working end is a crucial step in tying a secure knot. To do this, hold the standing part of the rope in your non-dominant hand, with the working end facing away from you. Take the working end and wrap it around the standing part, moving it away from you. The number of wraps will depend on the type of knot you're tying, but a general rule of thumb is to make at least three wraps. As you wrap the working end, keep your hand close to the standing part to maintain control and prevent the rope from twisting. Once you've completed the desired number of wraps, pass the working end through the loop you've just created. This will start to form the knot. Make sure the working end is seated properly and not twisted, as this can affect the knot's security. With the working end passed through the loop, you're now ready to pull it tight and start to secure the knot.
Securing the Knot with a Final Tuck
Securing the knot with a final tuck is a crucial step in ensuring the knot remains in place. To do this, take the working end of the rope and pass it under the standing part of the rope, then bring it up and through the loop you just created in the previous step. This will form a second loop that sits on top of the first loop. Take the working end and pass it through this second loop, then pull it gently to tighten the knot. You should start to see the knot take shape and feel it begin to secure. To finish, take the working end and tuck it under the standing part of the rope, making sure it is snug and even with the rest of the knot. This final tuck will help to prevent the knot from coming undone and ensure it remains secure. By following these steps and taking the time to secure the knot with a final tuck, you can be confident that your knot will hold fast and not slip, even in the most demanding situations.
Troubleshooting Common Issues with Slipping Knots
Slipping knots can be a frustrating and potentially hazardous issue in various applications, from sailing and climbing to camping and rescue operations. When a knot fails to hold, it can lead to accidents, injuries, and even fatalities. To address this problem, it's essential to understand the common causes of slipping knots and develop effective strategies to prevent them. In this article, we'll explore three key approaches to troubleshooting common issues with slipping knots: identifying the causes of a slipping knot, adjusting the knot to improve security, and using additional techniques to enhance knot stability. By understanding the underlying reasons for a slipping knot, we can take the first step towards resolving the issue. Let's start by examining the causes of a slipping knot.
Identifying the Causes of a Slipping Knot
When a knot starts to slip, it can be frustrating and challenging to identify the cause. However, understanding the reasons behind a slipping knot is crucial to prevent it from happening in the future. One of the primary causes of a slipping knot is incorrect tension. If the knot is not tightened enough, it can come undone, especially when subjected to stress or load. On the other hand, over-tightening can also cause the knot to slip, as it can put too much pressure on the rope, causing it to jam or bind. Another common cause of a slipping knot is using the wrong type of rope or material. Different types of ropes have varying levels of friction, texture, and elasticity, which can affect the knot's ability to hold. For example, a knot tied with a smooth, slippery rope may not hold as well as one tied with a rougher, more textured rope. Additionally, the size and type of the knot itself can also contribute to slipping. A knot that is too small or too large for the application may not provide enough security, while a knot that is not designed for the specific task may not be able to withstand the stresses and loads involved. Furthermore, environmental factors such as moisture, temperature, and vibration can also affect the knot's performance and cause it to slip. By identifying the underlying cause of a slipping knot, you can take corrective action to prevent it from happening again, such as adjusting the tension, using a different type of rope, or selecting a more suitable knot for the task at hand.
Adjusting the Knot to Improve Security
Adjusting the knot to improve security is a crucial step in ensuring that your knot remains reliable and doesn't come undone. One of the most effective ways to adjust the knot is to tighten the standing part of the rope, which is the section of the rope that is not part of the knot. By pulling the standing part gently but firmly, you can increase the tension on the knot and prevent it from slipping. Another way to adjust the knot is to add additional turns or wraps to the knot, which can help to increase its security and prevent it from coming undone. It's also important to check the knot regularly to ensure that it is still secure and make any necessary adjustments. Additionally, using a knot that is specifically designed for the type of application you are using it for can also help to improve security. For example, a bowline knot is a good choice for creating a secure loop at the end of a rope, while a sheet bend knot is a good choice for joining two ropes together. By taking the time to adjust the knot and choose the right type of knot for your application, you can help to ensure that your knot remains secure and reliable.
Using Additional Techniques to Enhance Knot Stability
When it comes to enhancing knot stability, there are several additional techniques that can be employed to ensure a secure and reliable connection. One such technique is the use of a "stopper knot," which is a small knot tied at the end of a rope to prevent it from running out of a larger knot. This is particularly useful in situations where the rope is subject to heavy loads or stress. Another technique is to use a "backup knot," which is a secondary knot tied in addition to the primary knot to provide extra security. This can be especially useful in critical applications such as climbing or sailing. Additionally, using a "knot dressing" can also help to enhance stability by applying a small amount of tension to the knot, which can help to set it in place and prevent it from coming undone. Furthermore, using a "knot lubricant" can also help to reduce friction and prevent the knot from jamming, making it easier to tie and untie. By incorporating these additional techniques into your knot-tying routine, you can significantly enhance the stability and reliability of your knots, and ensure a secure connection in even the most demanding applications.