How To Make Paper Stars
Understanding the Basics of Paper Star Crafting
The Materials Needed
Creating paper stars is a fun and engaging DIY project that requires a minimal number of materials. All you need is some paper (colored, craft, or natural colored paper can be used), a pair of scissors, and some glue or a stapler. Having a variety of paper types and colors at your disposal allows for a dynamic range of designs and patterns. This does not limit your creativity to just single-colored stars but adds extra depth and pattern to the projects. Furthermore, most of these materials are readily available, cheap, and usually, every household has them, turning paper star crafting into an easy and budget-friendly hobby or pastime. Lastly, the few tools needed for this project make it easily accessible to anyone, adults and children alike. It is perfect for an afternoon-bound activity that anyone can pull off.
The Types of Paper Stars
Different types of paper stars vary in complexity and style, giving you a broad spectrum of options to choose from. For instance, the traditional five-point star often associated with Christmas can easily be made with a few folds and some cuts. On the other hand, origami stars require more folding skills and are perfect for those seeking a challenging task. Moravian and Froebel stars are other types of paper stars that involve more intricate folding patterns and are often used as tree toppers or window decorations. These different types cater to different skill levels allowing anyone, by giving simple and straightforward instructions, to make beautiful paper stars.
The Process of Crafting Paper Stars
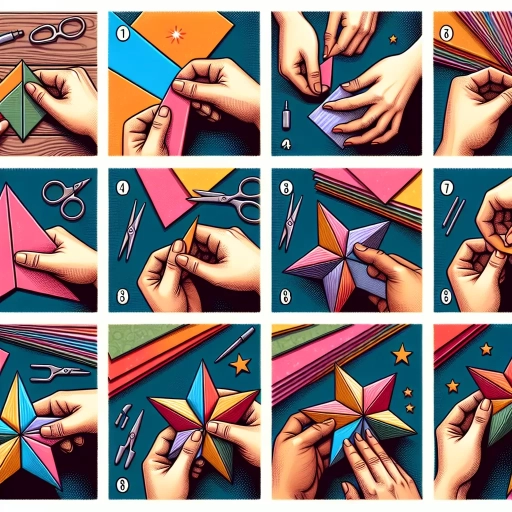
A step-by-step guide will aid in the process, making crafting paper stars as simple and efficient as possible. The process includes cutting a strip of paper, tying a specific knot at one end to create a pentagon shape, and then carefully folding the remaining part of the strip around this pentagon. The excess is then cut off, and the star is carefully pushed out to reveal a beautifully crafted paper star. When done correctly and with patience, a perfect star comes into existence that you designed and made yourself. For a more detailed process, our upcoming section will break down the steps in an easy to understand manner.
Creating Your Own Paper Stars: A Step-by-Step Guide
Choosing Your Material
Before you begin, it is essential to consider the type of paper you will use for your stars. The paper should be enough sturdy to withstand the folding and bending of the process, yet pliable enough to allow for smooth folding. Commonly craft paper or colored paper is used for more prominent stars, while origami paper is used for smaller, more intricate designs. Depending on the type of star you aim to create, the width and length of the paper strip can also vary greatly. Therefore, identifying and preparing your material is the first and foremost step.
The Core Steps of the Process
Crafting paper stars is dependent on the careful execution of a series of steps. People might initially face difficulties with it, but once they get the hang of it, it becomes a rhythmic, repetitive process that will lead to beautiful results. Folding the paper strip into a pentagon serves as the base of the star. The folding of the remaining strip around the pentagon forms the sides of the star, and cutting off the excess tail ensures a neat appearance. Lastly, shaping the star by gently pressing in the sides of the pentagon will push out the points of the star, thereby revealing its final shape. Consistent practice and careful folding will yield symmetrical and neat stars.
Decorating and Utilizing Your Stars
Once your paper stars are crafted, they can be further adorned. Adding glitter, ribbons, sequins, or using patterned paper can breathe life into the stars. These stars may then be used as filler for transparent Christmas ornaments, strung up as part of garlands, used in gift wrapping, or even as components of a mobile for brightening up indoor decor. In essence, your crafted stars can turn into beautiful pieces of decorations. Not just that, the activity itself is a therapeutic and creative outlet, offering peace and relaxation for many.
Troubleshooting and Tips for Paper Star Crafting
Common Pitfalls and Their Remedies
As simple as it may sound, crafting paper stars can come with its own set of challenges. For starters, the paper material chosen may not be suitable for the type of star you're attempting. It could either be too flimsy, resulting in a lack of shape, or too rigid, creating difficulty in folding. Choosing the appropriate type of paper will solve this issue. Another common problem arises when the paper strips are cut in improper measurements leading to an asymmetrical star. Therefore, careful measurement of paper will avoid such issues.
Tips for a Neater and Professional Finish
For a neater finish, always avoid hurrying through the steps. Taking your time to fold accurately, cutting neatly, and carefully adjusting the final shape will yield a professional-looking result. Using a ruler and pen can accurately measure the strip of paper and achieve a consistent height in your stars. Another essential tip is to recheck every fold before proceeding to the next — the process builds upon each step, so ensuring accuracy at every stage is crucial.
Enhancing Your Paper Stars
Once you have mastered the basic paper star, challenge yourself to make more complex stars. You can attempt to make starts with different numbers of points, use variegated paper for a gradient look, or create layered stars for a 3D effect. Another way to enhance your stars is by making them glow. This can be done by using glow-in-the-dark paint, making your stars a perfect addition to your night-time decorations. In essence, never stop experimenting and exploring the multitude of ways you can bring your stars to life.