How To Shorten Pants
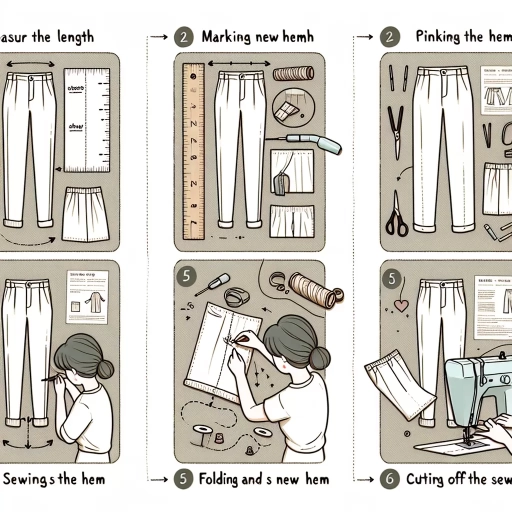
Shortening pants can be a daunting task, especially for those who are new to sewing or DIY projects. However, with the right techniques and preparation, it can be a simple and rewarding process. To achieve a professional-looking finish, it's essential to master the art of shortening pants. In this article, we'll guide you through the process, starting with the importance of preparation, where we'll discuss the necessary tools and materials needed to get started. We'll then delve into various shortening techniques to master, including how to measure, mark, and cut your pants for a perfect fit. Finally, we'll cover the finishing touches required to give your pants a professional look, including how to hem and finish the seams. By following these steps, you'll be able to shorten your pants with confidence and achieve a flawless finish. So, let's get started with the first step: Preparation is Key.
Preparation is Key
Preparation is key to creating a well-fitted and stylish pair of pants. Before starting your sewing project, it's essential to take the time to prepare and plan carefully. This involves choosing the right tools for the job, selecting the perfect fabric for your pants, and understanding the style of pants you want to create. By doing so, you'll be able to work efficiently and effectively, avoiding costly mistakes and ensuring a professional finish. With the right tools, you'll be able to cut and sew your fabric with precision and accuracy, while the perfect fabric will drape beautifully and provide comfort and durability. Understanding the pant style will also help you to create a garment that fits well and looks great. So, let's start by choosing the right tools for the job, as this will set the foundation for a successful sewing project.
Choose the Right Tools
Choosing the right tools is essential when it comes to shortening pants. The right tools can make the process easier, faster, and more accurate, while the wrong tools can lead to frustration, mistakes, and a poor finish. To start, you'll need a good pair of scissors or a rotary cutter, which will allow you to cut the pant legs accurately and cleanly. A seam ripper is also a must-have, as it will enable you to carefully remove the existing hem without damaging the fabric. A measuring tape or ruler is necessary for taking accurate measurements, and a marking tool such as a pencil or chalk will help you mark the new hemline. Additionally, a sewing machine and matching thread are required for sewing the new hem in place. Optional tools include a serger or overlock machine, which can be used to finish the raw edges of the pant legs, and a blind hem foot, which can help you create a nearly invisible hem. By choosing the right tools for the job, you'll be able to achieve professional-looking results and ensure that your shortened pants look great and last long.
Select the Perfect Fabric
When it comes to shortening pants, selecting the perfect fabric is crucial to ensure a professional-looking finish. The type of fabric you choose will determine the ease of shortening, the appearance of the hem, and the overall durability of the pants. For a seamless and invisible hem, opt for fabrics with a smooth, dense weave, such as wool, cotton, or linen. These fabrics will allow you to create a crisp fold and a clean finish. On the other hand, fabrics with a loose or open weave, like knits or stretchy materials, may require additional stabilizing techniques to prevent fraying or distortion. Consider the weight and thickness of the fabric as well, as heavier fabrics may require more substantial hemming techniques. Additionally, if you're working with a fabric that has a lot of texture or pattern, you may need to adjust your shortening technique to accommodate the design. By choosing the right fabric, you'll be able to achieve a professional-looking hem that complements the overall style and design of your pants.
Understand the Pant Style
When it comes to shortening pants, understanding the pant style is crucial to achieve a professional finish. Different pant styles have unique characteristics that affect the shortening process. For instance, flat-front pants have a smooth front panel, while pleated pants have folds of fabric that create a more relaxed fit. Similarly, tapered pants narrow down towards the ankle, whereas straight-leg pants maintain a consistent width from thigh to hem. Identifying the pant style will help you determine the best approach for shortening, as some styles may require more adjustments than others. For example, pleated pants may need to have the pleats re-sewn after shortening, while flat-front pants can be shortened without affecting the front panel. Additionally, understanding the pant style will also help you decide whether to shorten the pants from the bottom hem or the waistband, depending on the desired length and fit. By taking the time to understand the pant style, you can ensure a successful shortening process that maintains the original design and fit of the pants.
Shortening Techniques to Master
Mastering shortening techniques is an essential skill for any sewer, tailor, or fashion enthusiast. Whether you're working with pants, skirts, or dresses, knowing how to shorten garments effectively can make all the difference in achieving a perfect fit. In this article, we'll explore three key shortening techniques to help you achieve professional-looking results: The Folded Hem Method, The Cut and Re-Hem Method, and The Cuffing Method. Each of these techniques has its own unique benefits and applications, and by mastering them, you'll be able to tackle a wide range of shortening projects with confidence. From preserving the original hemline to creating a new, stylish cuff, these techniques will help you achieve a flawless finish. Let's start by exploring The Folded Hem Method, a simple yet effective technique for shortening garments without sacrificing their original hemline.
The Folded Hem Method
The Folded Hem Method is a popular technique for shortening pants, particularly for those who want to maintain the original hemline's appearance. This method involves folding the raw edge of the pant leg up by the desired length, then folding it up again to create a casing for the new hem. The folded edge is then pressed to create a crisp crease, and the pant leg is turned right side out. The folded hem is then sewn in place, usually by hand or using a blind hem stitch on a sewing machine. The result is a nearly invisible hem that looks like the original. This method is ideal for pants with a narrow hem allowance, as it doesn't require a lot of extra fabric to create the new hem. Additionally, the Folded Hem Method is a great way to preserve the original hem's stitching and finishing, which can be a nice touch for those who want to maintain the garment's original details. Overall, the Folded Hem Method is a versatile and effective technique for shortening pants, and with a little practice, it can be mastered by sewers of all skill levels.
The Cut and Re-Hem Method
The cut and re-hem method is a popular technique for shortening pants, especially for those who want to maintain the original hemline and stitching. This method involves cutting the pant leg to the desired length, then re-attaching the original hem allowance to create a new hemline. To start, try on the pants and mark the desired length with a pin or chalk. Then, carefully cut along the marked line, making sure to leave a 1/4 inch seam allowance. Next, fold the raw edge of the pant leg up by 1/4 inch, then another 1/4 inch, and press. This will create a crisp fold that will help guide the re-hemming process. Finally, re-attach the original hem allowance to the new hemline, using a matching thread color and a blind hem stitch or a straight stitch. The result is a professionally finished hem that looks like it was done by a tailor. This method is ideal for pants with a narrow hem allowance, as it allows for a clean and invisible finish. Additionally, it's a great way to preserve the original stitching and hemline, making it a popular choice for those who want to maintain the integrity of their pants.
The Cuffing Method
The Cuffing Method is a popular technique for shortening pants, especially for those who want to achieve a stylish and trendy look. This method involves folding the raw edge of the pant leg up by a desired length, creating a cuff, and then sewing in place. The cuff can be folded up to create a visible cuff or folded down to create a hidden cuff, depending on the desired style. To cuff pants, start by trying them on and marking the desired length with a pin or chalk. Then, fold the raw edge of the pant leg up to the marked line and press the fold to create a crisp crease. Next, fold the cuff up to the desired height and press again. Finally, sew the cuff in place using a sewing machine or by hand, making sure to backstitch at the beginning and end of the seam to secure it. The Cuffing Method is a great way to shorten pants without losing the original hem, and it can be easily reversed if needed. Additionally, cuffing can add a stylish touch to pants, making them look more fashionable and put-together. Overall, The Cuffing Method is a simple and effective technique for shortening pants that can be mastered with a little practice and patience.
Finishing Touches for a Professional Look
The finishing touches on a garment can make all the difference in achieving a professional look. A well-finished garment not only looks polished but also reflects the attention to detail and care that went into its creation. To achieve a professional finish, there are several techniques that can be employed. One of the most important is pressing the hem, which creates a crisp, clean fold that gives the garment a sleek appearance. Additionally, topstitching can be used to add a decorative touch and reinforce seams, while adding a lining or interfacing can provide stability and structure to the garment. By incorporating these techniques into your sewing practice, you can take your garments from homemade to high-end. In this article, we will explore each of these techniques in more detail, starting with the importance of pressing the hem.
Pressing the Hem
Pressing the hem is a crucial step in achieving a professional finish when shortening pants. To do this, start by folding the raw edge of the hem up by about 1/4 inch, and then another 1/4 inch, and press. This will create a crisp fold that will help you achieve a sharp crease. Next, fold the hem up to the desired length and press again. Make sure to use a hot iron and steam to help the fabric hold its shape. It's also a good idea to use a pressing cloth to protect the fabric from scorching. Once you've pressed the hem, let it cool before handling the pants. This will help the fabric set and prevent the hem from coming undone. By pressing the hem, you'll be able to achieve a clean and polished finish that will make your shortened pants look like they were tailored specifically for you.
Topstitching for a Finishing Touch
Here is the paragraphy: Topstitching is a simple yet effective way to add a professional finish to your shortened pants. This technique involves sewing a line of stitches along the edge of the hem, usually in a contrasting thread color, to create a decorative and functional detail. Topstitching serves several purposes: it reinforces the hem, preventing it from fraying or coming undone, and it also adds a touch of elegance to the overall appearance of the pants. To topstitch your shortened pants, start by threading your sewing machine with a contrasting thread color and setting the stitch length to a medium or long length. Then, place the pants under the machine's presser foot, aligning the edge of the hem with the edge of the presser foot. Slowly sew a straight line along the edge of the hem, using a steady and consistent motion. Make sure to backstitch at the beginning and end of the seam to secure it in place. Topstitching can be done by hand or by machine, but machine topstitching is generally faster and more efficient. With a little practice, you can achieve a professional-looking topstitch that adds a finishing touch to your shortened pants.
Adding a Lining or Interfacing
Adding a lining or interfacing to your shortened pants can elevate their appearance and provide a professional finish. A lining is a layer of fabric sewn inside the garment, typically made of a lightweight material such as cotton or silk, while an interfacing is a layer of fabric or material applied to the wrong side of the fabric to add stability and structure. Both can be used to add a touch of sophistication to your pants. To add a lining, simply cut a duplicate of the pant pieces from your lining fabric, then sew them together, leaving a small opening to turn the lining right side out. Insert the lining into the pant shell, making sure to align the seams, and then sew the opening shut by hand or by machine. Interfacing can be applied to specific areas of the pant, such as the waistband or pocket bags, to add stability and prevent stretching. When choosing a lining or interfacing, consider the type of fabric you are working with and the desired level of structure and support. For example, a lightweight lining may be suitable for a flowy cotton pant, while a heavier interfacing may be needed for a structured wool pant. By adding a lining or interfacing, you can create a polished and professional finish that elevates your shortened pants from a DIY project to a high-end garment.