How To Make Beaver Tails
Understanding the Basics of Making Beaver Tails
Background History of Beaver Tails
Beaver tails, a iconic Canadian delicacy, are not what they might initially appear to be. Many people might get the wrong impression from the name, but these treats are actually pastries. The delicious dessert-like item traces its roots back to the country’s early settlers. The name derives from the pastries' striking resemblance to the broad, flat tail of a beaver, one of Canada's national symbols. The Beaver Tails' story began in 1978 when Grant and Pam Hooker of Killaloe, Ontario, Canada, decided to make their family's secret recipe, traceable to the 19th century, commercial. Since that decision, BeaverTail pastries have become a Canadian food icon, renowned internationally. They have evolved from being a home-based business to eventually operating franchises in various countries, including the United States, Japan, UAE, and more.
Ingredients and Tools Necessary for Beaver Tails
When it comes to creating beaver tails, the ingredients needed are easy to find and accessible. Primary ingredients include yeast, warm water, granulated sugar, salt, vanilla extract, egg, warm milk, all-purpose flour, and oil for frying. Toppings can vary, but common ones include cinnamon sugar, Nutella and banana, apple pie filling, or a simple squeeze of lemon juice. In terms of tools, you'll need common kitchen utensils such as mixing bowls, a whisk, a rolling pin, a skillet or deep fryer for frying, and a slotted spoon to carefully retrieve the pastries once they are cooked.
Essential Steps in Making Beaver Tails
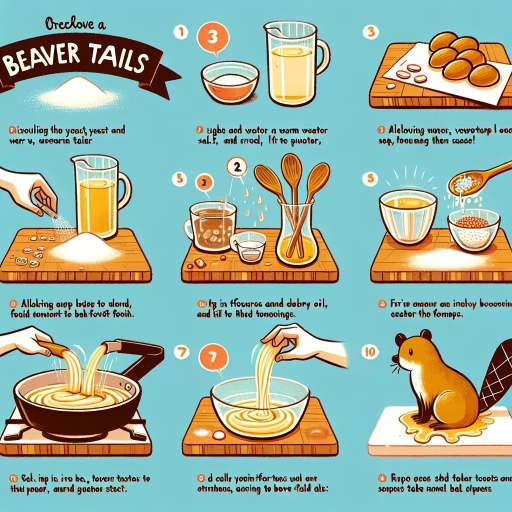
The process of making Beaver Tails may seem daunting, but it is quite straightforward once broken down into clear and manageable steps. The first step involves combining and whisking yeast, warm water, and a little sugar in a bowl until it is frothy. This process is important to activate the yeast. Following this, other ingredients like sugar, salt, vanilla, egg, and warm milk are combined then the yeast mixture is added. Gradually, flour is incorporated until a sticky dough forms. The dough needs to be kneaded and allowed to rise. After the dough has risen sufficiently, it's divided into pieces, each of which will be shaped into a beaver tail. These pieces will then be deep-fried until they turn golden brown and puffy, at which point they can be moved to a paper towel to drain and then while still hot, covered in a choice of topping.
Common Mistakes to Avoid When Making Beaver Tails
Incorrect Yeast Activation
One of the common mistakes made while making beaver tails involves the activation of the yeast. Yeast is a crucial component in making these pastries, as it helps the dough rise and attain the fluffy texture that beaver tails are known for. However, yeast can be quite finicky, so it's important to make sure that your water is at the correct temperature — too hot, and it could kill the yeast, but too cold, and it won't activate it. Investing in a kitchen thermometer is a good way to ensure your water reaches the optimal temperature range of between 105°F to 115°F before you add your yeast.
Mishandling the Dough
Dough management, particularly when it comes to allowing the dough to rise, is another area where mistakes frequently occur. Resultantly, it's necessary to provide your dough with the right conditions to rise, and enough time to do so. The dough should ideally be kept in a warm location and be given at least an hour to rise. Additionally, the dough needs to be carefully handled when it's being shaped into the beaver tail as too much manipulation can result in tough pastries.
Incorrect Frying Temperature
The last, but certainly not least, common mistake revolves around the frying temperature. Too low a temperature, and the dough will absorb too much oil, making the pastry greasy. Conversely, too high a temperature will result in the exterior burning before the dough has fully cooked through. To maintain the right oil temperature, it's crucial to have a deep-fry or candy thermometer. Aim for a temperature range between 375°F to 385°F, which will allow your beaver tails to cook properly, achieving a golden, crispy exterior and a soft, fluffy interior.
Fun and Innovative Variations of Beaver Tails
Creating Your Own Toppings
One of the best things about making Beaver Tails is the ability to get creative and customize the toppings as per your liking. Although classic cinnamon sugar is a common favorite, the options are virtually unlimited. Consider spreading Nutella and fresh-cut fruits, or perhaps a layer of cream cheese frosting and a sprinkle of crushed oreos. Savory versions can also be tried by substitifying sweet elements with shredded cheese and crisped bacon bits, making a fascinating and tasty twist on the conventional Beaver Tail.
Incorporating Flavour into the Dough
Another interesting variation could involve flavoring the dough itself. While traditional Beaver Tail dough is lightly sweetened and quite plain, experimenting with adding flavors to the dough can lead to exciting results. For instance, adding a hint of cardamom or cinnamon to the dough will provide a subtle spiced undertone that can complement a variety of toppings. By incorporating citrus zests, such as lemon or orange, you could also achieve a light and refreshing flavor profile.
Mini Beaver Tail Bites
If you're looking for a fun and bite-sized variation to the typical Beaver Tail, consider making Beaver Tail bites instead. Simply cut the dough into small pieces before frying. These make excellent party appetizers or would also work great for a snack on-the-go. They would be especially popular with children due to the fun and easy-to-eat format.