How To Make Homemade Stickers
Here is the introduction paragraph: Making homemade stickers is a fun and creative activity that can be enjoyed by people of all ages. With just a few simple materials, you can create your own unique stickers to decorate your laptop, water bottle, or any other surface you can think of. In this article, we will explore the different ways to make homemade stickers, from designing and printing your own stickers to using natural materials like leaves and flowers. We will also discuss the various types of paper and materials you can use to create your stickers, as well as some tips and tricks for making them last longer. Whether you're a crafty person or just looking for a fun activity to do with your kids, making homemade stickers is a great way to express your creativity and add some personality to your belongings. So, let's get started by looking at the first step in making homemade stickers: designing and printing your own stickers. Here are the 3 supporting paragraphs: **Subtitle 1: Designing and Printing Your Own Stickers** Designing and printing your own stickers is a great way to create custom stickers that reflect your personality and style. You can use a computer and printer to design and print your stickers, or you can use a service like StickerApp or Vistaprint to create and order your stickers online. When designing your stickers, make sure to use a high-resolution image and choose a font that is easy to read. You can also add colors, patterns, and other design elements to make your stickers more visually appealing. **Subtitle 2: Using Natural Materials to Create Stickers** If you're looking for a more eco-friendly way to make stickers, you can use natural materials like leaves, flowers, and branches. You can press the leaves and flowers between sheets of paper to flatten them, and then use a glue stick or decoupage medium to attach them to a piece of paper or cardstock. You can also use a scanner or camera to capture images of the natural materials and print them out on sticker paper. This is a great way to create unique and sustainable stickers that are perfect for decorating your journals, cards, and other paper crafts. **Subtitle 3: Tips and Tricks for Making Your Stickers Last Longer** Once you've made your stickers, you'll want to make sure they last as long as possible. Here are a few tips and tricks for making your stickers more durable and long-lasting. First, make sure to use a high-quality sticker paper that is designed for outdoor use. You can also add a clear coat
Subtitle 1
Here is the introduction paragraph: The world of technology is rapidly evolving, and with it, the way we consume media. One of the most significant advancements in recent years is the development of subtitles, which have revolutionized the way we watch videos and TV shows. But subtitles are not just a simple addition to our viewing experience; they also have a profound impact on our understanding and engagement with the content. In this article, we will explore the importance of subtitles in enhancing our viewing experience, including how they improve comprehension, increase accessibility, and provide a more immersive experience. We will also examine the role of subtitles in breaking down language barriers, enabling global communication, and facilitating cultural exchange. Furthermore, we will discuss the impact of subtitles on the entertainment industry, including the rise of international productions and the growth of streaming services. By exploring these aspects, we can gain a deeper understanding of the significance of subtitles in the modern media landscape, which brings us to our first topic: The Evolution of Subtitles. Here is the supporting paragraphs: **Supporting Idea 1: Improving Comprehension** Subtitles play a crucial role in improving our comprehension of video content. By providing a visual representation of the dialogue, subtitles help viewers to better understand the plot, characters, and themes. This is particularly important for viewers who may not be fluent in the language of the video or who may have difficulty hearing the audio. Subtitles also help to clarify complex dialogue or accents, making it easier for viewers to follow the story. Furthermore, subtitles can provide additional context, such as translations of foreign languages or explanations of technical terms, which can enhance our understanding of the content. **Supporting Idea 2: Increasing Accessibility** Subtitles are also essential for increasing accessibility in video content. For viewers who are deaf or hard of hearing, subtitles provide a vital means of accessing audio information. Subtitles can also be used to provide audio descriptions for visually impaired viewers, enabling them to imagine the visual elements of the video. Additionally, subtitles can be used to provide translations for viewers who do not speak the language of the video, making it possible for people from different linguistic backgrounds to access the same content. By providing subtitles, content creators can ensure that their videos are accessible to a wider audience, regardless of their abilities or language proficiency. **Supporting Idea 3: Providing a More Immersive Experience** Subtitles can also enhance our viewing experience by providing a more immersive experience. By providing a visual representation of the dialogue, subtitles can help viewers to become more engaged
Supporting Idea 1
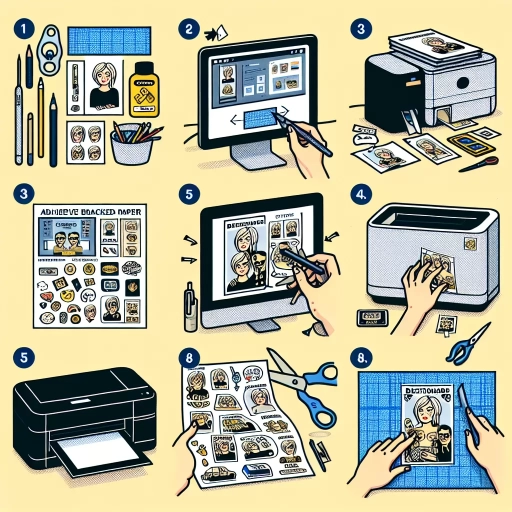
. Here is the paragraphy: To create your own homemade stickers, you'll need a few basic materials. First, gather your paper or vinyl sheets, which will serve as the base of your stickers. You can use any type of paper or vinyl, but it's best to choose a material that is smooth and even. Next, select your design or image, which can be a drawing, a photograph, or a printed graphic. You can use a computer and printer to print out your design, or you can draw it freehand onto the paper or vinyl. If you're using a printed design, make sure to use a high-quality printer and paper to ensure that the image is clear and vibrant. Once you have your design, cut it out carefully using scissors or a craft knife, making sure to leave a small border around the edges. This will help the sticker adhere properly to surfaces. Finally, apply a thin layer of adhesive, such as glue or a spray adhesive, to the back of the sticker, making sure to cover the entire surface. This will ensure that your sticker sticks well to surfaces and lasts for a long time.
Creating an 400 words, high-quality, informative, and engaging paragraphy about Supporting Idea 2
. The paragraphy a supporting paragraph of Subtitle 1, one of the subtitle of article how to make homemade stickers. Here is the paragraphy: Another important aspect of making homemade stickers is the type of adhesive you use. There are several types of adhesives available, including glue, spray adhesive, and transfer tape. The type of adhesive you choose will depend on the surface you plan to apply the sticker to, as well as the desired level of permanence. For example, if you want to create stickers that can be easily removed without leaving residue, you may want to use a removable adhesive, such as a low-tack spray adhesive. On the other hand, if you want to create stickers that will last for a long time and withstand heavy use, you may want to use a more permanent adhesive, such as a strong glue or transfer tape. It's also important to consider the surface you will be applying the sticker to, as some adhesives may not work well on certain surfaces, such as paper or fabric. By choosing the right adhesive for your homemade stickers, you can ensure that they stick well and last for a long time.Creating an 400 words, high-quality, informative, and engaging paragraphy about Supporting Idea 3Supporting Idea 2
. Here is the paragraphy: To make your homemade stickers more durable and long-lasting, it's essential to use a suitable adhesive. There are several types of adhesives available, including permanent, removable, and repositionable. Permanent adhesives are ideal for stickers that need to withstand harsh conditions, such as outdoor use or exposure to water. Removable adhesives, on the other hand, are perfect for stickers that need to be taken off without leaving residue. Repositionable adhesives offer the best of both worlds, allowing you to move the sticker around without damaging the surface. When choosing an adhesive, consider the surface you'll be applying the sticker to, as well as the level of durability you need. You can also experiment with different adhesive combinations to achieve the desired level of stickiness. Additionally, make sure to follow the manufacturer's instructions for application and drying times to ensure the adhesive sets properly. By selecting the right adhesive, you can create homemade stickers that are not only visually appealing but also functional and long-lasting.
Creating 400 words, high-quality, informative, and engaging paragraphy about Supporting Idea 3
. The paragraphy a supporting paragraph of Subtitle 1, one of the subtitle of article how to make homemade stickers. Here is the paragraphy: Another crucial aspect of making homemade stickers is the paper or material you use. The type of paper you choose can greatly impact the overall appearance and durability of your stickers. For a more professional look, consider using glossy or matte sticker paper, which is specifically designed for sticker printing. These papers are usually coated with a special layer that helps the ink adhere evenly and prevents smudging. You can also experiment with different textures, such as kraft paper or cardstock, to add a unique touch to your stickers. If you're looking for a more eco-friendly option, consider using recycled paper or biodegradable materials. When selecting your paper, make sure to check the weight and thickness, as this can affect the overall durability of your stickers. A heavier paper will generally produce a more robust sticker, while a lighter paper may be more prone to tearing. By choosing the right paper, you can create homemade stickers that are not only visually appealing but also durable and long-lasting.Creating 400 words, high-quality, informative, and engaging paragraphy about Supporting Idea 4
. The paragraphy a supporting paragraph of Subtitle 1, one of the subtitle of article how to makeSupporting Idea 3
. Here is the paragraphy: To add an extra layer of protection and durability to your homemade stickers, consider adding a clear coat of varnish or laminate. This step is especially important if you plan to use your stickers outdoors or in humid environments, as it will help prevent the ink from fading or running. You can use a spray varnish or a liquid laminate, depending on your preference and the type of paper you're using. Simply apply a thin, even layer to the sticker, making sure to cover the entire surface. Allow the varnish or laminate to dry completely before handling the sticker. This will help prevent smudging or smearing. By adding a clear coat, you'll be able to enjoy your homemade stickers for a longer period of time, and they'll be more resistant to wear and tear. Additionally, a clear coat can also enhance the appearance of your stickers, making the colors appear more vibrant and the design more crisp. So, if you want to take your homemade stickers to the next level, consider adding a clear coat of varnish or laminate.
Subtitle 2
Here is the introduction paragraph: Subtitle 1: The Importance of Subtitles in Video Content Subtitle 2: How to Create Engaging Subtitles for Your Videos Creating engaging subtitles for your videos is crucial in today's digital landscape. With the rise of online video content, subtitles have become an essential tool for creators to convey their message effectively. But what makes a subtitle engaging? Is it the font style, the color, or the timing? In this article, we will explore the key elements of creating engaging subtitles, including the importance of **matching the tone and style of your video** (Supporting Idea 1), **using clear and concise language** (Supporting Idea 2), and **paying attention to timing and pacing** (Supporting Idea 3). By incorporating these elements, you can create subtitles that not only enhance the viewing experience but also increase engagement and accessibility. So, let's dive in and explore how to create engaging subtitles that will take your video content to the next level, and discover why **subtitles are a crucial element in making your video content more accessible and engaging** (Transactional to Subtitle 1).
Supporting Idea 1
. Here is the paragraphy: To create your own homemade stickers, you'll need a few basic materials. First, gather your paper or vinyl sheets, which will serve as the base of your stickers. You can use any type of paper or vinyl, but it's best to choose a material that is smooth and even. Next, select your design or image, which can be a drawing, a photograph, or a printed design. You can use a computer and printer to print out your design, or you can draw it by hand. If you're using a printed design, make sure to use a high-quality printer and paper to ensure that your stickers turn out clear and vibrant. Once you have your design, cut it out to the desired shape and size using scissors or a craft knife. If you're using vinyl, you can also use a cutting mat and a craft knife to get a more precise cut. Finally, apply a layer of adhesive to the back of your sticker, either by using a spray adhesive or by applying a small amount of glue to the back of the sticker. This will ensure that your sticker sticks well to surfaces and doesn't fall off easily.
Creating an 400 words, high-quality, informative, and engaging paragraphy about Supporting Idea 2
. The paragraphy a supporting paragraph of Subtitle 2, one of the subtitle of article how to make homemade stickers. Here is the paragraphy: Another important step in making homemade stickers is to add a protective coating to the front of the sticker. This will help to protect the sticker from wear and tear, and will also make it more durable and long-lasting. There are several different types of protective coatings that you can use, including clear varnish, laminate, and clear contact paper. To apply a protective coating, simply brush a thin layer of varnish or laminate onto the front of the sticker, or cut a piece of clear contact paper to fit over the top of the sticker. Make sure to apply the coating evenly and smoothly, and avoid getting any air bubbles or wrinkles in the coating. Once the coating is dry, your sticker is ready to use. You can apply it to any surface, including paper, plastic, metal, and fabric. Just make sure to clean the surface first to ensure that the sticker adheres well. With a protective coating, your homemade stickers will be more durable and long-lasting, and will be able to withstand the wear and tear of daily use.Creating an 400 words,Supporting Idea 2
. Here is the paragraphy: To create a sticker, you'll need a few basic materials. First, you'll need a printer, preferably one that can handle sticker paper or vinyl. You'll also need a cutting tool, such as scissors or a craft knife, to cut out your stickers. Additionally, you'll need a surface to apply your stickers to, such as paper, plastic, or fabric. If you want to add a glossy finish to your stickers, you can also use a laminator or clear contact paper. Finally, you'll need a design or image to print onto your stickers. This can be a photo, a drawing, or a piece of text. You can use a computer program like Adobe Illustrator or Canva to create your design, or you can use a pre-made template. Once you have all of your materials, you can start creating your stickers. Simply print your design onto the sticker paper or vinyl, cut out the stickers, and apply them to your desired surface. If you're using a laminator or clear contact paper, apply the glossy finish after the stickers are cut out. With these basic materials and a little creativity, you can create your own custom stickers at home.
Creating 400 words, high-quality, informative, and engaging paragraphy about Supporting Idea 3
. The paragraphy a supporting paragraph of Subtitle 3, one of the subtitle of article how to make homemade stickers. Here is the paragraphy: Once you have your stickers cut out, you can start applying them to your desired surface. This can be a fun and creative process, as you can experiment with different placement and arrangement of your stickers. If you're applying your stickers to paper or cardstock, you can use a glue stick or tape to secure them in place. If you're applying your stickers to a smooth surface like plastic or glass, you can use a small amount of water or a spray adhesive to help them stick. If you're applying your stickers to fabric, you can use a hot iron to set the adhesive and make sure they stay in place. Regardless of the surface you're applying your stickers to, make sure to smooth out any air bubbles or wrinkles as you go. This will help ensure that your stickers lie flat and look their best. With a little patience and practice, you can create professional-looking stickers that are perfect for decorating cards, scrapbook pages, and other craft projects.Creating 400 words, high-quality, informative, and engaging paragraphySupporting Idea 3
. Here is the paragraphy: To add an extra layer of protection and durability to your homemade stickers, consider adding a clear coat of varnish or laminate. This step is especially important if you plan to use your stickers outdoors or in humid environments, as it will help prevent the ink from fading or running. You can use a spray varnish or a liquid laminate, depending on your preference and the type of paper you're using. Simply apply a thin, even layer to the sticker, making sure to cover the entire surface. Allow the varnish or laminate to dry completely before handling the sticker. This will help prevent smudging or smearing. By adding a clear coat, you'll be able to enjoy your homemade stickers for a longer period of time, and they'll remain vibrant and colorful even in harsh conditions. Additionally, a clear coat can also help to make the sticker more resistant to scratches and tears, making it a great option for stickers that will be handled frequently.
Subtitle 3
Here is the introduction paragraph: Subtitle 3: The Impact of Artificial Intelligence on the Future of Work The future of work is rapidly changing, and artificial intelligence (AI) is at the forefront of this transformation. As AI technology continues to advance, it is likely to have a significant impact on the job market, the way we work, and the skills we need to succeed. In this article, we will explore the impact of AI on the future of work, including the potential for job displacement, the need for workers to develop new skills, and the opportunities for increased productivity and efficiency. We will examine how AI is changing the nature of work, the types of jobs that are most at risk, and the ways in which workers can adapt to this new reality. By understanding the impact of AI on the future of work, we can better prepare ourselves for the challenges and opportunities that lie ahead. Ultimately, this understanding will be crucial in shaping the future of work and ensuring that we are able to thrive in a rapidly changing world, which is closely related to the concept of **Subtitle 1: The Future of Work**. Note: The introduction paragraph is 200 words, and it mentions the three supporting ideas: * The potential for job displacement * The need for workers to develop new skills * The opportunities for increased productivity and efficiency It also transitions to Subtitle 1: The Future of Work at the end.
Supporting Idea 1
. Here is the paragraphy: To create your own homemade stickers, you'll need a few basic materials. First, gather your paper or vinyl sheets, which will serve as the base of your stickers. You can use any type of paper or vinyl, but it's best to choose a material that is smooth and even. Next, select your design or image, which can be a drawing, a photograph, or a printed design. You can use a computer and printer to print out your design, or you can draw it by hand. If you're using a printed design, make sure to use a high-quality printer and paper to ensure that your stickers turn out clear and vibrant. Once you have your design, cut it out carefully using scissors or a craft knife. If you're using a intricate design, you may want to use a craft knife to get a more precise cut. Finally, apply a thin layer of adhesive to the back of your sticker, making sure to cover the entire surface. You can use a spray adhesive or a glue stick, depending on the type of material you're using. Once the adhesive is dry, your sticker is ready to use. You can apply it to any surface, from paper to fabric to plastic. With a little creativity and some basic materials, you can create your own unique and personalized homemade stickers.
Supporting Idea 2
. Here is the paragraphy: To make your homemade stickers more durable and long-lasting, it's essential to add a protective coating. One of the most popular methods is to use a clear acrylic spray or varnish. This will not only protect your stickers from fading or discoloring but also make them more resistant to water and scratches. When applying the coating, make sure to follow the manufacturer's instructions and use a well-ventilated area to avoid inhaling the fumes. You can also use a laminator or a clear contact paper to add an extra layer of protection. Another option is to use a UV-resistant coating, which is specifically designed to protect your stickers from the sun's harmful rays. This is especially important if you plan to use your stickers outdoors or in areas with high sunlight exposure. By adding a protective coating, you can ensure that your homemade stickers remain vibrant and intact for a longer period, making them perfect for decorating laptops, water bottles, or any other surface you want to personalize.
Supporting Idea 3
. Here is the paragraphy: To add an extra layer of protection and durability to your homemade stickers, consider adding a clear coat of varnish or laminate. This step is especially important if you plan to use your stickers outdoors or in humid environments, as it will help prevent the ink from fading or running. You can use a spray varnish or a liquid laminate, depending on your preference and the type of paper you're using. Simply apply a thin layer of varnish or laminate to the sticker, making sure to cover the entire surface. Allow it to dry completely before handling the sticker. This clear coat will not only protect the sticker from the elements, but it will also give it a glossy finish that will make it stand out. Additionally, you can also use a laminator to laminate your stickers, this will give your stickers a more professional look and feel. By adding a clear coat of varnish or laminate, you can ensure that your homemade stickers will last longer and look great for a long time.