How To Draw An Owl
Understanding the Basics of Drawing an Owl
Grasping the Fundamentals
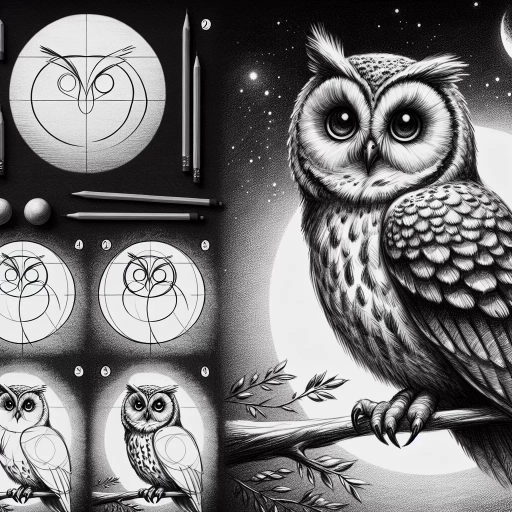
The first step to drawing anything, including an owl, is understanding the basic shapes that make up the object. For an owl, these shapes often include circles for the eyes and body, a triangle for the beak, and elongated ovals for the wings. These shapes form the foundation of your drawing. With practice, you will improve and be able to include more detail and complex shapes into your work.
Starting with a Rough Sketch
Once you have a basic understanding of the shapes involved, it is time to start your drawing. Begin with a light, rough sketch using the primary shapes. For instance, draw a large, pill-shaped ellipse for the body, a circle for the head, two smaller circles for the eyes, and a triangle for the beak. This stage may seem simple, but it sets the tone for your drawing and helps you to become more comfortable with the shapes. Remember, it is at this point you develop the positioning and proportion of your owl.
Applying the Details
Now that you have a rough sketch, you can start applying details to your drawing. Begin by refining the pencil lines you initially drew. Add more detailed features, such as the feathers around the eyes and on the wings, giving them an intricate pattern. Try to make the owl's face symmetrical. To enhance the realism factor, consider studying and observing photos or live owls as exploration is beneficial in adding life to your artwork. This will provide you a firsthand experience in capturing an owl's unique traits and characteristics.
Utilizing Techniques to Create a Realistic Owl
Shading for Depth and Texture
An integral part of making a realistic owl drawing is the implementation of shading. It gives depth and texture to the drawing, making the two-dimensional image appear three-dimensional. Shading varies with respect to intensity, dark areas indicating shadowed or distant parts, while the lighter shades provide dimension and depth. Use smooth and even strokes to apply shading, adding layers gradually to gain the desired effect. The owl's feathers need special attention as they have a layered look. Shading effectively will help accomplish this effect.
Highlighting for Effects
Just like shading, highlighting is a fundamental technique employed to add realism. Highlights are the lightest areas of an image, which reflect light. On an owl, the eyes, beak, and some parts of the feathers will need highlighting. The reflection in the eyes can simply be a small white circle. Creating a light source assists in determining where highlights should be applied. It enables the drawing to portray a sense of the environment through the placement of light. Use an eraser to lightly remove any shading or color where the highlights are supposed to be.
Finishing Touches
Details are everything. Even the smallest changes can make a significant difference in the outcome. After shades and highlights, lastly, focus on smaller details such as the texture of the feathers, the talons, and any surrounding elements like the branch. Use a fine-tipped tool for these details. Additionally, clean up any unnecessary lines or smudges. It is in the finishing touches that the owl comes alive and your drawing evolves from being just a sketch to an authentic piece of art.
Practicing With various Tools and Techniques
Experimenting with Different Mediums
Art is all about experimentation and finding what works best for you. Experiment with different drawing tools and mediums, such as charcoal, pastels, or even digital art platforms. Each medium brings a distinct quality to your artwork, be it the rich tones of charcoal or the blended vibrancy of pastels, or even flexibility and accessibility in digital platforms. Using different mediums can keep the process exciting and may help you uncover a style or technique you particularly enjoy.
Technique Mastery
A crucial aspect of the learning process is understanding and mastering different techniques. This includes various shading techniques like cross-hatching, stippling, and blending. Additionally, learning to correctly draw the gradient values can really elevate your artwork. Remember, like any other skill, mastering these techniques will require time and practice. You will gradually grow more comfortable using particular techniques, and over time, you will notice your drawing skills improving.
Consistent Practice
Like with any skill, practice makes perfect. Consistentlydrawing your chosen subject, in this case, an owl, can help to improve your skills and understanding of your subject matter. It is important to stay patient and remember that improvement comes with time. Don't be afraid to make mistakes, as each error presents a learning opportunity. Over time, you will notice your drawings become more detailed and realistic as your understanding and techniques grow.