How To Draw Female Body
Drawing the female body can be a challenging yet rewarding experience for artists of all skill levels. To create a realistic and aesthetically pleasing representation, it's essential to understand the basics of female body proportions, sketch the female form with confidence, and refine the details to add realism. In this article, we'll delve into these three crucial aspects of drawing the female body, providing you with the knowledge and techniques necessary to improve your skills. We'll start by exploring the fundamentals of female body proportions, discussing the key measurements and ratios that will help you create a balanced and harmonious figure. By understanding these basics, you'll be able to lay the foundation for a beautiful and realistic drawing. So, let's begin by Understanding the Basics of Female Body Proportions.
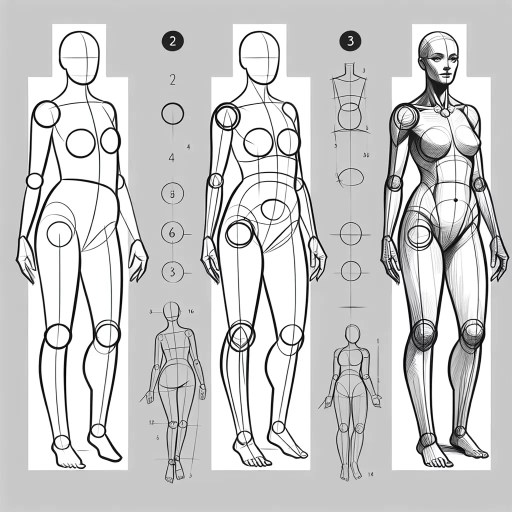
Understanding the Basics of Female Body Proportions
Understanding the basics of female body proportions is essential for artists, designers, and anyone interested in human anatomy. To accurately depict the female form, it's crucial to grasp the fundamental principles of proportion, measurement, and balance. This involves measuring the head and body ratio, identifying key landmarks and reference points, and recognizing the importance of symmetry and balance. By mastering these concepts, individuals can create more realistic and aesthetically pleasing representations of the female body. In this article, we will delve into the world of female body proportions, starting with the foundation of measurement: the head and body ratio. By understanding how to accurately measure and proportion the head in relation to the body, artists and designers can establish a solid foundation for their work. Let's begin by exploring the intricacies of measuring the head and body ratio.
Measuring the Head and Body Ratio
The head and body ratio is a fundamental aspect of drawing the female body. To measure this ratio, start by drawing a vertical line from the top of the head to the heels. Divide this line into eight equal parts, with the top part representing the head. The body should be roughly seven times the size of the head. This ratio can vary slightly depending on the individual and the style of drawing, but it provides a general guideline for achieving proportionate measurements. The head is typically one-eighth of the total body length, with the remaining seven-eighths comprising the torso, arms, and legs. By using this ratio, artists can ensure that their drawings are proportionate and visually appealing. Additionally, measuring the head and body ratio can help artists to better understand the overall proportions of the female body and make adjustments as needed to achieve a more realistic and balanced representation.
Identifying the Key Landmarks and Reference Points
When drawing the female body, it's essential to identify the key landmarks and reference points to ensure accurate proportions and a natural, balanced appearance. Start by locating the overall center line of the body, which runs vertically from the top of the head, through the nose, chin, and pubic bone. This line serves as a guide for placing the body's features in relation to each other. Next, find the shoulder line, which is typically slightly sloping and runs from the base of the neck to the outer edge of the shoulder. The shoulder line helps to establish the width of the torso and the placement of the arms. The bust line, which is usually around 1-2 inches below the shoulder line, marks the fullest part of the breasts and helps to define the shape of the torso. The waistline, typically located around 1-2 inches above the belly button, indicates the narrowest part of the torso and helps to create a defined silhouette. The hip line, which is usually around 1-2 inches below the waistline, marks the widest part of the hips and helps to establish the shape of the lower body. The knee line, ankle line, and toe line serve as additional reference points for drawing the legs and feet. By identifying and using these key landmarks and reference points, you can create a well-proportioned and balanced female figure that looks natural and realistic.
Recognizing the Importance of Symmetry and Balance
Recognizing the importance of symmetry and balance is crucial when drawing the female body. Symmetry refers to the arrangement of body parts on either side of a central axis, while balance refers to the distribution of visual weight and stability. A symmetrical body has identical features on both sides of the axis, such as the eyes, eyebrows, and shoulders. Balance, on the other hand, is achieved when the visual weight of the body is evenly distributed, creating a sense of stability and harmony. To achieve symmetry and balance in your drawings, pay attention to the placement of body parts, ensuring that they are evenly spaced and proportionate. For example, the shoulders should be level, the hips should be even, and the arms and legs should be in proportion to the body. Additionally, consider the distribution of visual weight, making sure that the body is not leaning too far to one side or the other. By recognizing the importance of symmetry and balance, you can create drawings that are visually appealing and anatomically correct.
Sketching the Female Form with Confidence
Sketching the female form can be a daunting task, especially for beginners. However, with practice and patience, anyone can learn to draw the female figure with confidence. To start, it's essential to break down the figure into simple shapes, using basic forms to block out the overall pose and proportions. This approach allows artists to focus on the underlying structure of the body, rather than getting bogged down in details. By using simple shapes, artists can establish a solid foundation for their drawing, making it easier to add volume and dimension with gentle curves. As the drawing progresses, defining the contours and silhouette with soft lines can help to create a more nuanced and realistic representation of the female form. By mastering these fundamental techniques, artists can develop the skills and confidence needed to sketch the female figure with ease. To begin, let's start with the basics and explore how to use simple shapes to block out the figure.
Using Simple Shapes to Block Out the Figure
When sketching the female form, using simple shapes to block out the figure is an effective way to achieve proportion and accuracy. Start by sketching a large oval for the head, making sure it's tilted at a slight angle. Next, draw a long, curved line for the neck, connecting the oval to a larger, inverted triangle for the torso. The triangle should be wide at the top and narrow at the bottom, with the base of the triangle aligning with the hips. The hips themselves can be represented by a curved line that echoes the shape of the torso, with the legs extending down from the hips in long, gentle curves. The arms can be sketched as long, flowing lines that emerge from the shoulders and curve down to the hands. By using these simple shapes, you can establish the overall proportions and pose of the figure, making it easier to add details and refine the drawing later on. This technique also helps to prevent mistakes and ensures that the figure is balanced and harmonious. Additionally, using simple shapes allows you to focus on the overall gesture and movement of the figure, rather than getting bogged down in details. By blocking out the figure in this way, you can create a strong foundation for your drawing and set yourself up for success.
Adding Volume and Dimension with Gentle Curves
When adding volume and dimension to the female form, gentle curves play a crucial role in creating a natural and realistic representation. To achieve this, start by identifying the areas of the body where curves are most prominent, such as the bust, hips, and thighs. Use smooth, flowing lines to suggest the contours of these areas, taking care to vary the width and depth of the curves to create a sense of volume and dimension. For example, the curve of the bust should be more pronounced than the curve of the hips, while the thighs should be slightly more angular to suggest the underlying bone structure. As you sketch, pay attention to the way the curves intersect and overlap, using gentle, subtle transitions to create a sense of continuity and flow. By using gentle curves to suggest volume and dimension, you can create a female form that appears soft, natural, and inviting, rather than stiff or angular. Additionally, gentle curves can also be used to suggest the underlying muscle structure, such as the curve of the deltoids or the quadriceps, adding depth and nuance to your drawing. By mastering the use of gentle curves, you can create a female form that is both beautiful and anatomically accurate.
Defining the Contours and Silhouette with Soft Lines
When defining the contours and silhouette of the female form, soft lines are essential in capturing the gentle curves and subtle nuances of the body. Soft lines are used to suggest the overall shape and volume of the figure, rather than to create sharp, defined edges. To create soft lines, use a gentle, flowing motion with your pencil, applying varying degrees of pressure to achieve a range of line weights. Start by blocking in the overall shape of the figure, using soft, gestural lines to capture the pose and proportions. Then, gradually refine the contours, using softer lines to suggest the subtle curves of the body, such as the gentle slope of the shoulders, the softness of the breasts, and the rounded contours of the hips and thighs. As you work, pay attention to the way the soft lines interact with the surrounding space, using the negative space to create a sense of depth and dimensionality. By using soft lines to define the contours and silhouette of the female form, you can create a sense of subtlety and nuance, capturing the gentle curves and softness of the body in a way that is both elegant and expressive.
Refining the Details and Adding Realism
When it comes to creating a realistic and engaging character, refining the details and adding realism is crucial. This involves paying attention to the smallest aspects of the character's appearance, from the delicate features of their face to the intricate patterns on their clothing. To achieve this level of realism, artists must employ a range of techniques, including rendering facial features with delicacy and precision, adding texture and pattern to the hair and clothing, and enhancing the overall pose and expression with subtle gestures. By focusing on these key areas, artists can bring their characters to life and create a truly immersive experience for their audience. One of the most critical aspects of refining the details is rendering the facial features with delicacy and precision, as this is often the first thing that viewers notice when looking at a character.
Rendering the Facial Features with Delicacy and Precision
When rendering the facial features with delicacy and precision, it's essential to approach each element with a gentle touch and a keen eye for detail. Start by defining the overall shape of the face, using soft, subtle lines to suggest the contours of the cheeks, nose, and jawline. Next, focus on the eyes, using a range of values and textures to capture their depth and dimensionality. Begin by blocking in the basic shape of the eyes, including the eyelids, eyelashes, and iris. Then, add layers of shading and detail, using a small brush or a fine-tip pen to suggest the delicate folds of the eyelids and the sparkle of the eyes. Move on to the nose, using a combination of gentle curves and subtle shading to capture its shape and contours. The mouth is another critical feature, requiring a delicate balance of shape, texture, and expression. Use a range of lines and values to suggest the shape of the lips, and add subtle shading and detail to capture their texture and movement. Finally, add the finishing touches to the face, including the eyebrows, hair, and any other features that bring the portrait to life. Throughout the process, remember to work with delicacy and precision, using a range of techniques and tools to capture the subtleties of the human face. By doing so, you'll be able to create a portrait that is not only visually stunning but also deeply expressive and engaging.
Adding Texture and Pattern to the Hair and Clothing
When adding texture and pattern to the hair and clothing, it's essential to consider the overall aesthetic and style of the drawing. For hair, you can use a range of techniques to create texture, such as hatching, cross-hatching, and stippling. These methods can help create a sense of volume, depth, and movement in the hair. For example, you can use gentle, flowing lines to suggest soft, curly hair, or more defined, angular lines to indicate straight or wavy hair. Additionally, you can add texture to the hair by suggesting individual strands or layers, which can help create a more realistic and dynamic look. When it comes to clothing, you can use a variety of patterns and textures to add visual interest and depth. For example, you can use stripes, polka dots, or florals to create a playful, whimsical look, or more subtle textures like denim or lace to suggest a more understated, elegant style. To add pattern to clothing, you can use a range of techniques, including drawing individual elements like buttons or embroidery, or suggesting larger patterns like plaid or stripes. You can also experiment with different line weights and styles to create a sense of texture and dimension in the clothing. For example, you can use thick, bold lines to suggest a chunky knit sweater, or more delicate, intricate lines to indicate a lacy or crocheted fabric. By adding texture and pattern to the hair and clothing, you can create a more nuanced, detailed, and engaging drawing that captures the viewer's attention and invites them to explore the subject further.
Enhancing the Overall Pose and Expression with Subtle Gestures
When it comes to enhancing the overall pose and expression of your female figure drawing, subtle gestures can make a significant difference. One of the most effective ways to add nuance and emotion to your drawing is by incorporating gentle, naturalistic hand and finger movements. For example, you can depict the subject's hands relaxed and slightly curled, with the fingers gently touching the thigh or hip, conveying a sense of comfort and ease. Alternatively, you can show the hands clasped together or placed on the hips, suggesting confidence and assertiveness. The way the fingers interact with the body can also reveal the subject's personality and mood, such as a gentle touch on the arm or a more forceful grip on the hip. Additionally, the position and angle of the head and neck can greatly impact the overall expression, with a slight tilt or turn of the head able to convey a range of emotions, from curiosity to sassiness. By paying attention to these subtle gestures, you can add depth and complexity to your drawing, creating a more engaging and relatable portrait of the female form.