How To Install Screen Protector
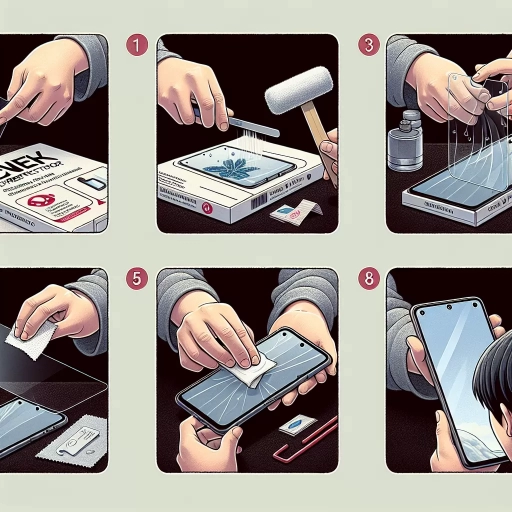
Installing a screen protector on your device can be a daunting task, but with the right approach, it can be a breeze. A good screen protector not only protects your screen from scratches and cracks but also enhances the overall user experience. However, a poorly installed screen protector can be frustrating and even render your device unusable. To ensure a successful installation, it's essential to understand the key steps involved in the process. In this article, we'll explore the three crucial aspects of installing a screen protector: preparation, application techniques, and troubleshooting and maintenance. By mastering these elements, you'll be able to install a screen protector like a pro. So, let's start with the foundation of a successful installation - preparation is key.
Preparation is Key
When it comes to applying a screen protector, many people assume it's a straightforward process that requires minimal effort. However, the reality is that proper preparation is essential to ensure a successful and bubble-free application. To achieve this, it's crucial to choose the right screen protector for your device, clean the screen thoroughly to remove any dirt or oils, and prepare the workspace to minimize distractions and errors. By taking these steps, you'll be able to apply your screen protector with confidence and precision. In this article, we'll explore each of these steps in more detail, starting with the importance of choosing the right screen protector.
Choose the Right Screen Protector
Here is the paragraphy: When it comes to choosing the right screen protector, there are several factors to consider. First and foremost, you'll want to select a protector that is specifically designed for your device. This ensures a precise fit and optimal protection. Next, consider the type of material you prefer. Glass screen protectors offer superior scratch resistance and clarity, while film protectors are often thinner and more affordable. If you're prone to dropping your device, a tempered glass protector with a high level of shock absorption may be the best choice. Additionally, think about the level of sensitivity you need. If you use your device for gaming or other activities that require precise touch input, look for a protector with a high level of touch sensitivity. Finally, check the protector's compatibility with any cases or accessories you use, and read reviews to ensure it doesn't interfere with your device's functionality. By carefully considering these factors, you can choose a screen protector that provides the right balance of protection, functionality, and convenience for your needs.
Clean the Screen Thoroughly
Cleaning the screen thoroughly is a crucial step in preparing your device for a screen protector installation. Any dirt, dust, or oils from your skin can interfere with the adhesive and cause bubbles or peeling. Start by turning off your device and removing any phone cases or accessories. Use a soft, dry cloth to wipe down the screen, paying attention to any areas with visible debris or smudges. For more stubborn stains, dampen the cloth with distilled water, but make sure to wipe it dry immediately to prevent any water spots. Avoid using any harsh chemicals, abrasive materials, or household cleaners, as they can damage the screen's coating or harm the device. Instead, use a specialized screen cleaning solution and a microfiber cloth to gently remove any remaining dirt or grime. Once the screen is clean, use a dry section of the cloth to wipe it down and remove any excess moisture. This will ensure a clean and dry surface for the screen protector to adhere to, reducing the risk of bubbles or other installation issues.
Prepare the Workspace
Before applying a screen protector, it's essential to prepare the workspace to ensure a smooth and successful installation process. Start by clearing a flat surface, such as a table or countertop, of any clutter, dust, or debris. This will prevent any particles from getting in the way of the installation and reduce the risk of air bubbles or other imperfections. Next, cover the surface with a soft, lint-free cloth or a microfiber cloth to prevent scratches and provide a clean surface for the installation. If you're installing the screen protector in a humid or dusty environment, consider using a screen protector installation kit that includes a cleaning solution and a dust-repelling cloth. Additionally, make sure the room is well-lit and free from any distractions, allowing you to focus on the installation process. By preparing the workspace, you'll be able to install the screen protector quickly and efficiently, ensuring a perfect fit and a bubble-free finish.
Application Techniques
When it comes to applying a screen protector to your device, there are several techniques you can use to ensure a smooth and bubble-free installation. To achieve a professional-looking finish, it's essential to follow a few key steps. First, you need to align the screen protector properly to ensure it's centered and even. This is crucial in preventing air bubbles and dust from getting trapped underneath. Once you've aligned the protector, you can apply it smoothly, using a credit card or similar tool to push out any air bubbles. Finally, you'll need to remove any remaining air bubbles and dust particles to complete the installation. By following these simple techniques, you can enjoy a crystal-clear screen protector that protects your device from scratches and damage. To start, let's take a closer look at the first step: aligning the screen protector properly.
Align the Screen Protector Properly
To align the screen protector properly, start by cleaning the screen thoroughly with a soft cloth and a gentle cleaning solution to remove any dirt, dust, or oils from your skin. Next, peel the backing off the screen protector and align it with the top edge of your screen, ensuring it is centered and even. Use the screen's speaker holes or camera cutouts as a reference point to help guide the alignment. Gently place the screen protector onto the screen, starting from the top and working your way down, using a credit card or similar tool to smooth out any air bubbles that may form. Make sure to apply even pressure to avoid creating wrinkles or creases. If necessary, use a small amount of water or a specialized screen protector application fluid to help the protector adhere to the screen. Once the protector is in place, use a microfiber cloth to wipe away any excess moisture or air bubbles, ensuring a smooth and bubble-free finish. By following these steps, you can ensure a precise and accurate alignment of your screen protector, providing optimal protection for your device's screen.
Apply the Screen Protector Smoothly
To apply the screen protector smoothly, start by cleaning the screen thoroughly with a soft cloth and a gentle cleaning solution to remove any dirt, dust, or oils from your skin. Next, peel the backing off the screen protector and align it with the screen, ensuring it is centered and even. Gently place the screen protector onto the screen, starting from the top and working your way down, using a credit card or similar tool to smooth out any air bubbles that may form. Apply gentle pressure, working from the center outwards, to ensure the screen protector adheres evenly to the screen. If any air bubbles do form, use the credit card to gently push them towards the edge of the screen, where they can be easily removed. Finally, use a soft cloth to wipe away any excess air bubbles or debris, and your screen protector should be applied smoothly and evenly.
Remove Air Bubbles and Dust
When it comes to installing a screen protector, one of the most frustrating issues that can arise is the presence of air bubbles and dust. These imperfections can not only detract from the appearance of your device, but they can also compromise the effectiveness of the screen protector. To remove air bubbles and dust, start by gently lifting the edge of the screen protector and reapplying it to the screen. This can help to release any air bubbles that have formed. If the bubbles persist, try using a credit card or similar tool to gently push them towards the edge of the screen. For dust particles, use a soft cloth or brush to gently sweep them away. In some cases, it may be necessary to use a small amount of adhesive remover or a specialized cleaning solution to remove stubborn dust or debris. It's also a good idea to clean the screen thoroughly before applying the screen protector to prevent dust and dirt from becoming trapped underneath. By taking the time to remove air bubbles and dust, you can ensure a smooth, bubble-free installation that will help to protect your device's screen for months to come.
Troubleshooting and Maintenance
Screen protectors are a must-have for any smartphone user, providing an extra layer of protection against scratches, cracks, and other forms of damage. However, they can also be a source of frustration when air bubbles and dust get trapped underneath, or when they need to be removed or cleaned. In this article, we will explore the common issues that arise with screen protectors and provide practical solutions for troubleshooting and maintenance. We will discuss how to fix air bubbles and dust that get trapped underneath the screen protector, how to remove the screen protector safely without damaging the screen, and how to clean and maintain the screen protector to keep it in good condition. By following these tips, you can ensure that your screen protector continues to provide optimal protection for your smartphone. First, let's start with the most common issue: fixing air bubbles and dust that get trapped underneath the screen protector.
Fixing Air Bubbles and Dust
Fixing air bubbles and dust is a crucial step in ensuring a smooth and bubble-free screen protector installation. To fix air bubbles, start by gently lifting the edge of the screen protector and reapplying it to the screen, making sure to align it properly. If the bubble persists, use a credit card or a similar tool to gently push the bubble towards the edge of the screen. For more stubborn bubbles, apply a small amount of water to the affected area and use a microfiber cloth to wipe it away. To fix dust, use compressed air to blow away any debris, and then use a microfiber cloth to wipe the screen clean. If the dust is stuck under the screen protector, try lifting the edge of the protector and reapplying it, making sure to align it properly. Regular cleaning and maintenance can also help prevent air bubbles and dust from forming in the future. By following these simple steps, you can ensure a smooth and bubble-free screen protector installation that will protect your device's screen for years to come.
Removing the Screen Protector Safely
Removing the screen protector safely is a crucial step to avoid damaging your device's screen. To start, clean the screen thoroughly with a soft cloth and a gentle cleaning solution to remove any dirt, dust, or oils that may interfere with the removal process. Next, locate the edge of the screen protector and gently peel it back, working your way around the screen. If the protector is stubborn, you can use a hair dryer or a warm cloth to loosen the adhesive. Be careful not to apply too much heat, as this can damage the screen. Once the protector is removed, use a soft cloth to wipe away any remaining adhesive residue. If there are any stubborn bits, you can use a small amount of adhesive remover or a specialized cleaning solution. Finally, inspect the screen for any remaining residue or debris and clean it again if necessary. By following these steps, you can safely remove your screen protector and maintain the integrity of your device's screen.
Cleaning and Maintaining the Screen Protector
Cleaning and maintaining the screen protector is crucial to ensure its longevity and effectiveness. To clean the screen protector, start by gently wiping it with a soft, dry cloth to remove any loose debris or dust. For more stubborn stains or smudges, dampen a cloth with water, but make sure to wring it out thoroughly to avoid any excess moisture. Avoid using harsh chemicals, abrasive cleaners, or rough cloths, as these can damage the screen protector's coating or scratch the screen. For tougher stains, a specialized screen cleaning solution can be used, but always follow the manufacturer's instructions. Regular cleaning will help prevent the buildup of dirt and grime, which can affect the screen protector's clarity and touch sensitivity. Additionally, avoid exposing the screen protector to extreme temperatures, direct sunlight, or moisture, as these can cause it to degrade or peel off prematurely. By following these simple cleaning and maintenance tips, you can help extend the life of your screen protector and keep your device's screen looking its best.