How To Draw Bear
Drawing a bear can be a fun and rewarding experience, especially when you have the right guidance. With a few simple steps and some practice, you can create a realistic and adorable bear drawing. To get started, it's essential to understand the basics of drawing a bear, including its body shape, proportions, and facial features. Once you have a good grasp of the basics, you can move on to sketching the bear's body and facial features, paying attention to details such as the shape of the ears, nose, and mouth. Finally, adding texture, shading, and final details will bring your bear drawing to life. In this article, we will explore these three key aspects of drawing a bear, starting with the fundamentals. Let's begin by understanding the basics of drawing a bear.
Understanding the Basics of Drawing a Bear
Drawing a bear can be a fun and rewarding experience, but it requires a good understanding of the basics. To get started, it's essential to familiarize yourself with bear anatomy, including the shape and proportions of the body, head, and limbs. This knowledge will help you create a realistic and accurate drawing. In addition to understanding bear anatomy, it's also crucial to choose the right drawing tools and materials, such as pencils, paper, and erasers, to ensure that your drawing turns out the way you want it to. Furthermore, setting up your drawing space for comfort and efficiency is vital to help you stay focused and avoid distractions. By mastering these fundamental aspects of drawing a bear, you'll be well on your way to creating a beautiful and lifelike piece of art. Let's start by taking a closer look at the anatomy of a bear.
Familiarizing Yourself with Bear Anatomy
Familiarizing yourself with bear anatomy is a crucial step in drawing a realistic bear. Understanding the structure and proportions of a bear's body will help you create a more accurate and detailed drawing. Start by studying the overall shape of a bear's body, noting the rounded head, long snout, and prominent ears. The body is typically muscular and sturdy, with a distinctive hump on the shoulders and a sloping back. The front legs are shorter than the back legs, and the paws are large and padded. Take note of the texture and pattern of a bear's fur, which can vary depending on the species. For example, black bears have a smooth, glossy coat, while grizzly bears have a more rugged, silver-tipped coat. By studying the anatomy of a bear, you'll be able to capture its unique characteristics and create a more convincing drawing. Additionally, understanding the proportions and structure of a bear's body will help you to draw it in different poses and angles, adding variety and interest to your artwork.
Choosing the Right Drawing Tools and Materials
When it comes to drawing a bear, having the right tools and materials can make all the difference in achieving a realistic and detailed illustration. The first step is to choose a suitable drawing surface, such as paper or board, that is smooth and durable enough to handle a variety of mediums. Look for paper with a weight of at least 80 gsm to prevent buckling or warping. Next, select a range of drawing tools that will allow you to achieve different line weights and textures. A set of graphite pencils (HB, 2B, 4B, 6B) is essential for creating a range of values and shading, while a charcoal pencil or sketching charcoal can add expressive, gestural lines. A sharpener and eraser are also must-haves for refining and correcting your drawing. Additionally, consider investing in a set of colored pencils or markers to add color and depth to your bear illustration. Finally, don't forget to have a reference image of a bear handy to ensure accuracy and inspiration. By choosing the right drawing tools and materials, you'll be well on your way to creating a stunning and realistic bear drawing.
Setting Up Your Drawing Space for Comfort and Efficiency
Setting up your drawing space for comfort and efficiency is crucial for creating a productive and enjoyable drawing experience. To start, choose a quiet and dedicated area with good lighting, preferably natural light, to minimize eye strain. Ensure the room is at a comfortable temperature, and consider using a desk or table with a smooth surface to prevent your paper from slipping or wrinkling. Invest in a comfortable and ergonomic chair, as you'll likely be spending hours sitting and drawing. A drawing board or lap desk can also be useful for supporting your paper and allowing you to work at a comfortable angle. Organize your drawing tools and supplies within easy reach, such as pencils, erasers, sharpeners, and paper, to save time and reduce distractions. Consider investing in a pencil case or storage container to keep your supplies tidy and organized. Finally, minimize clutter and distractions in your drawing space by turning off notifications on your phone or finding a quiet time to work. By setting up your drawing space with comfort and efficiency in mind, you'll be able to focus on creating your best work, including drawing a bear.
Sketching the Bear's Body and Facial Features
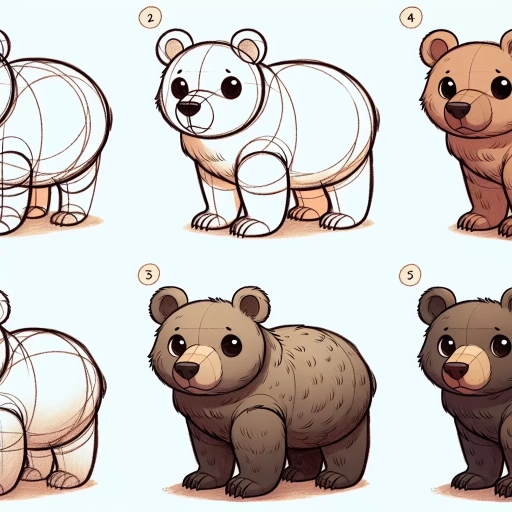
Sketching a bear's body and facial features requires attention to detail and a clear understanding of its anatomy. To create a realistic and engaging drawing, it's essential to break down the process into manageable steps. First, start by drawing the overall body shape and proportions, taking into account the bear's muscular build and distinctive posture. Next, focus on sketching the facial features, including the eyes, nose, and mouth, which are crucial in capturing the bear's expression and personality. Finally, add the ears, neck, and shoulders to the bear's body, which will help to create a sense of depth and dimension. By following these steps, you'll be able to create a detailed and lifelike drawing of a bear. Let's begin by exploring the first step in this process: drawing the overall body shape and proportions.
Drawing the Overall Body Shape and Proportions
When drawing the overall body shape and proportions of a bear, it's essential to consider the animal's muscular build and sturdy physique. Start by sketching a large oval for the body, making sure it's tall rather than wide. The oval should be slightly tilted, with the top end leaning towards the back. This will help you achieve the bear's characteristic sloping posture. Next, add a smaller oval for the head, connected to the body by a neck that's roughly one-quarter of the way down from the top of the body. The head should be positioned at a slight angle, with the nose pointing downwards. For the limbs, draw four straight lines extending from the body, two at the front and two at the back. The front legs should be slightly shorter than the back legs, and the paws should be small and rounded. Pay attention to the proportions of the body, ensuring that the head is in line with the shoulders and the hips are in line with the knees. A bear's body is roughly 1.5 to 2 times the length of its head, so keep this ratio in mind as you sketch. By following these guidelines, you'll be able to capture the bear's powerful and imposing physique, setting the foundation for a realistic and engaging drawing.
Sketching the Facial Features, Including the Eyes, Nose, and Mouth
Sketching the facial features of a bear requires attention to detail and a gentle touch. Start by sketching the eyes, which are typically almond-shaped and slanted, with the outer corner pointing towards the nose. The eyes should be fairly close together, with the top of the eye socket forming a slight curve. The nose is usually small and rounded, with a slight upturn at the tip. Sketch the nose in a gentle, rounded shape, making sure to leave enough space between the eyes and the nose. The mouth is a simple, curved line that follows the natural curve of the jaw. Sketch the mouth in a smooth, flowing motion, making sure to keep it in proportion to the rest of the face. As you sketch the facial features, pay attention to the overall shape and proportions of the face, making sure that everything is in balance and harmony. Remember to keep your lines soft and gentle, as bears have a naturally soft and cuddly appearance. By taking your time and paying attention to detail, you can create a beautiful and realistic sketch of a bear's facial features.
Adding the Ears, Neck, and Shoulders to the Bear's Body
To add the ears, neck, and shoulders to the bear's body, start by sketching two triangular shapes on either side of the head, making sure they are in line with the top of the skull. The ears should be rounded at the tips and slightly pointed at the base, with the edges being slightly curved. The neck should be drawn as a gentle, curved line that connects the head to the body, making sure it is in proportion to the rest of the bear's body. The shoulders should be indicated by two gentle, sloping lines that connect the neck to the body, with the front shoulder being slightly higher than the back shoulder. The shoulders should be rounded and muscular, with a slight indentation where the neck meets the shoulder. Make sure to pay attention to the proportions and placement of these features, as they will greatly affect the overall appearance of the bear. By carefully sketching the ears, neck, and shoulders, you can add depth and dimension to the bear's body, and create a more realistic and engaging drawing.
Adding Texture, Shading, and Final Details to Your Bear Drawing
Adding the final touches to your bear drawing can elevate it from a simple sketch to a stunning work of art. To achieve this, it's essential to focus on three key elements: texture, shading, and final details. By incorporating these elements, you can create a drawing that not only looks realistic but also engages the viewer's senses. In this article, we'll explore how to add texture and fur patterns to the bear's body, create shading and depth to enhance its three-dimensional appearance, and finalize your drawing with details such as claws and a background. By mastering these techniques, you'll be able to bring your bear drawing to life and make it a truly unforgettable piece. Let's start by exploring how to create texture and fur patterns on the bear's body, which will lay the foundation for the rest of your drawing.
Creating Texture and Fur Patterns on the Bear's Body
When creating texture and fur patterns on the bear's body, it's essential to consider the type of bear you're drawing and the level of detail you want to achieve. For a realistic bear, you can start by adding short, curved lines to indicate the direction of the fur, following the natural contours of the body. For a more stylized or cartoonish bear, you can use longer, more expressive lines to create a softer, more textured appearance. To add depth and dimension, you can also incorporate different line weights and hatching techniques, such as cross-hatching or stippling, to create a range of values and textures. For example, you can use thicker lines to suggest the coarser fur on the bear's shoulders and back, while using thinner lines to indicate the softer fur on the belly and face. Additionally, you can use subtle variations in line direction and texture to suggest the bear's muscles and joints, creating a more dynamic and lifelike appearance. By carefully balancing texture and pattern, you can create a rich, engaging, and highly detailed bear drawing that invites the viewer to explore every aspect of the animal's anatomy.
Adding Shading and Depth to Enhance the Bear's Three-Dimensional Appearance
Adding shading and depth to your bear drawing can make a significant difference in its overall appearance, transforming it from a flat, two-dimensional image to a three-dimensional representation that seems to leap off the page. To achieve this, start by identifying the areas of the bear's body that would naturally receive the most light and shade, such as the fur, eyes, nose, and mouth. Use a range of shading techniques, including hatching, cross-hatching, and stippling, to create a sense of depth and dimension. For example, you can use gentle, soft hatching to suggest the texture of the bear's fur, while using more intense, darker shading to create the illusion of depth around the eyes and nose. Additionally, pay attention to the way the light source affects the bear's body, using shading to create a sense of volume and mass. By carefully observing the play of light and shadow on the bear's form, you can create a drawing that is not only visually appealing but also convincingly three-dimensional. To further enhance the bear's three-dimensional appearance, consider adding subtle gradations of tone and texture to suggest the softness of the fur, the roughness of the paws, and the smoothness of the nose. By combining these techniques, you can create a bear drawing that is not only detailed and realistic but also engaging and lifelike.
Finalizing Your Drawing with Details, Such as Claws and a Background
Finalizing your drawing with details, such as claws and a background, is a crucial step in bringing your bear to life. To add claws, start by drawing small, curved lines at the end of each paw, making sure to vary the size and shape to create a natural look. You can also add a small oval shape at the base of each claw to indicate the claw bed. For a more realistic look, add some texture to the claws by drawing short, curved lines that follow the shape of the claw. When it comes to the background, you can choose to keep it simple with a basic shape, such as a rectangle or oval, or get creative and add some scenery, like trees, rocks, or a sunset. To add depth and dimension to your background, use different shades of gray or color to create a gradient effect. You can also add some texture to the background by drawing short, curved lines that follow the shape of the scenery. Additionally, consider adding some final details, such as eyes, nostrils, and a mouth, to bring your bear to life. Use a fine-tip pen or pencil to add these details, and make sure to vary the size and shape to create a natural look. By adding these final details, you can create a realistic and engaging bear drawing that showcases your artistic skills.