How To Paint Grass
Painting grass can be a daunting task, especially for beginners. However, with the right techniques and understanding of the basics, anyone can create a beautiful and realistic grass painting. To achieve this, it's essential to start by understanding the basics of painting grass, including the different types of brushes and paints to use, as well as the importance of color and texture. From there, you can move on to more advanced techniques, such as creating realistic grass textures, adding depth and dimension to your painting, and incorporating shadows and highlights. By layering colors for depth and dimension, using atmospheric perspective for distance, and incorporating shadows and highlights, you can create a grass painting that looks lifelike and engaging. In this article, we'll explore these techniques in more detail, starting with the basics of painting grass.
Understanding the Basics of Painting Grass
When it comes to painting grass, many artists struggle to capture its texture, color, and movement. However, with a few simple techniques and the right tools, anyone can create a beautiful and realistic grass landscape. To get started, it's essential to understand the basics of painting grass, including choosing the right brushes and tools, selecting the perfect green shades, and preparing the canvas or surface. By mastering these fundamental elements, artists can achieve a natural and lifelike representation of grass in their paintings. In this article, we'll explore these key aspects of painting grass, starting with the importance of choosing the right brushes and tools. With the right equipment, artists can create a wide range of textures and effects, from soft and delicate to thick and impasto. By selecting the right brushes and tools, artists can set themselves up for success and achieve a beautiful, grassy landscape.
Choosing the Right Brushes and Tools
When it comes to painting grass, having the right brushes and tools can make all the difference in achieving a realistic and visually appealing result. The first step is to choose the right brush size and shape. Natural hair brushes, such as sable or mongoose, are ideal for painting grass as they hold a lot of paint and have a soft, flexible texture that allows for smooth blending. Look for brushes with synthetic or natural fibers that are specifically designed for watercolor or acrylic painting. A flat brush with synthetic fibers is great for creating broad strokes and covering large areas, while a round brush with natural fibers is better suited for detail work and creating fine lines. In addition to brushes, a palette knife can be a useful tool for mixing and blending colors, and a spray bottle can be used to create subtle texture and blending effects. A painting medium, such as glazing medium or texture paste, can also be used to add depth and dimension to your grass. When selecting brushes and tools, consider the type of paint you are using, the size of your canvas, and the level of detail you want to achieve. By choosing the right brushes and tools, you can create a beautiful and realistic grass landscape that captures the beauty of nature.
Selecting the Perfect Green Shades
When it comes to selecting the perfect green shades for painting grass, there are several factors to consider. First, think about the type of grass you're trying to depict - is it a lush, vibrant lawn or a dry, withered meadow? Different types of grass have distinct color profiles, so it's essential to choose a shade that accurately reflects the grass you're painting. Next, consider the lighting conditions in your scene - is the grass in direct sunlight or shaded? This will affect the color and intensity of the green you choose. Additionally, think about the mood and atmosphere you want to convey in your painting - do you want the grass to appear calm and serene or energetic and vibrant? With these factors in mind, you can begin to narrow down your options and select the perfect green shades for your painting. A good starting point is to look at the color wheel and identify the different shades of green, ranging from yellow-green to blue-green. You can also experiment with mixing different colors to create unique and nuanced shades of green. Some popular green shades for painting grass include viridian green, sap green, and olive green, which can be used to create a range of effects from soft and subtle to bold and vibrant. Ultimately, the key to selecting the perfect green shades is to experiment and find the colors that work best for your specific painting and artistic vision.
Preparing the Canvas or Surface
Preparing the canvas or surface is a crucial step in painting grass, as it sets the foundation for the entire artwork. To start, choose a high-quality canvas or surface that is suitable for painting, such as cotton, linen, or board. If using a new canvas, prime it with a coat of gesso to create a smooth and non-porous surface. This will help the paint adhere evenly and prevent it from soaking into the canvas. If using a previously painted surface, make sure to clean it thoroughly with soap and water to remove any dirt or debris. Next, apply a coat of primer or a thin layer of paint to the entire surface, allowing it to dry completely before starting to paint. This will help to create a uniform base tone and prevent the paint from pooling or streaking. Additionally, consider applying a texture or roughening the surface to give the grass a more realistic and three-dimensional appearance. By taking the time to properly prepare the canvas or surface, you will be able to achieve a smooth and even finish, and ensure that your grass painting looks its best.
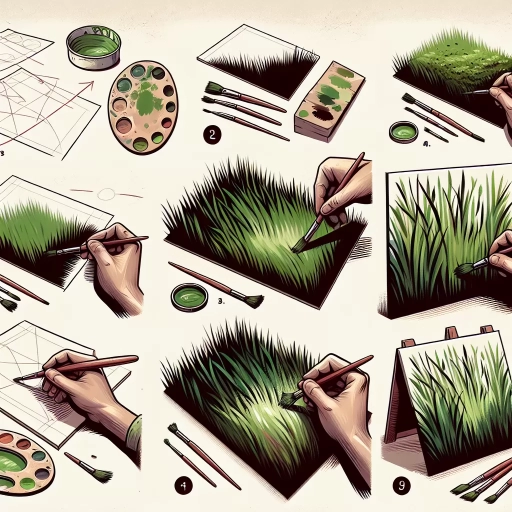
Techniques for Creating Realistic Grass Textures
Creating realistic grass textures can be a challenging task, but with the right techniques, you can achieve stunning results. To create a realistic grass texture, you can use a combination of drybrushing, glazing, and loose brushstrokes. Drybrushing is a great technique for creating coarse, textured grass, while glazing can be used to achieve soft, lush grass. Additionally, loose brushstrokes can be used to create movement and energy in your grass texture. By mastering these techniques, you can create a wide range of grass textures, from the rough, wild grass of a meadow to the soft, manicured grass of a lawn. In this article, we will explore these techniques in more detail, starting with the use of drybrushing for coarse grass.
Using Drybrushing for Coarse Grass
Using drybrushing for coarse grass is a fantastic technique to achieve a realistic and textured look. This method involves dragging a almost-dry brush across the canvas or painting surface to pick up the raised edges of the paint and create a rough, grass-like effect. To start, load your brush with a small amount of paint and wipe most of it off on a paper towel, leaving just a hint of color on the bristles. Then, holding the brush at a 45-degree angle, gently drag it across the surface in quick, light strokes, following the direction of the grass growth. This will help to create a sense of movement and texture, with the drybrushing technique catching the raised edges of the paint and leaving a rough, grassy appearance. For coarser grass, use a larger brush and more pronounced strokes, while for finer grass, use a smaller brush and lighter strokes. By varying the pressure and direction of the brushstrokes, you can achieve a range of different textures and effects, from soft and feathery to rough and wiry. With practice, drybrushing can become a versatile and effective technique for creating realistic and detailed grass textures in your paintings.
Applying Glazing for Soft, Lush Grass
Applying glazing for soft, lush grass is a technique used to achieve a realistic and vibrant grass texture in painting. To start, mix a glaze by combining a small amount of paint with a medium, such as water or a specialized glazing liquid. The ratio of paint to medium can vary depending on the desired level of transparency and the specific effect you want to achieve. For soft, lush grass, a higher ratio of medium to paint is often preferred, as this will allow for a more subtle and nuanced color. Once the glaze is mixed, apply it to the canvas using a soft brush, working in thin layers to build up the color gradually. This will help to prevent the glaze from becoming too opaque and will allow for a more even, natural-looking finish. To enhance the texture and depth of the grass, you can also use a wet-on-wet technique, applying the glaze to the canvas before the previous layer has fully dried. This will create a soft, blended edge that mimics the natural texture of grass. By applying multiple layers of glaze, you can achieve a rich, vibrant color that captures the soft, lush quality of real grass. Additionally, you can use a palette knife to add texture and dimension to the grass, creating a more realistic and three-dimensional effect. Overall, applying glazing for soft, lush grass is a versatile and effective technique that can be used to create a wide range of grass textures and effects in painting.
Creating Movement with Loose Brushstrokes
Creating movement with loose brushstrokes is a technique used to capture the dynamic and organic nature of grass. By applying loose, expressive brushstrokes, artists can convey the sense of movement and energy that is inherent in grass. This technique involves using a range of brushstrokes, from soft and gentle to bold and impulsive, to create a sense of texture and movement. The brushstrokes can be applied in a variety of directions, from horizontal to vertical, to capture the way that grass sways in the wind. By varying the length, thickness, and direction of the brushstrokes, artists can create a sense of depth and dimensionality in their painting, drawing the viewer's eye through the composition. To create movement with loose brushstrokes, artists can use a range of brush types, from flat brushes to round brushes, and can experiment with different brush sizes and shapes to achieve the desired effect. Additionally, artists can use a range of painting mediums, such as oil or acrylic paint, to create a sense of texture and luminosity in their brushstrokes. By combining loose brushstrokes with other techniques, such as layering and blending, artists can create a highly realistic and engaging depiction of grass that captures its dynamic and organic nature.
Adding Depth and Dimension to Your Grass Painting
Layering Colors for Depth and Dimension
Using Atmospheric Perspective for Distance
Incorporating Shadows and Highlights
To add depth and dimension to your grass painting, there are several techniques you can employ. One of the most effective methods is to layer colors, creating a sense of depth and dimension by building up layers of paint. This technique allows you to achieve a sense of texture and volume, making your grass appear more lifelike. Another approach is to use atmospheric perspective, which involves fading colors into the distance to create a sense of depth. This technique is particularly useful for capturing the subtle nuances of grass in a landscape. Finally, incorporating shadows and highlights can add an extra layer of dimension to your painting, creating a sense of movement and energy. By combining these techniques, you can create a grass painting that is rich in depth and dimension. In this article, we will explore each of these techniques in more detail, starting with layering colors for depth and dimension.
Layering Colors for Depth and Dimension
Using Atmospheric Perspective for Distance
Incorporating Shadows and Highlights
Layering Colors for Depth and Dimension
Using Atmospheric Perspective for Distance
Using atmospheric perspective for distance is a technique that can add depth and dimension to your grass painting. Atmospheric perspective refers to the way objects appear to fade into the distance due to the Earth's atmosphere. In a grass painting, this can be achieved by using softer colors and less defined brushstrokes in the background, gradually increasing in intensity and definition as you move towards the foreground. This technique can create a sense of depth and distance, drawing the viewer's eye into the painting. To incorporate atmospheric perspective into your grass painting, start by mixing a range of blues and greens to create a soft, hazy background. Use a large brush to block in the background, working from light to dark. As you move towards the foreground, gradually increase the intensity of the colors and the definition of the brushstrokes. Use a smaller brush to add texture and detail to the grass, creating a sense of movement and energy. By using atmospheric perspective, you can create a sense of depth and distance in your grass painting, drawing the viewer's eye into the scene and creating a sense of immersion.