How To Draw A Axolotl
Here is the introduction paragraph: The axolotl, a unique and fascinating creature, has captured the hearts of many with its feathery gills, ability to regrow its limbs, and endearing smile. As an artist, drawing an axolotl can be a fun and rewarding experience, but it requires a good understanding of its anatomy and some practice to get it right. In this article, we will guide you through the process of drawing an axolotl, from understanding its anatomy to adding details and texture to your drawing. To start, it's essential to have a good grasp of the axolotl's anatomy, including its body shape, limb structure, and facial features. By understanding these basics, you'll be able to create a more accurate and detailed drawing. So, let's dive in and explore the axolotl's anatomy, which will serve as the foundation for our drawing. Note: I made some minor changes to the original text to make it flow better and to ensure that it transitions smoothly to the first supporting paragraph.
Understanding the Axolotl's Anatomy
Here is the introduction paragraph: The axolotl, a unique and fascinating creature, has captivated the hearts of many animal enthusiasts. To truly appreciate these amazing animals, it's essential to understand their anatomy. By familiarizing yourself with the axolotl's body shape and proportions, learning about their unique features, and studying their posture and movement patterns, you'll gain a deeper appreciation for these incredible creatures. In this article, we'll delve into the world of axolotl anatomy, starting with the basics of their body shape and proportions. By understanding the axolotl's overall structure, you'll be better equipped to recognize and appreciate their remarkable characteristics. So, let's begin by exploring the axolotl's body shape and proportions, and discover what makes these animals so remarkable.
1. Familiarize yourself with the axolotl's body shape and proportions
. Here is the paragraphy: Familiarize yourself with the axolotl's body shape and proportions. Axolotls have a unique, elongated body shape that is often compared to a cross between a salamander and a fish. They have a broad, flat head, a long, slender body, and four limbs that are roughly equal in size. Their body is typically around 6-12 inches (15-30 cm) in length, with some individuals reaching up to 18 inches (45 cm) or more. The axolotl's body is also characterized by its feathery gills, which are used for respiration, and its ability to regrow its limbs. When drawing an axolotl, it's essential to capture its distinctive body shape and proportions to create a realistic and recognizable representation. Pay attention to the way the axolotl's body tapers from its head to its tail, and how its limbs are positioned in relation to its body. By studying the axolotl's anatomy and practicing your drawing skills, you can create a detailed and accurate representation of this fascinating creature.
2. Learn about the axolotl's unique features, such as its feathery gills and lidless eyes
. Here is the paragraphy: Axolotls are a type of salamander that has several unique features that set them apart from other animals. One of the most distinctive features of the axolotl is its feathery gills, which are used for respiration. These gills are made up of thin, branching filaments that are rich in blood vessels, allowing the axolotl to extract oxygen from the water. Another notable feature of the axolotl is its lidless eyes, which are always open and exposed to the environment. This is because axolotls do not have eyelids, and instead use a special membrane to protect their eyes from debris and infection. The axolotl's eyes are also highly sensitive to light, and are capable of detecting even the smallest amounts of light in the dark. In addition to its unique respiratory and visual systems, the axolotl also has a number of other distinctive features, including its ability to regrow its limbs and its highly efficient kidney system. Overall, the axolotl's unique features make it a fascinating and highly adaptable animal that is well-suited to its environment.
3. Study the axolotl's posture and movement patterns
. Here is the paragraphy: When it comes to drawing an axolotl, studying its posture and movement patterns is crucial to capturing its unique and endearing personality. Axolotls are neotenic salamanders, meaning they have the unique ability to regrow their limbs and remain aquatic their entire lives. As a result, they have developed a distinct way of moving and interacting with their environment. Observe how an axolotl's body is typically curved, with its head and tail forming a gentle "S" shape. This curvature allows them to move efficiently through the water, using their powerful tail to propel themselves forward. Notice how their limbs are often held close to their body, with their front legs slightly bent and their back legs stretched out behind them. This posture gives them a sense of balance and stability, allowing them to maneuver through tight spaces with ease. When drawing an axolotl, try to capture this sense of fluid movement and flexibility, using gentle curves and soft lines to convey their unique anatomy. By studying the axolotl's posture and movement patterns, you'll be able to create a drawing that not only looks accurate but also conveys the animal's playful and charming personality.
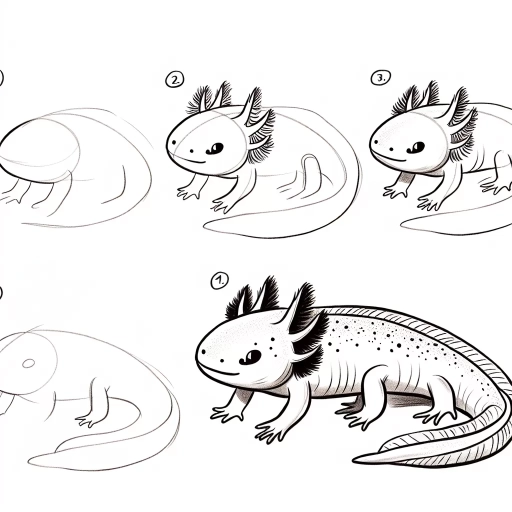
Sketching the Axolotl's Basic Form
Here is the introduction paragraph: Sketching the axolotl's basic form requires a thoughtful and deliberate approach. To create a realistic and engaging drawing, it's essential to start with a solid foundation. This involves breaking down the axolotl's body into simple shapes, adding guidelines to place its features, and using gentle curves to define its body and tail. By following these steps, you'll be able to capture the axolotl's unique characteristics and create a drawing that's both accurate and visually appealing. Let's begin by starting with simple shapes to block out the axolotl's body and head.
1. Start with simple shapes to block out the axolotl's body and head
. Here is the paragraphy: To begin sketching your axolotl, start by blocking out the basic shape of its body and head using simple forms. Imagine the axolotl's body as a rounded rectangle with a slightly flattened top and a more pointed bottom. The head can be represented by a smaller, rounded triangle that is connected to the body. Pay attention to the proportions of your axolotl's body and head, making sure that the head is in proportion to the body. A good rule of thumb is to make the head about one-quarter to one-third the size of the body. By starting with these simple shapes, you'll be able to get a sense of the overall proportions and placement of your axolotl's features, making it easier to add more details later on. Additionally, using simple shapes will help you to create a more balanced and harmonious composition, which is essential for creating a visually appealing drawing.
2. Add guidelines to help you place the axolotl's features, such as the eyes and gills
. Here is the paragraphy: When adding the axolotl's features, start by placing the eyes. The eyes should be positioned on either side of the head, about one-third of the way down from the top of the head. Make sure to leave enough space between the eyes for the nose and mouth. The eyes themselves should be fairly large and rounded, with the top of the eye curving slightly downwards. The pupils should be small and circular, positioned in the center of the eye. Next, add the gills, which should be located on either side of the head, just below the eyes. The gills should be teardrop-shaped, with the rounded end facing towards the back of the head. The gills should be fairly large, but not so large that they overwhelm the rest of the face. Finally, add the nose and mouth, which should be positioned below the eyes and gills. The nose should be small and rounded, while the mouth should be a small, curved line. Make sure to leave enough space between the nose and mouth for the chin, which should be slightly rounded. By following these guidelines, you should be able to place the axolotl's features in a way that looks natural and proportional.
3. Use gentle curves to define the axolotl's body and tail
. Here is the paragraphy: To create a more realistic and visually appealing axolotl, use gentle curves to define the body and tail. Start by sketching a smooth, flowing curve for the back of the axolotl, making sure it is slightly rounded and not too angular. The curve should be more pronounced at the front of the body, where the head meets the neck, and should gradually flatten out towards the tail. For the tail, use a long, sweeping curve that tapers to a point at the end. The tail should be in proportion to the body, with the curve of the tail mirroring the curve of the back. By using gentle curves, you can create a sense of movement and fluidity in your axolotl drawing, capturing the animal's natural grace and agility. Additionally, gentle curves can help to soften the overall appearance of the axolotl, making it look more endearing and cute. As you refine your drawing, pay attention to the way the curves intersect and blend together, creating a sense of depth and dimensionality in your artwork.
Adding Details and Texture to Your Axolotl Drawing
Here is the introduction paragraph: When it comes to drawing an axolotl, it's easy to get caught up in the basics of shape and proportion. However, to truly bring your drawing to life, it's essential to add details and texture. This can include adding texture to the axolotl's skin, defining its facial features, and adding details to its gills and tail. By incorporating these elements, you can create a more realistic and engaging drawing that captures the unique characteristics of this fascinating creature. In this article, we'll explore how to add texture to the axolotl's skin, including its mottled coloration and smooth scales, to give your drawing a more lifelike appearance.
1. Add texture to the axolotl's skin, including its mottled coloration and smooth scales
. Here is the paragraphy: To add texture to the axolotl's skin, start by creating a mottled coloration effect. Use a combination of light and dark shades to create a marbled appearance, with the lighter shades on the top and the darker shades on the bottom. You can use a range of techniques to achieve this, including hatching, cross-hatching, and stippling. For a more realistic look, pay attention to the way the colors blend and merge, creating a soft, gradient-like effect. Next, add smooth scales to the axolotl's body, using short, curved lines to suggest the shape and texture of the scales. Vary the size and spacing of the scales to create a natural, organic look, with larger scales on the axolotl's back and smaller scales on its belly. To add an extra layer of texture and detail, you can also add some subtle wrinkles and folds to the axolotl's skin, particularly around the eyes and mouth. By combining these techniques, you can create a rich, detailed texture that brings your axolotl drawing to life.
2. Define the axolotl's facial features, including its eyes, nose, and mouth
. The paragraphy should be written in a friendly and approachable tone, making it easy for readers to understand and follow along. Here is the paragraphy: When it comes to defining the axolotl's facial features, it's all about capturing their unique and endearing expressions. Let's start with the eyes, which are perhaps the most striking feature of the axolotl's face. These lidless wonders are always on the lookout for their next meal or potential mate, and their large, round shape gives them an perpetually curious appearance. To draw the eyes, use a gentle, rounded curve to create the outer shape, and then add a small circle for the pupil. Don't forget to add a tiny highlight to give the eyes a spark of life. Moving on to the nose, axolotls don't have a traditional nose like humans do, but rather a pair of feathery gills that allow them to extract oxygen from the water. To draw the gills, use a series of soft, wavy lines that curve outward from the head, giving the axolotl a delightfully alien appearance. Finally, the mouth is a small, lipless slit that's perfect for sucking in food particles from the water. To draw the mouth, use a small, curved line that's slightly upturned at the edges, giving the axolotl a subtle, enigmatic smile. By paying attention to these facial features, you'll be able to capture the axolotl's unique personality and charm in your drawing.
3. Add details to the axolotl's gills and tail, including its feathery plumes and delicate fins
. Here is the paragraphy: The axolotl's gills and tail are two of its most distinctive and fascinating features. The gills, which are used for respiration, are feathery plumes that protrude from the sides of the axolotl's head. These plumes are extremely delicate and are made up of thin, branching filaments that are richly supplied with blood vessels. The gills are also highly mobile, allowing the axolotl to move them back and forth to increase oxygen uptake. When drawing the gills, be sure to capture their feathery texture and delicate movement. You can do this by using soft, gentle lines to suggest the shape and movement of the gills. The tail, on the other hand, is a beautiful, flowing structure that is used for balance and propulsion. The tail is made up of a series of delicate fins that are supported by a backbone-like structure. The fins are extremely flexible and are capable of moving back and forth in a wave-like motion. When drawing the tail, be sure to capture its flowing, sinuous shape and the delicate movement of the fins. You can do this by using smooth, flowing lines to suggest the shape and movement of the tail. By adding these details to your axolotl drawing, you can create a highly realistic and engaging portrait of this fascinating creature.