How To Assemble A Clarinet
Assembling a clarinet can seem like a daunting task, especially for beginners. However, with the right guidance, it can be a straightforward process. In this article, we will walk you through the step-by-step process of assembling a clarinet, covering the essential steps to get you started. First, we will begin with unpacking and preparing the clarinet, ensuring that all the necessary parts are accounted for and ready for assembly. Next, we will move on to assembling the body and keys, carefully attaching each component to create a cohesive unit. Finally, we will cover the attachment of the barrel, bell, and mouthpiece, completing the clarinet's assembly. By following these steps, you will be able to successfully assemble your clarinet and start playing in no time. So, let's get started with Step 1: Unpacking and Preparing the Clarinet.
Step 1: Unpacking and Preparing the Clarinet
The first step in preparing your clarinet for play is to carefully unpack and prepare the instrument. This involves several key steps that will ensure your clarinet is in good working order and ready for use. First, you will need to remove the clarinet from its case and inspect it for any damage that may have occurred during storage or transport. Next, you will need to locate and identify all the parts and accessories that come with your clarinet, including the mouthpiece, ligature, and barrel. Finally, you will need to apply a small amount of cork grease to the corks to keep them from drying out and cracking. By following these steps, you can ensure that your clarinet is properly prepared and ready for play. To begin, let's start with the first step: removing the clarinet from its case and inspecting it for damage.
Remove the Clarinet from the Case and Inspect for Damage
When removing the clarinet from its case, it's essential to handle it with care to prevent any damage. Start by gently lifting the clarinet out of the case, taking note of any fragile or sensitive areas, such as the keys, pads, and mouthpiece. Inspect the instrument for any visible signs of damage, such as dents, scratches, or cracks. Check the keys for any signs of wear or misalignment, and make sure the pads are securely attached and not damaged. Also, inspect the mouthpiece for any signs of wear or damage, and ensure it is securely attached to the barrel. If you notice any damage, it's best to consult a professional clarinet technician for repairs before proceeding with assembly. Additionally, take a moment to wipe down the clarinet with a soft, dry cloth to remove any dust or debris that may have accumulated during storage. This will help ensure a smooth and proper assembly process.
Locate and Identify All the Parts and Accessories
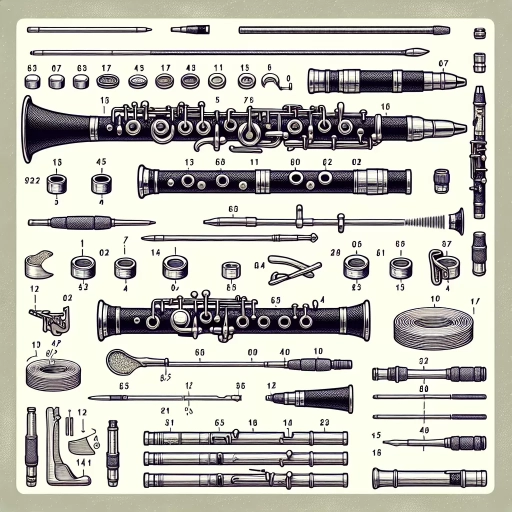
When unpacking your clarinet, it's essential to locate and identify all the parts and accessories to ensure you have everything you need for proper assembly and maintenance. Start by carefully removing the clarinet from its case or packaging, taking note of any protective wrapping or covering. Next, inspect the case or packaging for any small parts or accessories that may have been included, such as a mouthpiece, ligature, barrel, and bell. You should also find a set of keys, a neck strap, and a cleaning cloth. Additionally, check for any instructional materials, such as a user manual or assembly guide. If you're unsure about the identity or purpose of any part, consult the user manual or online resources for clarification. It's also a good idea to lay out all the parts and accessories on a flat surface, such as a table or countertop, to get a visual inventory of what you have. This will help you ensure that everything is accounted for and make the assembly process smoother. By taking the time to locate and identify all the parts and accessories, you'll be able to assemble your clarinet with confidence and start playing sooner.
Apply a Small Amount of Cork Grease to the Corks
When assembling a clarinet, it's essential to apply a small amount of cork grease to the corks to ensure a smooth and secure connection between the different parts of the instrument. Cork grease is a specialized lubricant designed specifically for clarinet corks, and it plays a crucial role in maintaining the instrument's sound quality and overall performance. By applying a small amount of cork grease to the corks, you'll be able to achieve a snug and airtight fit between the joints, which is vital for producing a clear and resonant sound. Additionally, cork grease helps to prevent the corks from drying out and cracking over time, which can lead to costly repairs and maintenance. To apply the cork grease, simply take a small amount and rub it onto the corks using a soft cloth or your finger, making sure to cover the entire surface evenly. Be careful not to apply too much grease, as this can attract dust and dirt, which can compromise the instrument's sound quality. By applying the right amount of cork grease, you'll be able to ensure a smooth and secure connection between the different parts of the clarinet, setting the stage for a successful assembly and optimal performance.
Step 2: Assembling the Body and Keys
Here is the introduction paragraph: Assembling the body and keys of a musical instrument is a crucial step in its construction. This process requires attention to detail and precision to ensure that the instrument sounds and plays properly. In this article, we will guide you through the process of assembling the body and keys, highlighting the key steps involved. Specifically, we will cover attaching the upper and lower body joints together, connecting the keys to the body using key rods, and aligning and adjusting the key pads and tone holes. By following these steps, you will be able to create a well-crafted instrument that produces high-quality sound. Let's start by attaching the upper and lower body joints together.
Attach the Upper and Lower Body Joints Together
Here is the paragraphy: Now that the upper and lower body joints are prepared, it's time to attach them together. Begin by applying a thin layer of cork grease to the tenon of the lower body joint. This will ensure a smooth and secure connection. Next, carefully align the upper and lower body joints, making sure that the keys and tone holes are properly aligned. Gently twist and push the joints together until they click into place. Be careful not to apply too much pressure, as this can damage the joints or keys. Once the joints are securely attached, use a soft cloth to wipe away any excess cork grease. Finally, inspect the connection to ensure that it is secure and even. If necessary, make any adjustments to the alignment or tightness of the joints to achieve a smooth and airtight connection. With the upper and lower body joints attached, the clarinet is starting to take shape, and you're one step closer to being able to play your instrument.
Connect the Keys to the Body Using the Key Rods
When assembling the clarinet, it's essential to connect the keys to the body using the key rods. This process requires attention to detail and a gentle touch to avoid damaging the delicate mechanisms. Start by locating the key rods, which are usually attached to the key cups or the body of the clarinet. Identify the corresponding keys and align them with the key rods, ensuring they are properly seated and aligned. Gently push the key rods into place, making sure they are securely attached to the key cups or body. As you connect the keys, pay attention to the key's movement and action, ensuring they are functioning smoothly and evenly. If a key is not moving freely, check the key rod for any blockages or misalignment and adjust accordingly. Continue connecting the keys to the body, working your way around the clarinet, and make sure all keys are securely attached and functioning properly. By carefully connecting the keys to the body using the key rods, you'll ensure a smooth and responsive playing experience.
Align and Adjust the Key Pads and Tone Holes
Here is the paragraphy: To ensure proper alignment and adjustment of the key pads and tone holes, carefully examine the clarinet's body and keys. Begin by attaching the key pads to the key cups, making sure they are securely fastened with the provided screws. Next, align the key cups with the tone holes, taking note of the subtle markings or guides on the body that indicate the correct positioning. Gently press the key cups onto the tone holes, ensuring a snug fit without applying too much pressure, which can damage the pads or tone holes. Once the key cups are in place, use a soft cloth or pad adjustment tool to fine-tune the alignment, making any necessary adjustments to achieve a smooth, even seal. Repeat this process for each key pad and tone hole, working your way around the clarinet's body. As you adjust the key pads, pay attention to the tone holes' edges, ensuring they are not damaged or scratched, which can affect the clarinet's sound quality. By carefully aligning and adjusting the key pads and tone holes, you'll be able to achieve a precise seal, allowing for optimal airflow and a rich, resonant sound.
Step 3: Attaching the Barrel, Bell, and Mouthpiece
Here is the introduction paragraph: Attaching the barrel, bell, and mouthpiece are crucial steps in assembling a saxophone. These components work together to produce the instrument's unique sound and playability. To ensure proper assembly, it's essential to follow the correct procedure. In this article, we will guide you through the process of attaching the barrel, bell, and mouthpiece, starting with attaching the barrel to the upper body joint, then connecting the bell to the lower body joint, and finally attaching the mouthpiece to the barrel and adjusting the ligature. By following these steps, you'll be able to assemble your saxophone with confidence and achieve optimal sound quality. Let's begin with the first step: attaching the barrel to the upper body joint.
Attach the Barrel to the Upper Body Joint
Attaching the barrel to the upper body joint is a crucial step in assembling a clarinet. To do this, locate the barrel and the upper body joint, ensuring they are free from any debris or obstructions. Next, align the barrel with the upper body joint, making sure the tenon on the barrel matches up with the socket on the joint. Gently twist the barrel clockwise while applying gentle pressure until it clicks into place, securing it firmly to the upper body joint. Be careful not to overtighten, as this can cause damage to the instrument. Once attached, check that the barrel is level and even with the rest of the clarinet, ensuring proper alignment and a smooth airflow. This step requires patience and attention to detail, as a secure and proper attachment is essential for producing a rich and clear sound. By following these steps, you can successfully attach the barrel to the upper body joint, bringing you one step closer to completing the assembly of your clarinet.
Connect the Bell to the Lower Body Joint
When attaching the bell to the lower body joint, it's essential to ensure a secure and precise connection to maintain the clarinet's overall sound quality and playability. Begin by locating the bell's socket, which is usually marked with a slight indentation or a small notch. Align the socket with the lower body joint's corresponding receiver, taking care to match the two parts carefully. Gently twist the bell clockwise while applying gentle pressure until it clicks into place, indicating a secure connection. Be cautious not to overtighten, as this can damage the joint or the bell. Once the bell is attached, inspect the connection to ensure it is snug and even. If necessary, make adjustments to achieve a smooth, airtight seal. A well-connected bell is crucial for producing a rich, full-bodied sound, and proper attachment will also help prevent air leaks and intonation issues. By taking the time to carefully attach the bell to the lower body joint, you'll be able to enjoy a more responsive and resonant playing experience.
Attach the Mouthpiece to the Barrel and Adjust the Ligature
Attaching the mouthpiece to the barrel and adjusting the ligature is a crucial step in assembling a clarinet. To begin, locate the mouthpiece and barrel, ensuring they are free from any debris or obstructions. Next, carefully align the mouthpiece with the barrel, making sure the tenon (the small protrusion on the mouthpiece) is securely seated in the barrel's socket. Gently twist the mouthpiece clockwise until it is snugly attached to the barrel. Be cautious not to overtighten, as this can damage the mouthpiece or barrel. Once attached, adjust the ligature by loosening the screws and sliding it onto the mouthpiece. The ligature should be positioned so that it is centered and evenly spaced around the mouthpiece. Tighten the screws in a star pattern to ensure even pressure and prevent the ligature from becoming misshapen. Finally, check that the mouthpiece is securely attached to the barrel and the ligature is properly adjusted, ensuring a smooth and even airflow through the clarinet.