How To Draw A Flower Step By Step
 In a world filled with vibrant colors and biodiversity, flowers undoubtedly claim a spot as one of the most beautiful subjects one can depict through drawing. Yet, capturing their delicate charm on paper can often seem like a daunting task for beginners. This comprehensive article intends to untangle the complexities of drawing a flower by offering you a simple, step-by-step guide. We'll start by Understanding the Basics of Drawing a Flower, establishing a strong foundation in perceiving and sketching a flower's elementary structure. Then, we'll delve into a meticulous, Step-by-Step Guide to Drawing a Flower, focusing on each angle, each petal, and every curve with precision. Next, to breathe life into your drawing, we'll explore the world of colors and shading in Enhancing Your Flower Drawing with Colors and Shading. By the end of this tutorial, you will not merely be reproducing a facsimile of a flower, but you’ll be creating an artistically vibrant and dynamic representation of nature's beauty. So, let’s kick start our tutorial with Understanding the Basics of Drawing a Flower.
Understanding the Basics of Drawing a Flower
of artistic accomplishment is understanding and perfecting the basics. Capturing the delicate beauty of a flower through drawing can be both challenging and rewarding, requiring not just talent, but knowledge, practice, and the right tools. This article focuses on three fundamental aspects that artists, regardless of their proficiency level, should pay heed to while drawing a flower. Initially, an artist must intimately familiarize themselves with the basic shapes that make up a flower. Recognizing and understanding these shapes can significantly simplify the drawing process and enhance accuracy. Secondly, choosing the most suitable tools and materials for drawing is essential. Quality drawing materials can enhance the overall effect and make the drawing process more effortless. Lastly, an understanding of the significance of proportions and measurements is crucial to creating a realistic or stylized representation of a flower. Even the most captivating drawing can lose its charm if the proportions are inaccurate. Let's start this creative journey with the first essential step - familiarizing yourself with the basic shapes of a flower.
1. Familiarizing yourself with the basic shapes of a flower
of Drawing a Flower, is familiarizing yourself with the basic shapes that constitute a flower. One must remember that ultimately, all complex structures can be broken down into simpler, more manageable shapes. For instance, the basic silhouette of a flower usually includes a circle for the center - which is the flower's heart or ‘Bloom', and an oval or a teardrop shape for the petals. Other shapes such as triangles, squares, or rectangles can be used to represent the leaves or the stem. When identifying the shapes that make up a flower, one must pay attention to how these shapes interact with one another, the spaces they occupy, and how they appear in relation to each other. Observing the angles at which the petals curve away from the bloom, or how the leaves angle off the stem can help in replicating the flower accurately. These basic shapes will serve as a foundation for your sketch. Layer them, and use guidelines if necessary, to accurately form the flower's outline. One common mistake beginners make is trying to draw a flower in its entirety all at once. Rather, drawing must be approached step-by-step; only by first breaking the complex figure into its fundamental components can a more comprehensive and true-to-life image be created. Understanding and mastering the basic shapes of a flower not only helps in drawing flowers but also improves your overall sketching skills. This because shapes are everywhere in nature, including in other subjects you might want to draw. Therefore, if you can accurately represent these shapes in your flower drawings, you'll be able to draw just about anything else. Keep practicing and experimenting with different ways to connect these shapes until you are comfortable with it. Use reference photos and always try to see shapes on those images. Finally, remember that art is about perception and interpretation, the way you perceive the basic shapes in a flower might be different from another person, this uniqueness is one of the nuggets that differentiate one artist from another. Learning to draw flowers can be an exciting and immensely satisfying journey, one where you can continually discover and express your creativity.
2. Choosing the right tools and materials for drawing
Before delving into the anatomy of a flower and its artistic portrayal, it's paramount to discuss the importance of choosing appropriate tools and materials for drawing. Investing in the right tools is an integral part of your journey to becoming a skilled drawing artist as they significantly impact the final outcome of your drawings. The first essential tool is a set of high-quality graphite pencils, the preferred medium for most beginners. Graphite pencils vary in hardness and softness, and generally range from 9H (hard, lighter strokes) to 9B (soft, darker strokes). Having a range of these will allow for an assortment of depths and tone in your flower drawings. Moreover, the significance of erasers goes beyond rectifying mistakes. Rubber erasers are apt for undoing objects entirely, while kneaded erasers can be shaped for removing small specific areas, a vital feature in drawing detailed compositions like flowers. Also, blending stumps, otherwise known as tortillons, help in smoothly blending out your hard lines, thus providing an even, grayscale transition effect that's excellent for shading petals. Choosing quality paper is another fundamental consideration. The texture and weight of the drawing paper can greatly affect your drawing's overall appearance. Heavier, textured papers like sketch or charcoal paper create sturdy artwork that can handle pressure from vigorous pencil strokes. Meanwhile, smooth surface papers are perfect for highly detailed work. It all boils down to the artist's preference and the intended detail level of the drawing. Additionally, a good quality sharpener will help to maintain the integrity of your pencils and ensuring neat and clean lines in your flower drawings. It’s also beneficial to invest in a drawing board or a flat surface to provide a solid foundation, preventing any unwelcome creases or bends while sketching. Finally, it's important to acknowledge that while quality tools contribute to the overall drawing experience and end result, they are merely a means to unleash your inherent creativity. Hence, one should not limit their artistic abilities by sole dependence on the best tools. As with any skill, practice is key to perfection. And understanding your tools, to extract the best from them, is the indispensable foundation upon which to build your blossoming journey to drawing exquisite flowers.
3. Understanding the importance of proportions and measurements
of successfully sketching a flower lies in understanding the importance of proportions and measurements. This aspect of drawing is often overlooked by novice artists who are compelled by the allure of shading and detailing, but it provides the foundation for a recognizably accurate drawing. Recognizing proportions— the size relationship between the parts of an object— is like reading the map of a flower's structure, which helps in highlighting its unique characteristics. A lily, for instance, has long and slender petals, while a rose showcases round and closely arranged petals. Understanding this is crucial in capturing not just their forms, but also their individual essence. Accuracy in measurement is key to maintaining this proportionality. The use of measuring tools should not be dismissed; however, training your eye to gauge distances and lengths can prove to be an even more practical approach. Let's say you're drawing a daisy. Once you start, you'll notice your initial instinct might be to exaggerate the size of the petals. Now, this might be a valid artistic choice, but if you intend to draw a life-like representation of the flower, this is where the discipline of measuring comes into play. You’d have to realize that a daisy's center is actually larger than its petals in contrast. Measurement also aids in correctly capturing the flower's perspective. If seen from a particular angle, the size of the petals tends to decrease, and this phenomenon can only be accurately represented on paper when you understand and apply the principles of measurement. Using these essential tools of proportion and measurement not only balances your creation but also adds depth and realism. This makes your sketch more visually appealing, as details alone do not hold viewer attention for long. By focusing on this, an artist incorporates mathematical precision into their artwork, making it more coherent and organic. A well-proportioned sketch, therefore, has an inherent harmony that resonates with the viewer, making it more immersive and engaging. Just like colors, lines and forms, proportions and measurements are vital features in the extensive language of visual art - underscoring the essence of the object being represented. Hence, next time when you intend to draw a flower, place focus on its proportions and measurements to accurately capture its true and entire beauty.
Step-by-Step Guide to Drawing a Flower
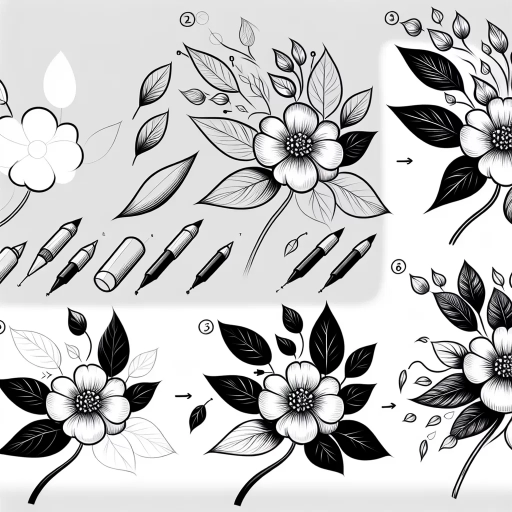
To harness the beauty of nature using paper and a pencil is quite the art, yet anyone can do it, even you. In this comprehensive guide, we take you through a step-by-step journey into sketching a delightful flower, simplified in such a manner that both beginners and seasoned artists will appreciate. We will start with laying down the initial framework by illustrating the center of the flower, the very heart from which the magic bloom starts. This foundation will set the tone for the subsequent steps. Next, we will add zest and glamour to our drawing by incorporating the petals, shaping the flower to bring out its unique appeal and charm. Lastly, detailing and texturing will be applied to imbue your artwork with life. Depth, dimension, and shades will be added to make your drawing markedly lifelike. Now, with the basics cleared, let’s dive into the first step: drawing the center of the flower, the starting point of capturing the enchanting beauty only a flower can offer.
1. Drawing the center of the flower
Drawing the center of a flower is often the focal point of your art piece and is where you can truly let your creativity thrive. It is the heart of your floral depiction, a repository of theuring pollen inviting its pollinators to further propagate life. The level of detail in the flower's center can dramatically alter the perception of your drawing, and hence, merits a practiced hand. Start by marking a point on your sheet - this is where the middle of your flower will be. Then, keeping in mind the scale of your drawing, create a small circle (or other shape, depending on the flower you're drawing) around that point. This is the stamen or the pollen-producing part of the flower. You can use a more detailed rendering for a closer, macro view of the flower. Draw tiny circles or oblong shapes as individual pollen grains and tiny lines extending outwards as filaments. For far-off, scenic views of flowers, a simple cluster of dots should suffice. The petals will radiate from this point and thus, getting the center right is crucial. Select your coloring medium and fill in the center of your flower judiciously. Dark hues can represent depth while lighter ones highlight. Mix and blend different colors to create visually interesting effects. The ultimate objective is to render the flower center in a way that captures the viewer's attention while maintaining the natural beauty that flowers exemplify. Remember that drawing is a skill that improves with practice. Don't be disheartened if your first few attempts don't quite match up to your expectations. With every stroke, you're getting better at understanding the flower's nuances and translating it onto paper. Beneficially, by taking the time to draw these intricate centers, you're also learning to appreciate the role these little parts play in the grand design of nature.
2. Adding the petals and shaping the flower
After you've successfully sketched out the base of your flower according to your design, it's time to add life to your work of art by adding in and shaping the petals. This stage can be compared to painting the soul of your flower, as the petals most significantly embody the beauty of a flower. Start by drawing the outline of the petals, emanating from the centre of the base or the bud. Petals vary in shape and size, depending on the type of flower you're drawing. For instance, roses feature round and wide petals while daisies have long and pointed ones. Thus, understanding the morphology of your chosen flower is crucial for the realism of your sketch. Dedicate your time to observe the natural shape and patterns of the petals, noticing the existence of any crinkles, curves, or noticeable smoothness. Once you're satisfied with the outline, move to defining the edges of the petals. Some flowers have smooth and sleek edges, while others could have fringed or scalloped boundaries. Match the appearance of your drawing to the real-life model. If you're drawing a flower from imagination, experiment with different edges to design petals according to your creative vision. Adding texture to the petals will help them appear three-dimensional and realistic. Notice how each petal has a vein-like structure running through the heart, fanning out towards the edges. Lightly sketching these lines can highlight the depth and structure of your petals. You can also vary the shading on different parts of each petal to show the play of light and shadow, lending your flower more vitality. Additionally, understanding the direction in which each petal folds or curves will add dynamism to your drawing. For example, the petals of a tulip curve upwards forming a cup, while those of a sunflower lay almost flat. Infusing such characteristics into your sketch makes your flower appear more natural and energetic. Also, remember that the disposition of petals is rarely symmetrical or perfect in nature. Hence, you can depict a petal or two folding over, curling up, or slightly wilting away. These subtle touches infuse authenticity and make your flower look less robotic or rigid. Finally, pay attention to the arrangement of the petals. In some flowers, petals overlap each other, while in others, they are side by side. Flowers like roses have multiple layers of petals that get progressively smaller as you reach the center. For flowers like daisies, petals radiate outwards directly from the center. By complementing the accuracy with your unique interpretation, you can strike the perfect balance between realism and creativity. Not only will you be able to design a beautiful representation of a flower, but it will also carry the personality you breathed into it. Remember, the objective of art isn't to replicate, but to express and communicate. With every stroke and every petal you draw, make sure your flower doesn't just speak to the onlooker's eyes but also to their heart. Remember, practice makes perfect. So, keep drawing and keep exploring to continually better your artistic skills.
3. Adding details and textures to the flower
Adding details and textures to your flower drawing is a critical step to make it look realistic and engaging. This step can be a fun and experimental time in your drawing process where you add your personal style and touches to the piece. Before you delve into detailing, take a moment to really study your flower reference. Notice the patterns within the petals; observe the way light and shadows play on the blooms. Take note of the ridges, veins, bumps, and other minute details that make your subject unique. Using a sharp pencil or a fine pen, start to replicate these details on your sketch. For petal textures, look for areas of light and shade and gently shade them in gradations to give depth and fullness. The edges of petals often have subtle ridges or waves, shade these parts darker to create a natural-looking texture. Drawing the veins on the petals can further bring your flower to life. Keep the lines thin and soft; they should be visible but not too prominent. Add some curved lines to the petals to give them a sense of movement and fluidity. Next, focus on the center of the flower. Often, intricate patterns and textures can be seen here. Sketch minute seeds or pollen dots, you can create these details using stippling technique for an authentic texture. Try using dots and lines to give the impression of the soft, fuzzy center many flowers have. Meanwhile, for the stem and leaves, bear in mind that they are not perfectly smooth. They have veins, they have texture and they have thorns or hair-like growth sometimes. Use light, broken lines to create the illusion of these fine hairs on your flower stem. Eraser can be your secondary tool in creating textures. It is efficient for creating highlights or setting light areas in your drawing. For instance, erasing a thin line within a shaded petal can help illustrate a vein. Adding details and textures can be a detailed process, requiring patience and concentration, but the result of your hard work will be a realistic, dynamic drawing that captures the beauty of your flower in an impressive way. Lastly, remember to take your time with this step. Accuracy in portraying textures and details is quintessential in achieving a realistic depiction of your flower. Practice makes perfect and with each new flower you draw, you'll get better at identifying and replicating these essential elements.
Enhancing Your Flower Drawing with Colors and Shading
The art of impeccably capturing the exquisite beauty of flowers on paper extends far beyond mere outlines and shapes. One must venture into the captivating realm of colors and shading to truly grasp the subtleties and nuances that contribute to the vibrancy, depth, and realism of flower drawings. There are three crucial zones an artist needs to tread through in this journey. Firstly, an understanding of the intricate blend of colors and the combinations that best complement your flower drawings. This sets the primary tone and mood of your art piece. Secondly, a fundamental perception of shading and the influence of light sources plays a paramount role in the overall representation. Understanding where the light falls, casts shadows, and illuminates petals can be the difference between a flat, lifeless drawing and a three-dimensional masterpiece. Lastly, fusing the power of color and shading to add incredible depth and dimension to your drawn flowers is the final piece of the equation. Stitching these elements together maximizes the realism and intricacy of the final output. Dive into the riveting arena of accurate color representation as we unravel the secrets of flower coloring and how to choose the right palettes.
1. Choosing the right colors and color combinations for your flower
Choosing the right colors and color combinations for your flower drawing is foundational to the overall aesthetic and realism of your art. The spectrum of nature offers a fascinating array of shades and nuances, which can add a strikingly authentic touch to your flower drawings. It's integral not to limit yourself to stereotypical colors of flowers; remember, there is no such thing as a standard red or standard yellow in nature. In real life, flower colors intermix, bleed, and blend into one another, creating infinite hues and tints. To bring out this exquisite diversity in your creation, study how the flower colors interact when exposed to different lighting conditions. Partial sunlight can add a warm touch to your floral hues, while subdued lighting can cool them down, resulting in muted blues and purples. Furthermore, consider not only the blossom but also the stem, leaves, and the veins, all of which sport a variety of greens, grey, and browns. It is essential to understand that each part of the flower contributes to a broader color theme that provides coherence and harmony to your flower drawing. To effectively balance color combinations, a basic understanding of the color wheel is pivotal. Complementary and contrasting colors can dramatically enhance the vibrancy of your flower. For instance, placing a bright red flower against a cool green background can make the red pop and appear more intense. At the same time, analogous colors provide a pleasing and calming effect, embodying nature's default color scheme. Additionally, while shading, try to incorporate different colors instead of merely using black for adding shadows. For instance, blues, purples, or deep greens can be used to shade a red or pink flower, providing depth and a sense of dimensionality. White, cream, or yellow can work as highlights, bringing out the flower's volume and form. Finally, through color, emotion can be conveyed subtly. Lighter, pastel colors can reflect tranquility and innocence, while bold, intense colors might signify passion and vitality. Hence, your color selection not only replicates nature but also can interpret and portray your relationship with nature and your perceptions of it. Therefore, exploring, experimenting, and selecting the right color combinations is indeed a fundamental process of enhancing your flower drawings. It is through the imaginative and correct use of color that your flower artwork can blossom into a vibrant, winning masterpiece.
2. Understanding the basics of shading and light sources
3. Adding depth and dimension to your flower with shading and colors
The ability to add depth and dimension to your flower drawings with shading and color is an indispensable asset in crafting realistic and engaging art. This process draws on an understanding of the natural world, a keen eye for observation, and the application of basic artistic techniques. Enhancing your flower drawing with colors and shading involves exploring light and shadow, color theory, and the inherent structure of the flower you are representing. The power of shadows in art is profound. By implementing shading in your flower drawings, you can make your flower bloom right off the page. Use a range of values—ranging from light to dark—to imply the areas of the flower hit by light or hidden in shadow. Take note of the changes in value on different parts of the flower, and replicate these in your drawing. The darkest areas usually suggest deep recesses within the flower or parts that are obscured from the source of light, while lighter areas often represent those directly in the sun's path. The variation and contrast of shades give your flower life and realism. Colors, on the other hand, give your flower its vibrancy and emotion. Each tonal choice conveys a mood, time of day, or even season. Warm colors, like red, orange, and yellow can suggest a fiery, high energy, or summer-themed atmosphere, while cooler colors, such as blues and purples, can hint at a serene, tranquil, or winter-like setting. If you decide to use colors in your flower drawing, keep in mind the principles of color theory to guide your palette selections. For example, complementary colors—those opposite each other on the color wheel—can intensify each other and create dynamic visual interest. Analogous colors, however—those situated close to each other on the color wheel—can create harmonious and visually pleasing scenes. Moreover, take into account the organic structure of the flower. Understand the shape and form of its petals, its stem, and its stamen and pistil. These unique characteristics should be reflected in your application of shading and color. Petals that curve inward, for instance, typically have an area of shadow under the curve. In addition, different flowers have a variety of colors and color patterns. Some feature one solid color, while others may showcase an array of colors on just one petal. In conclusion, adding depth and dimension to your flower drawings with shading and color is a creative and artistic journey that enhances the beauty and realism of these plants. By harnessing the power of light and shadow, exploring the principles of color theory and understanding the physical structure on a flower, artists can elevate their work from simple illustrations to captivating representations of nature. It is a process that goes beyond technique and delves into personal interpretation to reveal the unique vision of the artist.