How To Draw A City
 The ability to capture the complexity and dynamism of a city on paper is a skill many aspiring artists aim to master. Drawing a city might seem daunting due to its intricate architectural details, diverse structures, and unique landscapes, but with the right techniques and understanding, it can be a rewarding artistic endeavor. In this comprehensive guide, we will walk you through the process, beginning with the necessary foundations of "Understanding the Basics of Drawing a City". Sneak peek to our next sections, you'll be led hand in hand through the process of "Sketching the Cityscape" where we delve into effectively representing city buildings and bustling street scenes. Finally, we will dive into "Adding Details and Realism to Your City Drawing", helping you polish your draft into a masterpiece. As we transit into the first segment, let's embark on the enriching journey of translating the vibrancy and spirit of a city onto your canvas!
Understanding the Basics of Drawing a City
The essence of drawing a city largely rests on three vital principles, each echoing the progression from basic construction to the completion of a detailed masterpiece. Drawing a city doesn't solely hinge on talent, but more critically, on understanding and employing these structural elements. Firstly, breaking down the city into basic shapes enables simplification of complex structures, making the beginning steps of drawing less daunting. Secondly, identifying key landmarks and features ensures authentic replication, providing your drawing with a distinct, recognisable appeal unique to the city you're illustrating. Lastly, establishing a scale and perspective not only assures that the drawing is proportional but also bestows depth, making the artwork appear more realistic and three-dimensional. As you unravel these concepts one by one, you commence your journey of mastering cityscapes with a solid foundation through breaking down the city into basic shapes. Engaging in this initial yet critical step introduces a shift in perspective: viewing grand structures as a collection of simple shapes, paving the way for a more manageable, and systematic approach to urban drawing.
Breaking Down the City into Basic Shapes
When we think of a city, we often visualize it as a complex array of towering skyscrapers, undulating roads, and bustling pedestrians. But before getting overwhelmed by the scale and detail of the entire cityscape, it's crucial to break it down into basic shapes. It's the simple geometric forms that collectively make up the city's grand structural design. Whether you're drawing New York's renowned skyline or a quaint town in Provence, the principle remains the same. Believe it or not, a diverse range of city structures can be simplified to rectangles and squares. Skyscrapers, residential blocks, commercial buildings, or even a cathedral's towering spire typically follow a boxy design. Start by sketching small, basic geometric shapes on your canvas or paper; these will serve as your buildings' foundations. You can draw thinner, longer rectangles for skyscrapers, squarer ones for office blocks, and smaller, stacked squares for houses. Circles and half-circles too are fundamental in city drawing, though they might seem less prevalent. They play their parts as domes on top of churches, arcs of bridges, or as design elements on a building's façade, subtly breaking the linear monotony. Triangular shapes primarily lend themselves to the rooftops. Gable roofs on traditional houses or pyramidal tops on grand edifices all borrow this geometric form. Furthermore, inclined roads or pathways can be represented as trapezoids, while semi-circles come handy for arches under bridges or doorways. Natuirical shapes, like an irregularly-shaped pond in a park or a meandering shoreline, add organicness to your composition, softening the city's angular hardiness. Understanding how these simple shapes form the basis of every city design could demystify the city sketching process significantly. It also assists in the arrangement of buildings logically, establishing proportion and perspective, ensuring your cityscape doesn't appear flat and dimensionless. Keep in mind that as you progress, these basic shapes will transform; they'll expand, contract, overlap, and intersect, forming complex structures that add a level of intricate realism to your city drawing. As such, mastering the ability to identify and manipulate these basic shapes in the context of a cityscape is a crucial art achievement. Therefore, breaking down a city into basic shapes is more than a drawing technique; it represents a novel way of seeing the world. It prompts artists to deconstruct the complexity of architecture and urban design to its fundamental elements, ultimately fostering a deeper appreciation for the geometry and symmetry that pervades our everyday environment. Don't let the complexity of a city intimidate you; embrace this practice, and you'll soon be sketching cities with a newfound understanding. Whether you're a novice exploring the art of city drawing or a seasoned artist seeking a fresh perspective, considering cities as an amalgamation of simple geometric shapes is a unique approach worth exploring.
Identifying Key Landmarks and Features
Learning to draw cities involves many aspects; an integral part of which includes identifying key landmarks and features. This paragraph seeks to equip readers with expert tips on how to correctly identify and subsequently incorporate such essential elements into their city sketch. Landmarks and key features serve as the distinguishing elements that set one city apart from the other, providing its unique identity. In Paris, you have the magnificent Eiffel Tower, in New York there's the iconic Statue of Liberty, and London is known for the House of Parliament and its adjoining Big Ben. Identifying these landmarks is more than just sketching a well-known monument. It involves studying and understanding their architectural details, their geographical location and surroundings, and how they contribute to the overall visual appeal of the cityscape. When drawing, these landmarks become your focal points. They anchor your cityscape and create depth and realism. Start with a rough sketch of the general layout of your city, marking locations for these landmarks. Once these anchor points are established, you can start building the rest of the city around them. Remember, landmarks are not just high-rise buildings or spectacular monuments. They can be bridges, parks, or even a distinct street or neighborhood. For instance, San Francisco is famous for its steep, rolling streets and the vintage cable cars that navigate them. These, along with the Golden Gate Bridge and Alcatraz Island, are distinctive features that anyone drawing this city should aim to capture. Furthermore, consider sketching from a unique viewpoint. This may mean drawing Mumbai's Gateway of India from its sea-facing avenue, or capturing the Eiffel Tower from a quaint café on a nearby Parisian street. This not only offers a fresh perspective but increases the engagement of your audience by taking them on a visual tour beyond the well-tread, often-photographed views of the city. Including key landmarks and features doesn't mean cramming every notable structure into your sketch. It means carefully selecting the elements that best represent the city’s essence and adding them to your drawing in a way that feels balanced and unified. An overcrowded sketch may overwhelm viewers, diluting the impact of each individual feature. The sky too plays an integral role. An azure clear sky gives a different feeling compared to a fiery sunset or a night full of stars or city lights. Natural elements like trees, mountains, or bodies of water near the city, such as the River Thames in London or Central Park in New York City, also contribute to the city's unique character. In conclusion, identifying key landmarks and distinctive features are fundamental when drawing a city. This involves careful selection, understanding of their architectural details, and considering their geographical position and surroundings. It's essential to create a balanced composition that encapsulates the city's unique identity without overwhelming the viewer. Any artist aspiring to master cityscape drawing must nurture this vital skill.
Establishing a Scale and Perspective
When establishing a scale and perspective in drawing a city landscape, consider the horizon line, vanishing points, and size relations. The horizon line, also known as eye level, gives us the viewer's viewpoint. Above it, we see the top of things, and below it, we see their undersides. It plays a crucial role as the line where the sky seems to meet the earth. Think about where you want to place the horizon line - whether you want an aerial view or a ground-level perspective - it can greatly influence the feeling and overall message of your artwork. Subsequently, the vanishing point(s) come into play. Usually placed on the horizon line, they signify where lines converge. In one-point perspective, all lines are drawn to meet at this single point, making it an ideal technique for communicating depth. Consider the placement of the vanishing point carefully - center, left, or right. Each selection can dramatically impact the composition and offers an entirely different perspective. Two-point perspective, which creates an even more realistic sense of depth, has two vanishing points – each placed strategically on opposite ends of the horizon line. Buildings diminish in size as they approach these points, creating a realistic depiction of scale and perspective. Size relations are vital to establish scale. Closer objects are larger, while distant ones reduce in size. However, maintain consistency. If a car is taller than a building, the scale is off and it will detract from the overall believability of the picture. Also, consider using atmospheric perspective - distant objects are paler and less detailed than closer ones. Objects' color intensity and detail level decrease as the distance from viewer increases. This contributes to a convincing sense of space. Indeed, estabIshing scale and perspective can initially seem challenging but with practices, one's proficiency improves, resulting in more dynamic and engaging city landscapes. By carefully determining the horizon line, working out the vanishing points, and maintaining consistent size relations, artists can accurately depict a range of different urban scenes in a realistic and visually interesting way. With this understanding, we can draw a city with variation in sizes, from soaring skyscrapers to tiny cars, all co-existing harmoniously in one frame. It plays a significant role in offering more depth, interest, and authenticity to the artwork, thus, tapping into the viewer’s sense of realism.
Sketching the Cityscape
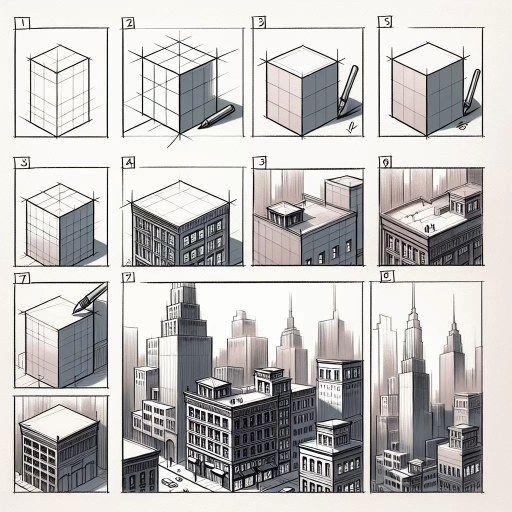
The way we perceive the city's silhouette can transform dramatically when sketched on paper. To truly master urban sketching, one must mentally deconstruct the cityscape and approach it in layers. This method can be boiled down to three main stages. Firstly, an artist starts by 'Blocking Out the City’s Layout,' wherein they map out the spaces, boundaries, and overall structure of the scene. Secondly, the artist moves to 'Adding Basic Forms and Shapes' where the emphasis is on understanding and delineating the rudimentary geometric forms within the cityscape. This process allows one to focus on individual architectural elements, converting daunting cityscape into manageable components. Finally, we explore 'Developing the City’s Texture and Pattern.' This is where an artist breathes life into the illustration by capturing the unique characteristics of the city, its structures, materials, and the play of light and shadow. Now, let's delve into our first step, 'Blocking Out the City's Layout,' a crucial starting point that sets the foundation for an urban sketch.
Blocking Out the City's Layout
Sketching a cityscape can be a mighty challenge without first understanding the basic structures that form the city's layout. A metropolis such as New York or Los Angeles is an intricate tapestry of high-rise buildings, streets, parks and water bodies. A cityscape sketch captures this grandeur in manageable proportions. To draw a cityscape, artists employ a technique known as 'blocking out.' Blocking out refers to a process where you create simple shapes to outline your city's layout instead of diving straight into sketching every minor detail. For instance, you can draw simple rectangles for buildings, lines for streets, and perhaps circles for parks. When drawing, consider the city's perspective. Is it an aerial birds-eye view or a street view? From a bird's eye view, your rectangles (buildings) would appear smaller the further they are, creating an illusion of depth. If it's a street view, the buildings, especially skyscrapers, could skew towards one direction, revealing their three-dimensional aspect. Blocking out the cityscape is also about identifying these buildings' spatial arrangement. It goes beyond simply drawing buildings alongside each other. You must notice how these structures are situated in relation to one another. For instance, some buildings are clustered together while others are spaced out. Some are set behind others, creating a layering effect. When blocking out this layout, remember that your cityscape should not appear uniform, but reflect the city's structural diversity. Attention to the city's infrastructure is also vital. Highways, flyovers, underpasses, bridges, these are essential elements that add authenticity to your cityscape. These are the arteries and veins that bring life to the city. Ignoring them is like drawing a city without its personality. Organized in an intricate network, these roads and bridges often criss-cross, loop, and converge in fascinating formations, adding exciting visuals to your cityscape sketch. Furthermore, the cityscape is not just concrete and steel but also comprises natural landmarks. Rivers, parks, hills can often break the monotony of the cityscape with their organic shapes and designs. For instance, a river cutting through the city or a park lining the base of towering skyscrapers brings a certain dynamism to your sketch. When blocking out the city's layout, consider these elements and their interaction with the city's architecture. Ensure to understand the play between the rigid, straight-lined man-made structures and the free-forming natural elements. To sum up, blocking out the city's layout is creating a skeleton around which the details of the cityscape are fleshed out. Remember, this is not the stage for fine-tuning; rather, it sets the stage for deeper exploration and detailing. So, do not worry about making perfect shapes or lines. The focus is on understanding the broader aesthetic of the skyline, which shapes your cityscape. After all, every city has its distinct architectural personality, and blocking out helps you capture that uniqueness in your sketch. By mastering the blocking out technique, you can streamline the process of creating detailed, nuanced cityscape sketches that vibrate with urban life and diversity.
Adding Basic Forms and Shapes
Under the broad title "Sketching the Cityscape," Adding Basic Forms and Shapes acts as the early, integral step when illustrating any cityscape. It is through the understanding and application of this concept that a sketch transforms from mere lines to discernible buildings and structures each with its unique sense of depth and volume. The ability to add basic shapes and forms is pivotal in creating functional, engaging, and dynamic urban drawings. To skillfully render a cityscape, first, you need to comprehend the underlying geometrical structures that buildings embody. The most fundamental shapes include rectangles, squares, triangles, and circles. The humble square can be elongated into a rectangle, or ascend skywards into a skyscraper in your sketch. A triangle can morph into a sloping roof, while a circle can become an intricate dome adorning an elaborate cathedral. These basic shapes are the building blocks of any cityscape. They can be further manipulated into three-dimensional entities known as forms. A square can be turned into a cube, a rectangle into a cuboid, a triangle into a pyramid, and a circle into a sphere or cylinder. Here's where the sketch attains depth and perspective, adding that crucial element of realism to the urban landscape. Let's delve into how these two-dimensional shapes and their three-dimensional counterparts interact in a drawing. Every form in a drawing has three key facets – the face in highlight, the face in mid-tone, and the face in shadow. This tripartite structure provides your sketches with that sense of depth, solidity, and volume. It is what differentiates a flat square from a lively cube and what separates a two-dimensional drawing from a three-dimensional representation. Understanding and implementation of light and shadow is another essential feature while adding forms and shapes. Depending on where the light source is, the relative position and intensity of shadows change, which in turn affects the overall perception of depth in an image. These indications of light and shadow not only help to separate one form from another but also establish their placement and orientation in space. To sum up, adding basic shapes and forms acts like the foundational stone in sketching a cityscape. Recognizing these shapes not only simplifies the enormous array of structures in a cityscape, but also paves the way for intricate detailing that follows. By mastering this aspect, you give your cityscape sketches a strong grounding in reality, turning them into more than just combinations of lines – into breath-taking sceneries that evoke a sense of space and depth. Be it the towering skyscrapers or sprawling boulevards, every element of the city starts with a simple shape. The key lies in wielding these shapes to create forms, add perspective, and play with light and shadow to create beautiful, engaging cityscapes.
Developing the City's Texture and Pattern
Developing the texture and pattern of a cityscape is an integral aspect of accurately sketching an urban setting. This is because the texture and pattern of a city are reflections of its architectural style, cultural influences and historical evolution. The varied texture communicates the city's physicality - the smooth reflective surfaces of high-rise buildings, the cobblestoned paths or the coarse brick walls of old buildings. Patterns, on the other hand, encapsulate the rhythm and symmetry of urban landscapes. Incorporating these elements into your cityscape sketch not only provides visual interest but also adds a level of realism and authenticity to your representation. Understanding and capturing the harmonious blend of these details starts with an observant eye. Study the architectural designs of buildings and structures, notice the repetitive motifs, surface materials, or special facade treatments present in the environment. A city’s texture and pattern are often marked by its unique silhouettes, shapes, and forms. You can use this to create depth and perspective in your sketch, setting the foreground, middle ground, and background to create a unified portrayal of the urban landscape. In the process of sketching, varying your line weights and using hatching, cross-hatching, or scribbling techniques can help create texture and indicate depth or shadows. Experimenting with these techniques lets you represent diverse materials and surfaces — from glass and steel to wood and stone. Developing patterns, on the other hand, can be a test of analytical skills. Look for recurring elements or a defined sequence in the architectural features and accurately capture it in your drawing. Moreover, a city is an ever-evolving entity, marked by numerous renovations, restorations, and additions. Overlooking these temporal shifts while concentrating only on the static parts might lead to a flat portrayal. So, document changes over time and tell the story of the city's evolution through your sketch. Show contrast between older, traditional buildings and sleek, modern design; between crowded commercial spaces and peaceful residential habitats. Adding humans to your sketch breathes life into your cityscape, making it more dynamic and relatable. Humans provide a scale of reference, establishing a clear understanding of the city's proportion. Play with textures to capture different attires and movements, and draw patterns of activities indicating the city's vibe and pace. To conclude, developing the texture and pattern of a cityscape isn't merely about ink and lines, it's about visual storytelling. It's about bringing the story of a city to life, celebrating its architecture, culture, and life rhythm. It's a tale of simultaneous sameness and difference, capturing a snapshot of a city's life in all its blooming complexity. Remember, each city, each neighborhood, each street has its own song, its distinct texture, and pattern. Practice and patience help us to listen and sketch that song visually. By mastering these techniques, you will be able to accurately depict any cityscape and truly bring its character to life on paper.
Adding Details and Realism to Your City Drawing
Your prowess in city drawing can significantly improve when you master the art of adding intrinsic details and infusing an aura of realism into your work. This is achieved primarily by focusing on three key elements. First and foremost, we delve into the incorporation of architectural details into city drawings; such as doors, windows, and other structural nuances - this enhances the overall aesthetic and versimilitude of your piece. Secondly, the infusion of active elements like vehicles and pedestrians breathes life and dynamism to a still cityscape, creating a vibrant and more engaging visual dialogue. Lastly, a great city drawing is never complete without those final touches that spike the atmosphere; shadows, artificial lighting, and weather effects can drastically alter and elevate your work's impression. These details collectively make your city drawing more than just a skyline of buildings; they transform it into a rich, living organism. Now, let's embark on this artistic journey, starting with adding essential architectural details like windows and doors.
Adding Windows, Doors, and Other Architectural Details
Adding windows, doors, and other architectural details to your city drawing can elevate its realism and complexity, enhancing the visual appeal of your depiction. These features serve as the connective tissue of your cityscape, offering viewers a glimpse into the city's life, texture, and vitality. Let's delve into how to effectively incorporate these elements into your drawing. Windows, arguably one of the most vital aspects of any building, often manifest as intricate mosaic patterns in your cityscape drawing. To create these, start by sketching simple squares or rectangles on your building structures. Vary the size and arrangement of windows on different buildings to nail down the building's character and function. Remember that different buildings have different window styles - for example, residential homes might have smaller, fewer windows, while office buildings feature floor-to-ceiling glass windows running their entire height. Doors, though not always visible in cityscape drawings, provide immense detail when included. Residential buildings might feature a single entry door, while commercial structures might exhibit multiples, often made of glass. The make, shape, size, and design of a door can offer clues about a building’s purpose and the era it belongs to. For example, Victorian-style doors can suggest a historical building, while futuristic designs might indicate a more modern construction. Adding other architectural details, such as awnings, balconies, roof details, or signage, can further enrich your city drawing. These elements add depth and dimension to your drawing, breaking up the monotony of box-like structures and injecting personality into your cityscape. When drawing these features, pay attention to their size, design, and location, as these details can hint at the building's function. For instance, an awning might suggest a shopfront, while numerous balconies indicate a residential apartment block. Remember: the devil is in the details. Successfully incorporating windows, doors, and other architectural elements can be the difference between a flat, two-dimensional portrayal and a vibrant, realistic cityscape. Use these features to your advantage to add layers to your city drawing, rendering it not just an architectural sketch but a depiction of urban life. Ultimately, practicing and refining your ability to accurately capture these details scaffolds your journey towards creating a compelling, detailed city drawing that brings the concrete jungle to life on your canvas.
Introducing Vehicles and Pedestrians
Drawing a city extends beyond skyscrapers and architecture. Adding life to your cityscape includes carefully sketching vehicles and pedestrians to infuse a vibrant, bustling energy, giving viewers a sense of the city's daily activity. Think of these elements as key details that add layers of realism and depth to your work, lending a more tangible and relatable essence to your cityscape. Integrating vehicles and pedestrians into your city drawing requires careful attention to scale and perspective. The size and placement of these elements can significantly influence the overall composition and 'feel' of the city. Typically, vehicles and pedestrians should appear smaller as they recede into the background, creating an illusion of depth and distance. Take the time to observe different types of vehicles - from sleek city cars, to buses, to taxis - and their proportions relative to the buildings around them. Light commercial vehicles such as delivery vans and trucks, for instance, uniquely contribute to the city's industrial feel. Pedestrians, on the other hand, add a human touch to your drawing. They are the vibrant pulse of the city, the life that animates the urban environment. Whether it's a businessman sprinting down the sidewalk with a briefcase, children playing in the park, or street vendors hawking their wares, the diverse array of pedestrians gives your city a story, a character, and a mood. Pay attention to how people interact with the city elements, like waiting at a traffic light, crossing roads, or sitting on park benches, and incorporate them into your drawing. Colour can also be utilised to heighten the level of detail and realism in your drawing. Vehicles in a variety of colours bring a colourful flair to the grey cityscape. Similarly, the clothing of pedestrians can be given different colours to reflect diversity and individuality. When mastered, skilful integration of vehicles and pedestrians into your city drawing can elevate your artwork, making it appear more realistic and engaging. These elements encapsulate the city's dynamic life and movement, drawing viewers to immerse in the ambiance of the city you've meticulously crafted. So, remember, a city drawing isn't merely about the architecture; it includes the vehicles that zoom along its roads, the people that walk its streets, painting a complete portrait of urban life.
Adding Final Touches and Enhancing the Atmosphere
Creating a city drawing brims with several layers of complexity and eloquence. However, the final phase of adding finishing touches and enhancing the atmosphere is quite possibly the most critical. This stage is where your city landscape truly comes to life, transitioning from a static image to a dynamic environment filled with realism and exactitude. Adding final touches to your city drawing largely influences the atmosphere and details of your image. Your choice of lighting, shadows, and color tones significantly contributes to the overall mood of your drawing, be it the golden glow of a setting sun or the cool ambivalence of an overcast day. For instance, using a darker tone to shade the buildings will add more depth and dimension to your city scene. Additionally, lighter tones can create highlights, providing an illusion of sunlight reflection. Further, you can sketch irregularities, such as wear and tear on building facades or cracks in pavements, to enhance the sense of realism. Likewise, you can populate your cityscape with carefully drawn people, cars, trees, and more. This not only adds character and liveliness to your drawing but also augments its scale and perception. Remember, proportions matter in every detail you add. The size of the humans compared to buildings, cars, and other elements should be accurate to maintain realism. Atmospheric perspective is also an essential aspect of enhancing the mood of your city drawing. Atmospheric perspective refers to depicting depth by modifying color and contrast. As a rule of thumb, objects closer to the viewer are more vibrant and have higher contrast levels, while distant objects appear hazier and slightly faded. This technique can generate a sense of depth, making your city drawing more three-dimensional. When drawing skies, incorporating nuances like different hues and cloud formations can also enhance the atmosphere. The ashy gray of a cloudy day, the bright blue of a clear sky, or the play of colors during sunrise or sunset can all help create mood variance. You can also capture the city during different seasons or times of the day, each offering its unique blend of colors and shades. In addition, texture plays a major role in adding the final touches. Whether it's the grainy look of an old brick building, the smoothness of a modern skyscraper, or the rustic feel of a cobblestone street, these details give a tactile sense and character to your city drawing. Remember, your city does not necessarily have to be a photorealistic depiction. It carries your artistic interpretation, so don't hesitate to complement reality with your creative flair. Incorporate what you like, and exclude elements that you find unnecessary. Adding final touches and enhancing the atmosphere is essentially giving your city drawing a soul and personality of its own. The key is to remain consistent and consider how every additional detail impacts the overall composition. After all, the magic of artistry resides in this exquisite play of imagination and precision.