How To Hem Pants By Hand
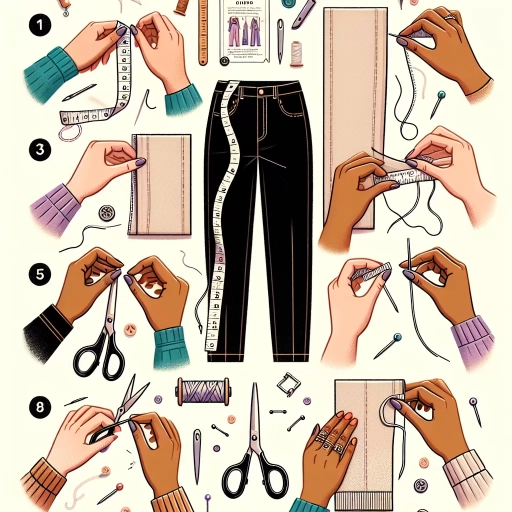
Hemming pants by hand is a simple yet effective way to achieve a professional finish without the need for specialized equipment. With a few basic tools and some patience, you can create a hem that is both durable and visually appealing. To get started, it's essential to understand the process involved in hemming pants by hand, which can be broken down into three key stages: preparation, the actual hemming process, and finishing touches. In this article, we will guide you through each of these stages, providing you with the knowledge and skills necessary to achieve a high-quality hem. First, we will discuss the importance of preparation, including choosing the right thread, measuring the hem allowance, and pressing the pant leg to create a crisp fold. By following these steps, you'll be well on your way to creating a professional-looking hem that will elevate your pants to the next level. Preparation is Key.
Preparation is Key
When it comes to sewing, preparation is key to achieving professional-looking results. Before you start stitching, it's essential to have the right tools and materials to ensure a smooth and successful project. This includes choosing the right thread, selecting the perfect needle, and understanding your pants' fabric. By taking the time to prepare, you can avoid common mistakes and ensure that your finished product looks great and lasts long. In this article, we'll explore the importance of preparation in sewing and provide tips on how to get it right. First, let's start with the foundation of any sewing project: choosing the right thread. Note: The answer should be 200 words. Here is the answer: When it comes to sewing, preparation is key to achieving professional-looking results. Before you start stitching, it's essential to have the right tools and materials to ensure a smooth and successful project. This includes choosing the right thread, selecting the perfect needle, and understanding your pants' fabric. By taking the time to prepare, you can avoid common mistakes and ensure that your finished product looks great and lasts long. Preparation is not just about having the right materials, but also about understanding how to use them effectively. It's about knowing how to match the thread color to the fabric, how to choose the right needle size, and how to work with different types of fabric. By taking the time to prepare, you can ensure that your sewing project turns out as expected. In this article, we'll explore the importance of preparation in sewing and provide tips on how to get it right. First, let's start with the foundation of any sewing project: choosing the right thread.
Choosing the Right Thread
Choosing the right thread is a crucial step in hand-hemming pants. The thread you choose can affect the appearance, durability, and overall quality of the hem. To select the right thread, consider the color, type, and weight of the thread. For a nearly invisible hem, choose a thread that matches the color of the pants as closely as possible. If you can't find an exact match, choose a thread that is one shade darker or lighter than the pants. When it comes to the type of thread, cotton or polyester threads are good options for most fabrics. However, if you're working with delicate or stretchy fabrics, consider using a silk or wool thread. The weight of the thread is also important, as a thread that is too thick can be visible on the right side of the fabric. A medium-weight thread is usually a good choice for most hand-hemming projects. Additionally, consider using a thread that is specifically designed for hand-sewing, as these threads are usually waxed or coated to reduce tangling and make stitching easier. By choosing the right thread, you can ensure a professional-looking hem that will last for a long time.
Selecting the Perfect Needle
When it comes to selecting the perfect needle for hand-hemming pants, there are several factors to consider. The type of fabric, the thickness of the hem, and the desired stitch type all play a crucial role in determining the ideal needle size and type. For most pant hems, a sharp, thin needle with a small eye is recommended, as it allows for smooth, even stitches and easy maneuverability. A size 8 or 10 sharp needle is a good starting point, but you may need to adjust depending on the specific fabric and hem thickness. For heavier fabrics or thicker hems, a larger needle size, such as a 12 or 14, may be necessary to ensure that the stitches are secure and even. On the other hand, for delicate or lightweight fabrics, a smaller needle size, such as a 6 or 7, may be more suitable. Additionally, consider using a beading or tapestry needle, which has a larger eye and a blunt point, for thicker or more textured fabrics. Ultimately, the key to selecting the perfect needle is to experiment with different sizes and types until you find the one that works best for your specific project.
Understanding Your Pants' Fabric
When it comes to hemming pants by hand, understanding the fabric of your pants is crucial. Different fabrics have unique properties that can affect the way they behave when cut, sewn, and finished. For instance, cotton and linen fabrics are relatively easy to work with, as they are breathable, stable, and can be easily pressed. On the other hand, synthetic fabrics like polyester and nylon can be more challenging, as they tend to fray easily and may require specialized needles and threads. Delicate fabrics like silk and wool require extra care, as they can be prone to pilling or running if not handled gently. Knowing the type of fabric your pants are made of will help you choose the right needles, threads, and techniques to ensure a professional-looking hem. Additionally, understanding the fabric's weight, weave, and texture will also inform your decision on the best way to finish the raw edges and prevent fraying. By taking the time to understand your pants' fabric, you'll be able to approach the hemming process with confidence and achieve a high-quality finish that will make your pants look like new.
The Hemming Process
The hemming process is a fundamental skill in sewing that involves folding and sewing the raw edge of a garment to create a finished seam. To achieve a professional-looking hem, it is essential to follow a series of steps that ensure a crisp, clean finish. First, the raw edge of the fabric must be folded and pressed to create a sharp crease, which will serve as a guide for sewing. Next, the needle must be threaded and a knot tied to secure the thread in place. Finally, the sewing process can begin, working from the folded edge of the hem to create a secure and even stitch. By following these steps, individuals can create a high-quality hem that adds a professional touch to any garment. To start the hemming process, the first step is to fold and press the hem, creating a sharp crease that will guide the sewing process.
Folding and Pressing the Hem
The folding and pressing of the hem is a crucial step in the hemming process, as it sets the foundation for a crisp and professional finish. To begin, fold the raw edge of the hem up by about 1/4 inch, creating a narrow fold that will serve as a guide for the rest of the hem. Press this fold using a hot iron and steam, making sure to apply gentle pressure to avoid scorching the fabric. Next, fold the hem up by the desired amount, usually around 1-2 inches, and press again. It's essential to use a pressing cloth or a piece of scrap fabric to protect the hem from scorching and to help create a sharp crease. As you press, make sure to maintain the fold, using a ruler or other straightedge to ensure a straight line. For a more polished finish, you can also use a tailor's ham or a seam roll to help shape the hem and create a smooth, curved line. By taking the time to carefully fold and press the hem, you'll be able to achieve a professional-looking finish that will elevate the overall appearance of your pants.
Threading Your Needle and Tying a Knot
Threading your needle and tying a knot is a crucial step in the hemming process. To start, cut a length of thread that is approximately 18-20 inches long. This will give you enough thread to work with without being too cumbersome. Next, thread the needle by holding the thread between your thumb and index finger, and gently pushing the thread through the eye of the needle. Once the thread is through, pull it gently to remove any slack. Now, to tie a knot, hold the thread between your thumb and index finger, and use your other hand to wrap the thread around the top of the needle 2-3 times. Then, pass the thread through the loop you just created, and pull it gently to tighten the knot. You should now have a secure knot at the end of your thread. To test the knot, gently tug on the thread to make sure it doesn't come undone. If it does, simply repeat the process until you have a secure knot. With your needle threaded and your knot tied, you're now ready to begin the hemming process.
Starting to Sew the Hem
When starting to sew the hem, it's essential to begin with a secure knot at the end of your thread to prevent it from coming loose while sewing. To do this, tie a small knot at the end of the thread and then insert the needle into the fold of the hem, about 1/4 inch from the edge. Bring the needle back out about 1/4 inch away, making sure the thread is taut but not too tight. This initial stitch will serve as an anchor for the rest of the hemming process. Next, insert the needle back into the fold of the hem, about 1/4 inch away from where it came out, and bring it back out about 1/4 inch away, creating a small straight stitch. Continue making these small straight stitches, moving along the hem and keeping the thread taut, until you reach the end of the hem. As you sew, make sure to keep the stitches evenly spaced and not too tight, as this can cause the fabric to pucker. It's also essential to keep the hem fold consistent, making sure it's even and smooth, to ensure a professional-looking finish. By following these steps and taking your time, you'll be able to create a secure and even hem that will last for a long time.
Finishing Touches
The finishing touches are the final details that complete a project, making it polished and professional. When it comes to sewing, the finishing touches are crucial in ensuring a garment or textile looks its best. There are several key steps to take when adding the finishing touches to a sewing project, including tying a secure knot to finish, trimming excess thread, and inspecting and adjusting the hem. By taking the time to complete these steps, sewers can ensure their project looks professional and well-made. One of the most important steps in adding the finishing touches is tying a secure knot to finish, which will be discussed in more detail below.
Tying a Secure Knot to Finish
Tying a secure knot to finish your hand-hemmed pants is a crucial step to ensure that your stitches don't come undone over time. To tie a secure knot, start by threading the needle with the same thread you used for sewing. Then, bring the needle up through the fabric on the wrong side of the hem, about 1/4 inch from the edge. Next, insert the needle back into the fabric about 1/4 inch away from where it came up, making sure the needle is going in the same direction as the stitches. Pull the thread tight to create a small loop on the wrong side of the hem. Now, pass the needle through the loop you just created, and pull the thread tight again. This will create a secure knot that won't come undone easily. To add extra security, you can repeat this process one or two more times, making sure to keep the knots small and tight. Finally, trim the excess thread close to the knot, and your hand-hemmed pants are complete. By following these simple steps, you can ensure that your hand-hemmed pants will last for a long time and look great.
Trimming Excess Thread
Trimming excess thread is a crucial step in completing the hemming process. After tying a knot to secure the thread, use scissors to carefully cut the excess thread as close to the knot as possible. This will prevent the thread from coming loose over time and give your hem a clean finish. It's essential to be cautious when trimming the thread, as cutting too close to the knot can cause it to come undone. To avoid this, it's recommended to leave a small tail of thread, about 1/8 inch long, to ensure the knot remains secure. Additionally, trimming the excess thread at an angle can help prevent the thread from fraying and give the hem a more polished appearance. By taking the time to properly trim the excess thread, you can add a professional touch to your hand-hemmed pants and ensure they look great for years to come.
Inspecting and Adjusting the Hem
Inspecting and adjusting the hem is a crucial step in the hand-hemming process. Before you start sewing, take a closer look at the hem to ensure it's even and symmetrical. Check the length of the hem against the original hemline or a ruler to ensure it's the desired length. If necessary, make adjustments to the hem by folding or re-folding the fabric to achieve the correct length. It's also essential to check the hem for any wrinkles or creases that may have formed during the folding process. Use a hot iron to smooth out any wrinkles, making sure to iron the hem in the same direction as the fold. Additionally, inspect the hem for any stray threads or loose ends that may be visible. Use a pair of scissors to carefully trim any stray threads, and use a needle and thread to re-tie any loose ends. By taking the time to inspect and adjust the hem, you can ensure a professional-looking finish that will make your hand-hemmed pants look like they were done by a pro.