How To Build A Gate
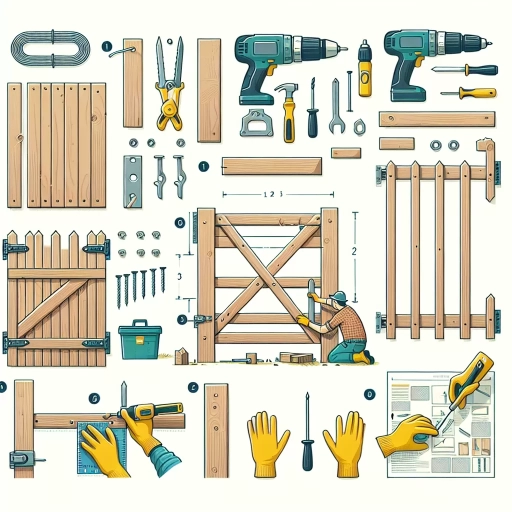
Here is the introduction paragraph: Building a gate can be a rewarding DIY project that adds a touch of personality to your home's exterior. Not only does a well-crafted gate provide a sense of security and privacy, but it also serves as a welcoming entrance to your property. To build a gate that meets your needs and complements your home's style, it's essential to follow a step-by-step approach. This article will guide you through the process, starting with planning your gate project, where you'll determine the gate's purpose, size, and design. From there, you'll learn how to build the gate frame and panels, using materials such as wood or metal. Finally, you'll discover how to install and finish the gate, adding the final touches to create a beautiful and functional entrance. By following these steps, you'll be able to create a gate that not only enhances your home's curb appeal but also provides years of reliable service. So, let's get started with planning your gate project.
Plan Your Gate Project
Planning a gate project can be a daunting task, but with a clear understanding of the process, you can achieve a successful and functional outcome. To start, it's essential to determine the purpose and function of your gate, as this will guide your decisions on materials, design, and installation. You'll also need to choose the right materials and tools for the job, considering factors such as durability, maintenance, and aesthetic appeal. Additionally, accurate measurement and marking of the gate location are crucial to ensure a proper fit and smooth operation. By considering these key factors, you can set yourself up for success and create a gate that meets your needs and enhances your property. So, let's begin by determining the purpose and function of your gate.
Determine the Purpose and Function of Your Gate
When planning your gate project, it's essential to determine the purpose and function of your gate. This will help you decide on the design, materials, and features that will best suit your needs. Ask yourself what you want your gate to achieve. Is it to provide security and keep intruders out, or is it to add a decorative touch to your property? Perhaps it's to mark the entrance to your home or to create a sense of separation between your yard and the street. Whatever the purpose, it will influence the type of gate you build and the features you include. For example, if security is a top priority, you may want to consider a sturdy metal gate with a lock and a secure latch. On the other hand, if you're looking to add a decorative touch, you may opt for a wooden gate with intricate carvings or a beautiful archway. Additionally, think about the function of your gate. Will it be used frequently, or will it be more of a statement piece? If it will be used often, you'll want to ensure it's durable and easy to open and close. By determining the purpose and function of your gate, you'll be able to create a design that meets your needs and enhances your property.
Choose the Right Materials and Tools
When planning your gate project, it's essential to choose the right materials and tools to ensure a sturdy, functional, and visually appealing gate. For the frame, consider using durable and weather-resistant materials such as cedar, cypress, or pressure-treated pine. These woods can withstand harsh weather conditions and require minimal maintenance. For the gate's infill, you can use a variety of materials, including wood pickets, metal bars, or even glass panels, depending on the desired level of privacy and security. Additionally, consider using a rust-resistant metal for the hinges, latch, and other hardware to prevent corrosion and ensure smooth operation. In terms of tools, you'll need a circular saw or hand saw for cutting the wood, a drill press or impact driver for drilling screw holes, and a level to ensure the gate is properly aligned. A tape measure, square, and pencil will also come in handy for marking and measuring the wood. If you're using metal components, a metal cutter or hacksaw may be necessary. By selecting the right materials and tools, you'll be able to build a gate that is both functional and aesthetically pleasing, and will provide years of reliable service.
Measure and Mark the Gate Location
To measure and mark the gate location, start by determining the width of the gate you want to install. Consider the space available and the purpose of the gate. For a standard gate, a width of 3 to 4 feet is common, but you can choose a wider or narrower gate depending on your needs. Once you have decided on the width, measure the distance between the two gate posts or the area where you plan to install the gate. Use a tape measure to record the distance, taking note of any obstacles or irregularities in the terrain. Next, mark the center point of the gate location with a stake and string or a piece of chalk. This will serve as a reference point for your measurements. From the center point, measure outwards to mark the location of the gate posts, using a level to ensure the marks are straight and level. Make sure to take into account the thickness of the gate posts and the space needed for the hinges and latch. Finally, double-check your measurements to ensure accuracy and make any necessary adjustments before proceeding with the installation.
Build the Gate Frame and Panels
Building a gate frame and panels is a crucial step in creating a functional and aesthetically pleasing entrance for your property. To achieve this, it's essential to construct the gate frame using posts and rails, which will provide the structural foundation for your gate. Additionally, adding panels to the gate frame will not only enhance its appearance but also provide privacy and security. Furthermore, using decorative trim and moulding can elevate the gate's design and make it a beautiful focal point for your property. By following these steps, you can create a stunning and functional gate that complements your home's exterior. To start, let's begin with constructing the gate frame using posts and rails.
Construct the Gate Frame Using Posts and Rails
Constructing the gate frame using posts and rails is a crucial step in building a sturdy and functional gate. To start, you will need to prepare the posts and rails according to your gate design. Cut the posts to the required length, taking into account the height of the gate and the depth of the post holes. Next, cut the rails to the required length, ensuring they are slightly longer than the width of the gate. Assemble the frame by attaching the rails to the posts using screws or nails, making sure they are evenly spaced and securely fastened. Use a level to ensure the frame is straight and level, and use clamps to hold the rails in place while you attach them to the posts. Once the frame is assembled, use a drill to make holes for the hinges and latch, and attach the hinges and latch according to the manufacturer's instructions. Finally, add any additional features, such as a gate stop or a gate latch, to complete the gate frame.
Add Panels to the Gate Frame for Privacy and Security
Adding panels to the gate frame is a crucial step in enhancing the privacy and security of your gate. To start, you'll need to determine the type of panels you want to use, such as wooden boards, metal sheets, or vinyl panels. Once you've selected the material, measure the gate frame to determine the number of panels you'll need. Typically, panels are spaced evenly apart, about 1-2 inches, to allow for airflow and visibility. Next, cut the panels to size using a saw or a cutting tool, making sure to wear protective gear and follow safety guidelines. After cutting the panels, attach them to the gate frame using screws, nails, or brackets, depending on the type of material and the desired level of security. Make sure the panels are securely attached and evenly spaced to prevent sagging or warping. Finally, add any finishing touches, such as a coat of paint or stain, to protect the panels from the elements and enhance the overall appearance of the gate. By adding panels to the gate frame, you'll not only improve the privacy and security of your gate but also add a touch of style and sophistication to your outdoor space.
Use Decorative Trim and Moulding to Enhance the Gate's Appearance
The addition of decorative trim and moulding can elevate the gate's appearance, making it a beautiful and functional entrance to your property. By incorporating trim and moulding, you can add a touch of elegance and sophistication to the gate's design. Start by selecting a style that complements the gate's material and architecture, such as a classic ogee or a modern flat trim. You can also choose from a variety of materials, including wood, PVC, or metal, to match the gate's frame and panels. Once you've selected the trim and moulding, carefully measure and cut the pieces to fit the gate's frame, using a miter saw or a coping saw to make precise angled cuts. Apply a small amount of adhesive, such as wood glue or caulk, to secure the trim and moulding in place, and finish with a coat of paint or stain to match the gate's color. The result is a beautifully crafted gate that adds curb appeal and enhances the overall appearance of your property.
Install and Finish the Gate
Installing and finishing a gate is a crucial step in completing a fence installation project. A well-installed and finished gate not only adds aesthetic value to a property but also provides a secure and functional entry point. To ensure a gate operates smoothly and efficiently, it is essential to install the gate hinges and latch correctly. Additionally, adding a gate lock can enhance the security of the gate, providing an extra layer of protection against unauthorized access. Finally, applying a finish to the gate can protect it from the elements, extending its lifespan and maintaining its appearance. By following these steps, homeowners can ensure their gate is both functional and visually appealing. In this article, we will explore the process of installing and finishing a gate, starting with the installation of gate hinges and latch for smooth operation.
Install the Gate Hinges and Latch for Smooth Operation
Installing the gate hinges and latch is a crucial step in ensuring smooth operation and secure closure of your gate. To begin, attach the hinges to the gate frame, making sure they are evenly spaced and securely fastened with screws. Next, attach the latch to the gate post, ensuring it is level and aligned with the gate's strike plate. The latch should be installed at a comfortable height, typically between 36 and 40 inches from the ground, to allow for easy operation. It's essential to choose a latch that is suitable for your gate's size and material, as well as the level of security you require. For example, a magnetic latch is ideal for a small, lightweight gate, while a more robust latch with a lock may be necessary for a larger, heavier gate. Once the hinges and latch are installed, test the gate's operation to ensure it opens and closes smoothly and securely. Make any necessary adjustments to the hinges or latch to achieve a smooth, even motion. Finally, add any finishing touches, such as a gate stop or a decorative latch cover, to complete the installation and enhance the gate's appearance. By following these steps, you can ensure your gate operates smoothly and securely, providing years of trouble-free service.
Add a Gate Lock for Enhanced Security
Adding a gate lock is a crucial step in enhancing the security of your gate. A gate lock not only prevents unauthorized access but also provides an additional layer of protection for your property. When choosing a gate lock, consider the type of gate you have, the level of security you need, and the durability of the lock. You can opt for a simple latch lock or a more advanced digital lock, depending on your requirements. Installing a gate lock is relatively straightforward, and you can do it yourself with basic tools. Start by attaching the lock to the gate post, making sure it is level and secure. Then, attach the latch or locking mechanism to the gate, ensuring it is aligned with the lock. Finally, test the lock to ensure it is working properly and make any necessary adjustments. By adding a gate lock, you can enjoy peace of mind knowing that your property is secure and protected from potential intruders.
Apply a Finish to Protect the Gate from the Elements
Applying a finish to protect the gate from the elements is a crucial step in the gate-building process. A finish not only enhances the appearance of the gate but also shields it from harsh weather conditions, such as rain, sun, and snow. There are various types of finishes available, including paint, stain, sealant, and oil-based treatments. The choice of finish depends on the type of material used to build the gate, as well as personal preference. For instance, if the gate is made of wood, a water-repellent stain or sealant can be applied to protect it from moisture and rot. On the other hand, if the gate is made of metal, a rust-resistant paint or coating can be used to prevent corrosion. It's essential to follow the manufacturer's instructions when applying a finish, and to test a small, inconspicuous area first to ensure the desired result. Additionally, regular maintenance is necessary to ensure the finish remains effective and the gate continues to look its best. This can include reapplying the finish as needed, cleaning the gate regularly, and inspecting it for any signs of damage or wear. By applying a finish and performing regular maintenance, homeowners can enjoy a beautiful and functional gate that withstands the elements and adds value to their property.