How To Draw Holly
Here is the introduction paragraph: Drawing holly is a fun and creative activity that can add a touch of festive cheer to your artwork. Whether you're looking to create a holiday card, decorate a gift, or simply practice your drawing skills, learning to draw holly is a great way to get into the holiday spirit. To get started, it's essential to understand the basic structure of holly, including its leaves, stems, and berries. Once you have a solid grasp of the basics, you can begin sketching and refining your holly drawing, paying attention to the intricate details and textures that make holly so unique. Finally, you can add final touches and enhancements to bring your drawing to life. In this article, we'll take a closer look at the process of drawing holly, starting with the foundation of it all: understanding the basic structure of holly.
Understanding the Basic Structure of Holly
Holly is a popular evergreen plant known for its glossy leaves and bright red berries. To truly appreciate the beauty and complexity of holly, it's essential to understand its basic structure. This involves identifying the main components of the plant, recognizing the shape and proportions of its leaves, and observing the arrangement of leaves and berries. By breaking down these key elements, you'll gain a deeper understanding of holly's unique characteristics and be able to identify different species with confidence. Let's start by identifying the main components of holly, including its leaves, stems, and roots, which provide the foundation for the plant's growth and development.
Identifying the Main Components of Holly
Holly is a popular Christmas symbol, and drawing it can be a fun and creative activity. To get started, it's essential to understand the basic structure of holly, which consists of several key components. The main components of holly include the leaves, berries, and stems. The leaves are typically oval-shaped with pointed tips and serrated edges, and they are usually a deep green color. The berries are small, round, and bright red, and they grow in clusters along the stems. The stems are long and slender, with a woody texture and a brown color. To draw holly, start by sketching the stems, using gentle, curved lines to create the shape of the branches. Next, add the leaves, using oval shapes with pointed tips and serrated edges. Finally, add the berries, using small, round shapes and a bright red color. By understanding the main components of holly and how they fit together, you can create a beautiful and realistic drawing of this festive plant.
Recognizing the Shape and Proportions of Holly Leaves
Recognizing the shape and proportions of holly leaves is a crucial step in drawing realistic holly. Holly leaves are typically oval or elliptical in shape, with a pointed tip and a wavy or serrated edge. The leaves are usually a deep green color, with a glossy texture that reflects light. To draw a holly leaf, start by sketching a rough oval shape, making sure to capture the pointed tip and wavy edge. Pay attention to the proportions of the leaf, as holly leaves can vary in size and shape. Generally, holly leaves are between 2-4 inches long and 1-2 inches wide. The leaves are also typically arranged in an alternate pattern on the stem, with each leaf facing in the opposite direction of the one below it. By carefully observing and drawing the shape and proportions of holly leaves, you can create a realistic and detailed drawing of holly.
Observing the Arrangement of Leaves and Berries
Observing the arrangement of leaves and berries is a crucial step in drawing holly. The leaves of a holly plant are typically arranged in an alternate pattern, meaning that they grow in an alternating pattern along the stem. Each leaf is usually a deep green color with a glossy texture and has a distinctive shape, often with spiny edges. The leaves can be oval or lance-shaped, and they can grow up to 4 inches long. The berries, on the other hand, are usually bright red and grow in clusters along the stem. They are an important part of the holly plant's structure and can add a pop of color to your drawing. When observing the arrangement of leaves and berries, take note of how they are spaced along the stem and how they interact with each other. Notice how the leaves are angled and how the berries are clustered together. This attention to detail will help you create a more realistic and detailed drawing of holly.
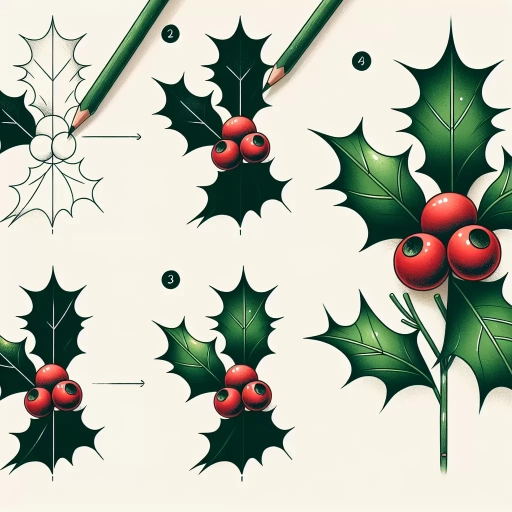
Sketching and Refining the Holly Drawing
Sketching and refining a holly drawing requires attention to detail and a step-by-step approach. To create a beautiful and realistic holly drawing, one must start by creating a basic outline of the holly branch, taking into account the shape and structure of the leaves and stems. Once the outline is complete, the next step is to add details to the leaves and berries, including the veins, edges, and texture. Finally, refining the shapes and textures of the holly is crucial to achieving a lifelike representation. By following these steps, artists can create a stunning holly drawing that captures the essence of this festive and symbolic plant. To begin, let's start with the foundation of our holly drawing: creating a basic outline of the holly branch.
Creating a Basic Outline of the Holly Branch
To create a basic outline of the holly branch, start by sketching the overall shape of the branch, considering its length, thickness, and curvature. Typically, holly branches are slightly curved and taper towards the tip. Use simple lines to block out the main shape, paying attention to the proportions and balance of the branch. Next, add the main stems and veins, using gentle, flowing lines to suggest the organic shape of the holly. Be sure to vary the thickness and texture of the lines to convey the different parts of the branch, such as the thicker, woody stems and the thinner, more delicate veins. As you refine your outline, consider the spacing and arrangement of the leaves and berries, taking care to balance the composition and create a visually appealing arrangement. By establishing a clear and well-proportioned outline, you'll set the foundation for a beautiful and detailed holly drawing.
Adding Details to the Leaves and Berries
To add details to the leaves and berries, start by refining the shape and texture of the leaves. Use short, curved lines to suggest the veins on the leaves, and add some gentle, wavy lines to indicate the leaf's edges. You can also add some subtle shading to give the leaves some depth and dimension. For the berries, use small, rounded shapes to create a cluster of berries. You can add some texture to the berries by using short, curved lines to suggest the tiny bumps on the surface. To add some shine to the berries, use a small dot of white or light-colored pencil to create a highlight. You can also add some stems to the leaves and berries by using long, thin lines that connect the leaves and berries to the main stem. To add some final details, use a small brush or a fine-tip pen to add some delicate lines to suggest the texture of the leaves and berries. You can also add some subtle shading to the stems to give them some depth and dimension. By adding these details, you can create a beautiful and realistic holly drawing that captures the intricate details of this festive plant.
Refining the Shapes and Textures of the Holly
Refining the shapes and textures of the holly is a crucial step in creating a realistic and visually appealing drawing. To start, revisit the outline of the holly leaves and refine their shapes, making sure they are symmetrical and evenly spaced. Pay attention to the pointed tips and the wavy edges, using gentle, flowing lines to capture their natural curves. Next, focus on the berries, adding texture and dimension to their smooth surfaces. Use short, curved lines to suggest the subtle ridges and bumps that give the berries their characteristic appearance. For the stems and branches, use a range of lines and textures to convey their varying thicknesses and roughness. Thicker lines can be used for the main stems, while thinner lines can be used for the smaller branches and twigs. To add depth and interest to the drawing, consider adding some subtle shading and texture to the leaves and berries. This can be achieved using a range of techniques, including hatching, cross-hatching, and stippling. By carefully refining the shapes and textures of the holly, you can create a drawing that is not only visually appealing but also highly realistic and detailed.
Adding Final Touches and Enhancements
The final touches and enhancements are what set a good drawing apart from a great one. When it comes to adding the finishing details to a holly drawing, there are several key elements to consider. First, shading and dimensioning the holly leaves and berries can add depth and realism to the image. Additionally, adding background and context to the holly drawing can help to create a sense of atmosphere and mood. Finally, enhancing the overall appearance with colors and patterns can add visual interest and make the drawing truly pop. By incorporating these elements, artists can take their holly drawing to the next level and create a truly stunning piece of art. In this article, we will explore each of these elements in more detail, starting with the importance of shading and dimensioning the holly leaves and berries.
Shading and Dimensioning the Holly Leaves and Berries
To add depth and dimension to the holly leaves and berries, shading and dimensioning techniques can be employed. Start by identifying the light source, which will help determine the areas that should be shaded and those that should remain lighter. For the leaves, use a range of greens, from light to dark, to create a sense of volume and texture. Apply gentle, smooth strokes with a pencil or marker to suggest the soft, waxy surface of the leaves. To create dimension, add subtle shading to the edges and crevices of the leaves, using a slightly darker shade of green. This will help the leaves appear more three-dimensional and lifelike. For the berries, use a range of reds, from bright to deep, to create a sense of depth and luminosity. Apply bold, expressive strokes with a pencil or marker to suggest the plump, juicy texture of the berries. To create dimension, add subtle shading to the edges and crevices of the berries, using a slightly darker shade of red. This will help the berries appear more rounded and three-dimensional. By carefully shading and dimensioning the holly leaves and berries, you can add a sense of realism and depth to your drawing, making it more engaging and visually appealing.
Adding Background and Context to the Holly Drawing
Adding background and context to the holly drawing can elevate it from a simple illustration to a captivating piece of art. To start, consider the environment in which the holly is typically found. Holly is often associated with winter landscapes, so a snowy or frosty background could be a fitting choice. A soft, gradient blue or purple sky with gentle, white clouds can create a serene and peaceful atmosphere. Alternatively, a warm and cozy background, such as a wooden panel or a stone wall, can add a sense of rustic charm to the drawing. When adding context, think about the objects that are often found near holly, such as pinecones, berries, or festive decorations. Incorporating these elements can help to create a sense of depth and narrative in the drawing. For example, a few strategically placed pinecones or berries can create a sense of movement and energy, while a sprig of holly on a festive table or wreath can add a touch of holiday cheer. By carefully considering the background and context, artists can create a holly drawing that is not only visually appealing but also tells a story and evokes a sense of atmosphere and mood.
Enhancing the Overall Appearance with Colors and Patterns
When it comes to adding the final touches to your holly drawing, incorporating colors and patterns can elevate the overall appearance and make it more visually appealing. To start, consider the natural colors of holly, such as deep greens for the leaves and bright reds for the berries. You can use a range of mediums, including watercolors, colored pencils, or markers, to achieve the desired hues. For a more realistic look, pay attention to the subtle variations in color and texture, such as the lighter green of the leaf's underside or the slight sheen on the berries. In addition to solid colors, you can also experiment with patterns, such as the intricate veins on the leaves or the subtle texture of the stem. To add an extra layer of depth and interest, consider incorporating subtle shading and highlights, using techniques such as hatching or cross-hatching to create a sense of dimensionality. By carefully balancing colors and patterns, you can create a beautiful and eye-catching holly drawing that showcases your artistic skills.