How To Draw A Donut
Here is the introduction paragraph: Drawing a donut can be a fun and creative activity, but it requires some basic understanding of shapes and proportions. To get started, it's essential to understand the basics of drawing a donut, including its circular shape and the relationship between its components, such as the ring and the hole. Once you have a solid grasp of these fundamentals, you can move on to sketching the donut, following a step-by-step guide to ensure accuracy and proportion. Finally, adding realism and details to your donut drawing can elevate it from a simple sketch to a mouth-watering masterpiece. In this article, we'll explore these three key aspects of drawing a donut, starting with the basics.
Understanding the Basics of Drawing a Donut
Drawing a donut may seem like a simple task, but it requires a good understanding of its basic shapes and structures. To get started, it's essential to familiarize yourself with the different components of a donut, including the ring shape, the hole in the center, and the texture of the dough. Additionally, choosing the right drawing tools and materials is crucial in capturing the details and nuances of a donut. A set of fine-tip pens, pencils, and markers can help you achieve the desired level of precision and texture. Furthermore, setting up your drawing space for efficiency is vital in ensuring a smooth and enjoyable drawing experience. This includes having a comfortable and ergonomic workspace, good lighting, and a reference image of a donut to guide you. By understanding these basics, you'll be well on your way to creating a realistic and delicious-looking donut drawing. Let's start by familiarizing yourself with donut shapes and structures.
Familiarizing Yourself with Donut Shapes and Structures
Familiarizing yourself with donut shapes and structures is a crucial step in learning how to draw a donut. A donut typically consists of a ring-shaped body with a central hole, and its structure can be broken down into several key components. The body of the donut is usually rounded and smooth, with a subtle curve that gives it a soft and inviting appearance. The central hole, also known as the "doughnut hole," is typically circular and can vary in size depending on the type of donut. Some donuts may also have additional features such as sprinkles, glaze, or chopped nuts, which can add texture and visual interest to the drawing. To accurately depict a donut, it's essential to observe and understand the relationships between these different components, including the proportions, shapes, and textures. By studying the shapes and structures of donuts, you can develop a deeper understanding of their anatomy and improve your ability to draw them convincingly.
Choosing the Right Drawing Tools and Materials
Choosing the right drawing tools and materials is essential to create a realistic and detailed drawing of a donut. To start, you'll need a pencil with a range of hardness levels, such as a set of graphite pencils (HB, 2B, 4B, 6B) or a mechanical pencil with interchangeable leads. A sharpener is also necessary to keep your pencils sharp and ready to use. For added texture and shading, consider using a range of drawing tools like charcoal, pastels, or colored pencils. A blending stump or tortillon can help smooth out transitions and create subtle gradations of tone. A kneaded eraser is also a must-have for correcting mistakes and creating highlights. When it comes to paper, look for a high-quality, smooth surface that can handle a range of media, such as hot press watercolor paper or Bristol board. Finally, a drawing board or lap desk can provide a comfortable and stable surface for drawing, helping you to achieve more precise lines and details. By investing in the right tools and materials, you'll be well on your way to creating a delicious and realistic drawing of a donut.
Setting Up Your Drawing Space for Efficiency
Setting up your drawing space for efficiency is crucial when it comes to creating a realistic and detailed donut drawing. To start, choose a quiet and comfortable workspace with good lighting. Natural light is ideal, but if that's not possible, invest in a high-quality desk lamp to illuminate your drawing area. Next, organize your drawing tools and supplies within easy reach to minimize distractions and save time. This includes your pencils, erasers, sharpeners, and paper. Consider investing in a drawing board or a lap desk to keep your paper at a comfortable drawing height. Additionally, keep a trash can and a pencil case nearby to maintain a clutter-free workspace. Finally, play some soothing music or nature sounds in the background to help you focus and get into a creative flow. By setting up your drawing space efficiently, you'll be able to concentrate on the details of your donut drawing and produce a high-quality piece of art.
Sketching the Donut: Step-by-Step Guide
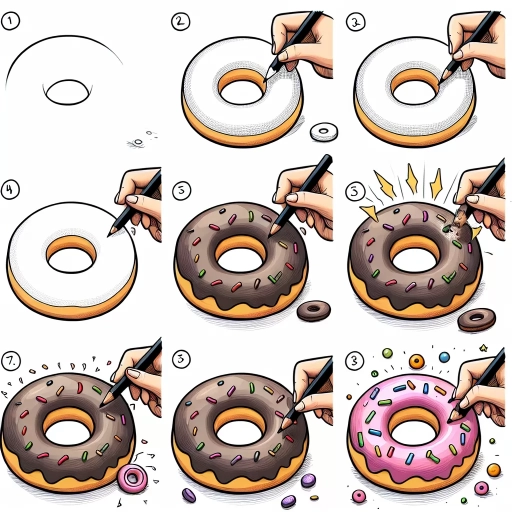
Sketching a donut can be a fun and creative activity, but it requires some skill and attention to detail. To help you get started, this article will provide a step-by-step guide on how to sketch a donut. We will cover the essential steps, including drawing the donut's circular base and center hole, adding the donut's ring shape and proportions, and refining the donut's edges and surface details. By following these steps, you will be able to create a realistic and delicious-looking donut sketch. In this article, we will begin by exploring the first step in sketching a donut: drawing the donut's circular base and center hole.
Drawing the Donut's Circular Base and Center Hole
To draw the donut's circular base and center hole, start by sketching a large circle for the base of the donut. Use a compass or a round object as a guide to ensure the circle is even and symmetrical. Place the point of the compass or the center of the round object in the middle of your paper, and draw a circle with a radius of about 2-3 inches, depending on the size of donut you want to draw. Next, draw a smaller circle inside the larger one to create the center hole. The radius of the smaller circle should be about 0.5-1 inch, depending on the size of the donut and the desired thickness of the ring. Make sure the smaller circle is centered within the larger one, and that the edges of both circles are smooth and even. You can use a ruler or a straightedge to help you draw the circles, or you can freehand them if you're comfortable with drawing curves. Once you have the two circles drawn, you can use them as a guide to add the details of the donut, such as the frosting and sprinkles. Remember to keep your lines smooth and even, and to pay attention to the proportions of the donut to ensure it looks realistic and appetizing.
Adding the Donut's Ring Shape and Proportions
To add the donut's ring shape and proportions, start by sketching a large circle for the outer ring, making sure it's tall and not too wide. The circle should be slightly flattened at the top and bottom, giving it a subtle oval shape. Next, draw a smaller circle inside the larger one, creating the donut's inner ring. The inner circle should be about one-third to one-half the size of the outer circle. Pay attention to the proportions, ensuring the inner ring is not too small or too large compared to the outer ring. The space between the two circles should be relatively even, with the inner ring centered within the outer ring. To achieve a more realistic donut shape, add a slight curvature to the inner ring, making it slightly thicker at the top and bottom. This will give your donut a more rounded and plump appearance. Finally, refine the shape by adding gentle, smooth curves to the outer ring, making sure it's symmetrical and even. By following these steps, you'll be able to create a donut with a convincing ring shape and proportions that will make your drawing look deliciously realistic.
Refining the Donut's Edges and Surface Details
Refining the Donut's Edges and Surface Details. To add more realism to your donut, focus on refining its edges and surface details. Start by defining the donut's edges, using gentle, smooth lines to create a soft, rounded shape. Pay attention to the areas where the donut meets the surface it's sitting on, as these areas tend to be slightly flattened. Next, add some subtle surface details, such as the faint lines and creases that appear on a real donut's surface. You can also add some texture to the donut's surface, using short, curved lines to suggest the soft, fluffy interior. Don't forget to add some highlights to the donut's surface, using a small dot or a short line to indicate where the light is reflecting off the donut's shiny surface. By adding these details, you'll be able to create a more realistic and visually appealing donut that will make your drawing stand out.
Adding Realism and Details to Your Donut Drawing
When it comes to drawing a realistic donut, it's all about the details. A simple circle with a hole in the middle just won't cut it. To create a truly mouth-watering donut, you need to add texture, shading, and dimension. One way to start is by creating texture and patterns on the donut's surface. This can be achieved by using different techniques such as hatching, cross-hatching, and stippling. By adding texture, you can give your donut a more realistic and inviting appearance. Additionally, adding shading and dimension can enhance the overall realism of your drawing. This can be done by using different shading techniques such as chiaroscuro and sfumato. Finally, incorporating additional details like glaze or sprinkles can add a touch of personality to your donut. By combining these techniques, you can create a donut drawing that's almost too good to eat. So, let's start by exploring how to create texture and patterns on the donut's surface.
Creating Texture and Patterns on the Donut's Surface
To add an extra layer of realism to your donut drawing, focus on creating texture and patterns on the donut's surface. Start by adding a subtle sheen to the donut's glaze, using gentle, curved lines to suggest the way the light reflects off the surface. Next, add some texture to the donut itself, using short, curved lines to indicate the soft, fluffy interior. You can also add some visual interest to the donut's surface by creating patterns, such as the characteristic rings of a cake donut or the swirly design of a frosted donut. To create these patterns, use a combination of curved and straight lines, varying the thickness and texture of the lines to create a sense of depth and dimension. For example, you could use thick, bold lines to create the outline of the donut's rings, and then fill in the center with thinner, more delicate lines to suggest the texture of the donut's surface. By adding these textures and patterns, you can create a donut drawing that looks almost good enough to eat.
Adding Shading and Dimension to Enhance Realism
Adding shading and dimension to your donut drawing can elevate it from a simple illustration to a mouth-watering masterpiece. To start, identify the light source in your drawing and determine where the shadows will fall. Typically, the light source is above and to the side, casting a shadow on the opposite side of the donut. Use a range of shading techniques, such as hatching, cross-hatching, and stippling, to create depth and dimension. Begin with gentle, soft shading on the areas closest to the light source, gradually increasing the intensity and darkness of the shading as you move towards the shadowed areas. Pay attention to the texture of the donut, adding shading to suggest the softness of the dough and the crunch of the sugar coating. To add dimension, use a combination of lines and shading to create the illusion of roundedness and curvature. For example, you can use gentle, curved lines to suggest the shape of the donut, and then add shading to create the appearance of depth and volume. Additionally, consider adding highlights to your drawing to create a sense of shine and reflectivity. This can be achieved by leaving small areas of the paper unshaded, or by using a white or light-colored pencil to create highlights. By incorporating shading and dimension into your donut drawing, you can create a realistic and engaging illustration that will make the viewer's mouth water.
Incorporating Additional Details like Glaze or Sprinkles
Incorporating additional details like glaze or sprinkles can elevate your donut drawing from a simple illustration to a mouth-watering masterpiece. To add glaze, start by mixing a small amount of water with your chosen color, creating a thin, translucent mixture. Use a small brush to apply the glaze to the donut, starting at the top and working your way down. You can also use a wet-on-wet technique by adding a small amount of water to the glaze and then applying it to the donut, allowing the colors to blend and merge. For sprinkles, use a small dotting tool or a toothpick to create small dots of color on the surface of the donut. You can also use a small brush to paint on sprinkles, using a gentle, dabbing motion to create a textured, dimensional look. To add an extra layer of realism, consider adding a few stray sprinkles around the base of the donut, as if they had fallen off during the decorating process. By incorporating these additional details, you can add depth, texture, and visual interest to your donut drawing, making it a truly irresistible treat.