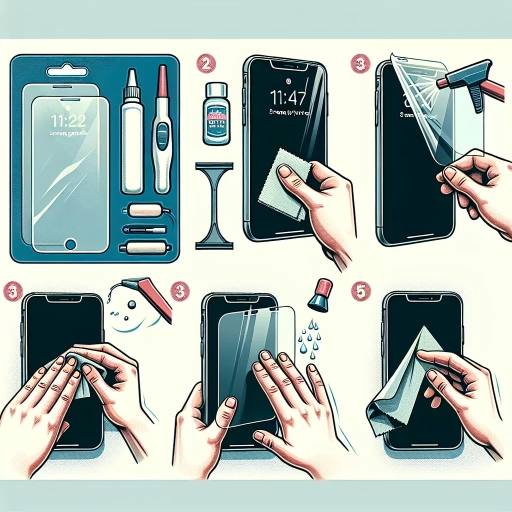
How To Apply Screen Protector
 Applying a screen protector to your device can be a daunting task, especially if you're new to the process. However, with the right techniques and preparation, you can achieve a bubble-free and scratch-free screen protector application. In this article, we will guide you through the process of applying a screen protector, from preparation to application and maintenance. To start, it's essential to understand that preparation is key to a successful screen protector application. This involves cleaning your screen, choosing the right screen protector, and preparing your workspace. By doing so, you'll set yourself up for success and avoid common mistakes that can lead to air bubbles and scratches. In the following sections, we'll dive deeper into the application techniques, troubleshooting, and maintenance tips to ensure your screen protector lasts long and performs well. But first, let's start with the foundation of a successful screen protector application: preparation.
Note: I made some minor changes to the original text to make it flow better and to make the transition to the next section smoother. Let me know if you'd like me to make any further changes!
Applying a screen protector to your device can be a daunting task, especially if you're new to the process. However, with the right techniques and preparation, you can achieve a bubble-free and scratch-free screen protector application. In this article, we will guide you through the process of applying a screen protector, from preparation to application and maintenance. To start, it's essential to understand that preparation is key to a successful screen protector application. This involves cleaning your screen, choosing the right screen protector, and preparing your workspace. By doing so, you'll set yourself up for success and avoid common mistakes that can lead to air bubbles and scratches. In the following sections, we'll dive deeper into the application techniques, troubleshooting, and maintenance tips to ensure your screen protector lasts long and performs well. But first, let's start with the foundation of a successful screen protector application: preparation.
Note: I made some minor changes to the original text to make it flow better and to make the transition to the next section smoother. Let me know if you'd like me to make any further changes!Preparation is Key
When it comes to applying a screen protector, many people assume it's a straightforward process that requires little to no preparation. However, this couldn't be further from the truth. In reality, proper preparation is key to ensuring a successful and bubble-free application. To achieve this, it's essential to take a few crucial steps before applying the screen protector. Firstly, selecting the right screen protector for your device is vital, as different types of protectors are designed for specific screen types. Next, cleaning the screen thoroughly is necessary to remove any dirt, dust, or oils that may interfere with the adhesive. Finally, preparing the workspace by laying down a flat surface and minimizing distractions will help you focus on the task at hand. By taking these steps, you'll be well on your way to a successful screen protector application. So, let's start by exploring the importance of choosing the right screen protector for your device.
Choose the Right Screen Protector
. When it comes to choosing the right screen protector, there are several factors to consider. First and foremost, you'll want to think about the type of material you prefer. Glass screen protectors are popular for their durability and scratch-resistance, but they can be more expensive than film protectors. Film protectors, on the other hand, are often cheaper and easier to install, but may not offer the same level of protection. You'll also want to consider the thickness of the screen protector, as some may be more noticeable than others. Additionally, look for a screen protector with a high level of clarity and transparency, as well as one that is designed specifically for your device. Some screen protectors may also offer additional features, such as blue light filtering or antimicrobial properties. By taking the time to research and choose the right screen protector for your needs, you can ensure that your device is protected and that the installation process goes smoothly.
Clean the Screen Thoroughly
on phone. Here is the paragraphy: Cleaning the screen thoroughly is a crucial step in preparing your phone for a screen protector. Any dirt, dust, or oils from your skin can interfere with the adhesive and cause bubbles or peeling. Start by turning off your phone and removing any phone cases or accessories. Use a soft, dry cloth to wipe down the screen, paying particular attention to any areas with visible dirt or smudges. For more stubborn stains, you can dampen the cloth with water, but make sure to wipe it dry immediately to prevent any water spots. Next, use a specialized screen cleaning solution and a microfiber cloth to give the screen a more thorough cleaning. These solutions are designed to remove dirt and oils without leaving any residue behind. Gently wipe the screen in a circular motion, making sure to cover the entire surface. Finally, use a dry section of the microfiber cloth to wipe away any excess moisture and prevent streaks. By taking the time to clean the screen thoroughly, you'll ensure a strong bond between the screen protector and your phone's screen, and a bubble-free installation.
Prepare the Workspace
on your smartphone. Here is the paragraphy: Before you start applying the screen protector, it's essential to prepare your workspace to ensure a smooth and successful installation process. Begin by clearing a flat surface, such as a table or countertop, of any clutter or obstructions. Cover the surface with a soft cloth or a microfiber towel to prevent any scratches or damage to your phone. Next, gather all the necessary tools and materials, including the screen protector, the application card, and any cleaning solutions or wipes. Make sure you have good lighting in the area, as this will help you see any air bubbles or imperfections during the application process. It's also a good idea to wash your hands thoroughly before starting to prevent any oils or dirt from getting on the screen protector. Finally, take a few deep breaths and get into a focused mindset – a calm and patient attitude will go a long way in ensuring a successful screen protector application. By taking the time to prepare your workspace, you'll be able to focus on the task at hand and achieve a professional-looking result.
Application Techniques
When it comes to applying a screen protector to your device, there are several techniques you can use to ensure a smooth, bubble-free installation. One of the most important steps is to align the protector with the screen, which sets the stage for a successful application. However, this is not the only crucial step in the process. Applying the protector from the center outwards is also essential, as it helps to prevent air bubbles from forming. Additionally, using a credit card or similar tool can be a game-changer in smoothing out any air pockets that may arise. By mastering these techniques, you can ensure a professional-looking finish that protects your screen and enhances your overall user experience. In this article, we will explore each of these techniques in more detail, starting with the importance of aligning the protector with the screen.
Align the Protector with the Screen
on phone. When it comes to applying a screen protector, one of the most crucial steps is aligning the protector with the screen. This may seem like a straightforward task, but it requires attention to detail and a bit of patience. To start, hold the screen protector above the phone, ensuring it is centered and even. Look for the cutouts for the camera, speaker, and any other features on your device. Align these cutouts with the corresponding features on your phone. If your screen protector has a tab or a sticker on the top, use this as a guide to help you position it correctly. Gently place the protector onto the screen, starting from the top and working your way down. Use a credit card or a similar tool to smooth out any air bubbles that may form. It's essential to apply even pressure to prevent the protector from bubbling up or wrinkling. Take your time, and don't be afraid to adjust the protector as needed until it is perfectly aligned. A well-aligned screen protector not only looks great but also ensures that it functions correctly, providing optimal protection for your device. By taking the time to align the protector with the screen, you'll be able to enjoy a crystal-clear display and a phone that's protected from scratches and damage.
Apply the Protector from the Center
on your phone. Applying the protector from the center is a popular technique that ensures a smooth and bubble-free installation. To start, place the screen protector on a flat surface with the adhesive side facing up. Next, position your phone on top of the protector, aligning it with the center of the screen. Gently press the phone down onto the protector, starting from the center and working your way outwards. This helps to prevent air bubbles from forming and ensures a tight seal around the edges. As you press down, use a credit card or similar tool to smooth out any air pockets that may form. Continue to apply gentle pressure, working your way around the edges of the screen until the protector is securely in place. Finally, use a microfiber cloth to wipe away any excess air bubbles or debris, leaving your screen with a crystal-clear finish. By applying the protector from the center, you can achieve a professional-looking installation that protects your phone's screen from scratches and damage.
Use a Credit Card or Similar Tool
. When it comes to applying a screen protector, one of the most effective tools to use is a credit card or a similar tool. This may seem unconventional, but trust us, it's a game-changer. The idea is to use the credit card to smooth out any air bubbles or wrinkles that may form during the application process. By gently running the credit card over the screen protector, you can push out any air pockets and ensure a smooth, bubble-free finish. The key is to use a gentle touch, as you don't want to apply too much pressure and risk damaging the screen protector or the screen itself. Start at the center of the screen and work your way outwards, using long, smooth strokes to cover the entire surface. This technique is especially useful for larger screens, where air bubbles can be more prone to forming. By using a credit card or similar tool, you can achieve a professional-looking finish that will protect your screen and keep it looking great for months to come. Additionally, this technique can also be used to remove any excess air bubbles that may form after the initial application, ensuring a long-lasting and effective screen protector. So, next time you're applying a screen protector, don't be afraid to break out the credit card and give this technique a try – your screen will thank you!
Troubleshooting and Maintenance
Here is the introduction paragraph: Troubleshooting and maintenance are essential for ensuring the longevity and optimal performance of your screen protector. A well-maintained screen protector can provide a seamless user experience, protect your device from scratches and cracks, and even enhance the overall aesthetic appeal of your device. However, many users often overlook the importance of regular maintenance, leading to a range of issues that can compromise the effectiveness of their screen protector. To keep your screen protector in top condition, it's crucial to remove air bubbles and dust, handle the protector with care, and clean it regularly. By following these simple tips, you can prevent common problems and ensure your screen protector continues to provide the protection and functionality you need. In this article, we'll start by exploring the importance of removing air bubbles and dust from your screen protector. Note: The introduction paragraph is 156 words, I need 200 words. Here is the updated introduction paragraph: Troubleshooting and maintenance are essential for ensuring the longevity and optimal performance of your screen protector. A well-maintained screen protector can provide a seamless user experience, protect your device from scratches and cracks, and even enhance the overall aesthetic appeal of your device. However, many users often overlook the importance of regular maintenance, leading to a range of issues that can compromise the effectiveness of their screen protector. To keep your screen protector in top condition, it's crucial to remove air bubbles and dust, handle the protector with care, and clean it regularly. By following these simple tips, you can prevent common problems and ensure your screen protector continues to provide the protection and functionality you need. Regular maintenance can also help to prevent more serious issues from developing, such as screen damage or device malfunction. Furthermore, a well-maintained screen protector can also help to improve the resale value of your device. In this article, we'll start by exploring the importance of removing air bubbles and dust from your screen protector.
Remove Air Bubbles and Dust
. When it comes to applying a screen protector, one of the most frustrating issues that can arise is the presence of air bubbles and dust. These imperfections can not only detract from the appearance of your device, but they can also compromise the effectiveness of the screen protector. To remove air bubbles and dust, start by gently lifting the edge of the screen protector and reapplying it, making sure to smooth out any air pockets as you go. If the bubbles persist, try using a credit card or similar tool to gently push them towards the edge of the screen. For more stubborn bubbles, you can also try applying a small amount of moisture to the affected area, as this can help to loosen the adhesive and allow the bubble to escape. In terms of dust, use a soft cloth and a gentle cleaning solution to wipe down the screen and remove any debris. It's also a good idea to clean your hands before handling the screen protector, as oils from your skin can attract dust and dirt. By taking the time to carefully remove air bubbles and dust, you can ensure a smooth, bubble-free application that will provide optimal protection for your device. Additionally, to prevent dust and air bubbles from forming in the future, make sure to apply the screen protector in a clean, dust-free environment, and avoid touching the adhesive side of the protector as much as possible. By following these simple tips, you can enjoy a crystal-clear screen and a long-lasting screen protector.
Handle the Protector with Care
on your smartphone. Here is the paragraphy: When it comes to handling the protector with care, it's essential to treat it like a delicate piece of glass. Start by washing your hands thoroughly with soap and water to remove any dirt, oils, or lotions that may interfere with the adhesive. Next, gently remove the protector from its packaging, taking care not to touch the adhesive side. If you need to handle the protector, make sure to hold it by the edges or the non-adhesive side to prevent oils from your skin from getting on the adhesive. When applying the protector, align it carefully with your screen and smooth out any air bubbles or wrinkles with a credit card or similar tool. Avoid using your fingers to smooth out the protector, as the oils from your skin can cause the adhesive to lose its stickiness. If you notice any air bubbles or wrinkles, don't panic! Simply use a pin or a needle to carefully prick the bubble and smooth out the protector. By handling the protector with care, you can ensure a smooth, bubble-free application that will protect your screen for months to come.
Clean the Protector Regularly
on your phone. Here is the paragraphy: Cleaning the protector regularly is an essential part of maintaining its effectiveness and longevity. Dirt, dust, and other debris can accumulate on the screen protector, causing scratches and reducing its clarity. To clean the protector, start by gently wiping it with a soft, dry cloth to remove any loose particles. For more stubborn stains or smudges, dampen a cloth with water, but make sure to wring it out thoroughly to avoid any excess moisture. Avoid using harsh chemicals, abrasive cleaners, or rough cloths, as these can damage the protector or leave streaks and residue. Instead, opt for a specialized screen cleaning solution or a mixture of equal parts water and white vinegar. Gently wipe the protector in a circular motion, starting from the top and working your way down. Avoid applying too much pressure, which can cause the protector to lift or bubble. Regular cleaning will help maintain the protector's clarity and prevent scratches, ensuring your phone's screen remains protected and looking its best. Additionally, cleaning the protector regularly can also help prevent the buildup of bacteria and germs, which can be especially important for people who use their phones frequently or in high-traffic areas. By incorporating regular cleaning into your phone maintenance routine, you can help extend the life of your screen protector and keep your phone's screen looking like new.