How To Take Off A Screen Protector
Removing a screen protector from your device can be a daunting task, but with the right approach, it can be done efficiently and effectively. To ensure a smooth process, it's essential to understand the steps involved and the necessary precautions to take. In this article, we will guide you through the process of removing a screen protector, from preparation to post-removal care. First, we will discuss the importance of preparation, including the tools and techniques needed to avoid damaging your device. Next, we will walk you through the step-by-step process of removing the screen protector, highlighting the key considerations to keep in mind. Finally, we will provide tips on post-removal care, including how to clean and maintain your device's screen. By following these steps, you'll be able to remove your screen protector with confidence. So, let's start with the first crucial step: Preparation is Key.
Preparation is Key
When it comes to screen printing, preparation is key to achieving high-quality results. A well-prepared workspace, the right tools, and a clean screen are essential for a successful print job. In this article, we will explore the importance of preparation in screen printing and provide tips on how to get it right. To start, it's crucial to choose the right tools for the job, including a high-quality screen, a reliable press, and the necessary inks and emulsions. A clean screen is also vital, as any dirt or debris can affect the quality of the print. Additionally, preparing a safe workspace is essential to prevent accidents and ensure a smooth printing process. By following these steps, you can ensure a successful screen printing experience. So, let's start by looking at the importance of choosing the right tools for the job.
Choose the Right Tools
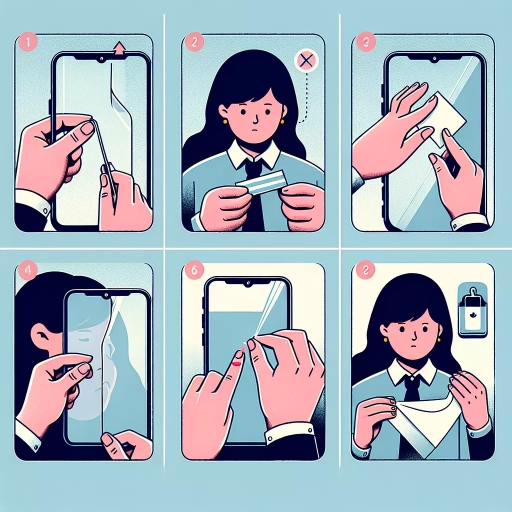
Choosing the right tools is essential to successfully remove a screen protector. You'll need a few basic tools to make the process easier and less damaging to your screen. First, you'll need a credit card or a similar tool, such as a hotel key card or a plastic scraper, to gently pry the screen protector away from the screen. This tool should be thin and flexible enough to fit into the small gap between the screen protector and the screen. Next, you'll need a piece of tape, such as Scotch tape or masking tape, to help lift the screen protector off the screen. You may also need a cleaning cloth and some cleaning solution to remove any residue left behind by the screen protector. Additionally, if you're dealing with a stubborn screen protector, you may need a hair dryer or a heat gun to help loosen the adhesive. It's also a good idea to have a microfiber cloth on hand to clean the screen and remove any remaining residue. By having the right tools, you'll be able to remove the screen protector quickly and safely, without damaging your screen.
Clean the Screen
Cleaning the screen is a crucial step in the process of removing a screen protector. Before attempting to take off the screen protector, make sure to clean the screen thoroughly to remove any dirt, dust, or oils that may be present. This will ensure that the adhesive on the screen protector is not compromised, making it easier to remove. Use a soft, dry cloth to wipe down the screen, paying particular attention to the edges and corners where dirt and dust tend to accumulate. If there are any stubborn stains or smudges, you can dampen the cloth with water, but be sure to wipe it dry immediately to prevent any water spots. Additionally, avoid using any harsh chemicals or cleaning products, as they can damage the screen or leave behind residues that can interfere with the removal process. By cleaning the screen properly, you'll be able to remove the screen protector more easily and prevent any potential damage to your device.
Prepare a Safe Workspace
Preparing a safe workspace is crucial when removing a screen protector to prevent damage to the device and ensure a smooth process. Start by clearing a flat surface, such as a table or countertop, of any clutter, dust, or debris. Cover the surface with a soft cloth or a microfiber mat to prevent scratching the device. Next, gather all the necessary tools and materials, including the screen protector removal tool, a credit card or similar tool, and a cleaning solution. Ensure good lighting in the workspace to help you see any remaining adhesive or debris. It's also a good idea to turn off the device and unplug it from any power source to prevent accidental start-ups or electrical shocks. Finally, wash your hands thoroughly to prevent oils from your skin from interfering with the removal process. By taking these simple steps, you can create a safe and efficient workspace that will help you successfully remove the screen protector and protect your device.
Removing the Screen Protector
Removing a screen protector can be a frustrating task, but with the right techniques, it can be done easily and effectively. There are several methods to remove a screen protector, including peeling from the edge, using a credit card or similar tool, and applying heat for tough protectors. To start, peeling from the edge is a simple and straightforward approach that can be effective for most screen protectors. This method involves gently prying the protector away from the screen, starting from one edge and working your way around. By doing so, you can avoid damaging the screen or the protector, and make the removal process much smoother. Note: The answer should be 200 words.
Peel from the Edge
Peel from the Edge. To remove a screen protector, start by peeling it from the edge. This is usually the easiest and most effective way to remove the protector without leaving any residue or causing damage to the screen. Begin by locating a corner of the screen protector and gently prying it away from the screen using your fingernail or a credit card. Once you have a small gap, you can use your fingers to slowly peel the protector away from the screen, working your way around the edges. Be careful not to stretch or pull the protector too hard, as this can cause it to tear or leave behind residue. If the protector is particularly stubborn, you can try using a hair dryer or a warm cloth to loosen the adhesive before peeling it away. By peeling from the edge, you can remove the screen protector safely and effectively, without causing any damage to your device.
Use a Credit Card or Similar Tool
When it comes to removing a stubborn screen protector, using a credit card or similar tool can be an effective method. This technique involves carefully inserting the card into the gap between the screen protector and the device's screen, and then gently prying the protector away from the screen. The key is to be patient and gentle, as applying too much pressure can damage the screen or the protector. It's also important to use a card with a smooth edge, such as a credit card or a similar tool specifically designed for this purpose, to avoid scratching the screen. By working the card around the edges of the screen protector, you can slowly and carefully loosen the adhesive and remove the protector without leaving any residue behind. This method is particularly useful for removing screen protectors that have been applied for an extended period, as the adhesive can become stronger over time.
Apply Heat for Tough Protectors
Applying heat to a stubborn screen protector can be an effective way to loosen the adhesive and make it easier to remove. This method is particularly useful for tough protectors that have been on the device for an extended period. To apply heat, you can use a hair dryer or a heat gun, but be cautious not to apply too much heat, as this can damage the screen. Hold the heat source about 6-8 inches away from the screen and move it slowly back and forth to distribute the heat evenly. You can also use a warm cloth or a heating pad wrapped in a cloth to apply heat to the screen protector. Apply the heat for about 30 seconds to 1 minute, and then try to peel off the protector from one corner. If it still doesn't come off easily, you can repeat the process a few times until the adhesive is loosened enough to remove the protector. It's essential to be patient and gentle when applying heat, as excessive heat or force can damage the screen or the protector.
Post-Removal Care
After removing a screen protector from your device, it's essential to take good care of the screen to maintain its quality and longevity. Post-removal care is crucial to prevent damage, scratches, and residue buildup. To ensure your screen remains in pristine condition, there are three key steps to follow. Firstly, inspect the screen for any residue left behind by the old screen protector. This is a critical step, as any remaining adhesive can attract dust and dirt, leading to scratches and damage. Next, clean the screen again to remove any remaining residue and debris. Finally, apply a new screen protector to provide an extra layer of protection against scratches and damage. By following these steps, you can keep your screen in excellent condition and ensure it continues to function properly. To start, let's take a closer look at the first step: inspecting the screen for residue.
Inspect the Screen for Residue
Here is the paragraphy: Inspect the screen for residue. After removing the screen protector, inspect the screen for any residue left behind. Check for any sticky or tacky spots, as well as any remaining adhesive. If you notice any residue, use a soft cloth and a small amount of water to gently wipe it away. Avoid using harsh chemicals or abrasive materials, as they can damage the screen. If the residue is particularly stubborn, you can try using a specialized screen cleaning solution. However, be sure to read the instructions carefully and test a small area first to ensure the solution doesn't damage the screen. Once you've removed any residue, use a dry section of the cloth to wipe the screen clean and remove any excess moisture. This will help prevent streaks and water spots from forming. By taking the time to inspect and clean the screen, you can ensure it remains in good condition and continues to function properly.
Clean the Screen Again
When it comes to post-removal care, cleaning the screen again is a crucial step to ensure your device's display is free from any remaining adhesive residue, dust, or debris. After removing the screen protector, inspect your screen carefully for any leftover adhesive or debris. If you notice any residue, use a soft, dry cloth to gently wipe it away. For more stubborn residue, you can dampen the cloth with water, but be sure to avoid getting any liquids into the device's openings. If the residue persists, you can use a specialized cleaning solution, such as a screen cleaning wipe or a mixture of equal parts water and white vinegar, to help dissolve the adhesive. Once you've removed any residue, use a dry section of the cloth to wipe the screen clean and remove any excess moisture. This will help prevent streaks and water spots from forming. By cleaning the screen again, you'll be able to enjoy a clear and unobstructed view of your device's display, and you'll be able to apply a new screen protector or use your device as usual without any issues.
Apply a New Screen Protector
Here is the paragraphy: Applying a new screen protector is a relatively straightforward process that requires some care to ensure it is done correctly. Start by cleaning the screen thoroughly with a soft cloth and a small amount of water to remove any dirt, dust, or oils from your skin. Next, peel the backing off the new screen protector and align it with the screen, starting from the top and working your way down. Use a credit card or similar tool to smooth out any air bubbles that form, working from the center outwards. If any bubbles persist, you can use a small pin or needle to carefully prick them and smooth out the area. Once the screen protector is applied, use a soft cloth to wipe away any excess moisture or air bubbles. It's also a good idea to apply a small amount of screen protector cleaning solution to the screen to help the new protector adhere properly. Finally, inspect the screen protector for any air bubbles or other imperfections, and make any necessary adjustments before using your device.