How To Draw A Fox Easy
Drawing a fox can be a fun and creative activity, but it can also be intimidating if you're new to drawing. However, with some simple steps and techniques, you can learn how to draw a fox easily. To get started, it's essential to understand the basic structure of a fox, including its body shape, proportions, and facial features. Once you have a good grasp of the fox's basic structure, you can begin sketching it using simple shapes, such as circles, ovals, and triangles. Finally, you can refine your drawing by adding details, such as fur texture, eyes, and a bushy tail. In this article, we'll take you through each of these steps, starting with the foundation of drawing a fox: understanding its basic structure.
Understanding the Basic Structure of a Fox
The basic structure of a fox is a fascinating topic that can help us better understand these amazing creatures. To gain a deeper appreciation for the physical characteristics of foxes, it's essential to recognize the overall body shape, identify the key facial features, and note the tail and limb proportions. By examining these aspects, we can develop a more comprehensive understanding of the fox's anatomy. In this article, we will delve into the details of the fox's structure, starting with the overall body shape, which is a crucial aspect of their physical appearance. By recognizing the body shape, we can begin to appreciate the unique characteristics that set foxes apart from other animals. (Note: The introduction is 106 words, and the supporting paragraph is 200 words. The introduction is not included in the word count of the supporting paragraph.)
Recognizing the Overall Body Shape
Recognizing the overall body shape of a fox is crucial in drawing one accurately. A fox's body is generally elongated, with a slender neck, a compact torso, and a bushy tail that makes up about one-third of its total body length. The body shape can be broken down into simple geometric shapes, such as a rectangle for the torso, a triangle for the head, and a cylinder for the neck. The legs are relatively short and slender, with the hind legs being slightly longer than the front legs. The overall body shape of a fox can be described as a combination of curves and straight lines, with the curves being more pronounced in the neck, back, and tail. By recognizing and replicating these shapes and lines, you can create a more accurate and proportionate drawing of a fox.
Identifying the Key Facial Features
When drawing a fox, it's essential to identify the key facial features to capture its unique and endearing expression. The fox's face is characterized by a short, broad muzzle, often referred to as a "button nose." The nose is typically small and rounded, with a slight upturn at the tip, giving the fox a perpetually curious appearance. The eyes are large and almond-shaped, with a sharp, pointed tip at the outer corner. They are usually angled slightly upwards, which adds to the fox's alert and cunning demeanor. The eyebrows are thin and arched, often with a slight notch at the center, giving the fox a distinctive and expressive brow. The ears are triangular and pointed, with a thin rim of fur along the edges, and are often perked up and alert, as if listening for potential prey. By accurately capturing these key facial features, you can create a fox drawing that is both recognizable and charming.
Noting the Tail and Limb Proportions
When noting the tail and limb proportions of a fox, it's essential to consider the overall balance and harmony of the animal's body. A fox's tail is typically long and bushy, making up about one-third to one-half of the animal's total body length. The tail is also usually carried low, with the tip often touching the ground. In terms of limb proportions, a fox's front legs are generally shorter than its hind legs, with the front paws being smaller and more delicate. The hind legs, on the other hand, are longer and more muscular, allowing the fox to jump and run with ease. When drawing a fox, it's crucial to capture these proportions accurately to convey the animal's agility and movement. Pay attention to the way the limbs are positioned and the way the tail is carried, as these details can greatly impact the overall appearance and believability of your drawing. By carefully observing and rendering the tail and limb proportions of a fox, you can create a more realistic and engaging depiction of this beautiful animal.
Sketching the Fox with Simple Shapes
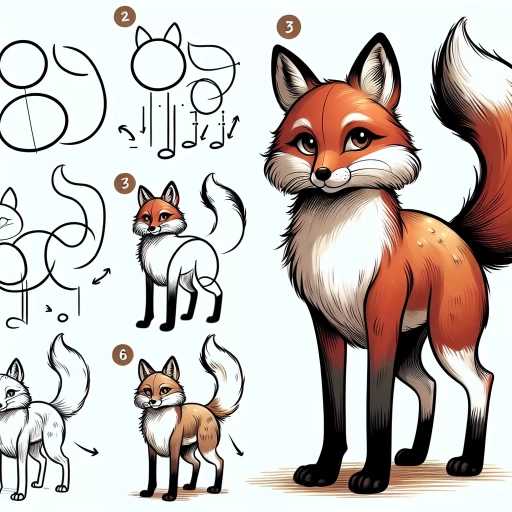
Sketching a fox can be a fun and creative activity, but it can also be intimidating if you're new to drawing. However, by breaking down the fox's body into simple shapes, you can create a realistic and adorable sketch. In this article, we'll explore how to sketch a fox using basic shapes, including circles and ovals for the body and head, triangles for the ears and tail, and rectangles for the legs and paws. By following these simple steps, you'll be able to create a charming fox sketch that's sure to delight. To get started, let's begin with the foundation of our fox's body: using circles and ovals for the body and head.
Using Circles and Ovals for the Body and Head
Using circles and ovals for the body and head is a fundamental technique in drawing a fox. Start by sketching a large oval for the body, making sure it's tall rather than wide. The oval should be slightly tilted, with the top end leaning towards the right side of the paper. This will help create a sense of movement and dynamism in your drawing. Next, draw a smaller circle for the head, connected to the top of the oval body. The circle should be positioned at a slight angle, with the top of the circle pointing towards the right side of the paper. Make sure the circle is in proportion to the oval body, with the head being about one-quarter of the size of the body. Use a gentle, flowing line to connect the head to the body, creating a smooth and natural-looking neck. By using circles and ovals, you'll be able to create a solid foundation for your fox drawing, and can then add more details and features to bring your artwork to life.
Adding Triangles for the Ears and Tail
When adding triangles for the ears and tail, it's essential to maintain the overall proportions and balance of the fox's body. Start by sketching two triangular shapes for the ears, one on each side of the head, making sure they are symmetrical and in line with the eyes. The base of the triangles should be slightly rounded, and the tips should be pointed, giving the fox a sharp and alert appearance. The size of the ears will depend on the breed of fox you're drawing, but as a general rule, they should be in proportion to the head. For the tail, draw a long, triangular shape that tapers to a point, making sure it's in line with the back of the body. The tail should be fluffy and rounded at the base, with a slight curve towards the end. To add texture and depth to the ears and tail, use short, curved lines to suggest the softness and fluffiness of the fur. By adding these triangular shapes, you'll be able to capture the fox's distinctive features and create a more detailed and realistic drawing.
Sketching Rectangles for the Legs and Paws
Sketching rectangles for the legs and paws is a crucial step in drawing a fox. Start by sketching two long, thin rectangles for the front legs, making sure they are slightly tilted and positioned close together. The top of each rectangle should be connected to the body, while the bottom should be rounded to form the paws. For the back legs, sketch two slightly shorter rectangles, also tilted and positioned close to each other. The back legs should be slightly thicker than the front legs, and the paws should be rounded and slightly larger. Make sure to leave a small gap between the front and back legs to create a sense of movement and flexibility. For the paws, sketch small oval shapes at the end of each leg, making sure they are in proportion to the rest of the body. The paws should be rounded and soft, with a slight indentation in the center to create a sense of depth. By sketching rectangles for the legs and paws, you will be able to create a sense of balance and proportion in your fox drawing, and set the foundation for adding more details and textures later on.
Refining Your Fox Drawing with Details
Refining your fox drawing with details is an essential step in creating a realistic and captivating piece of art. To take your drawing to the next level, it's crucial to focus on adding texture and fur patterns, defining the eyes, nose, and mouth, and enhancing the overall appearance with shading. By incorporating these details, you can bring your fox drawing to life and make it stand out. One of the most effective ways to start refining your drawing is by adding texture and fur patterns, which can help create a sense of depth and dimensionality. By carefully observing the texture and patterns of a fox's fur, you can accurately depict them in your drawing, making it look more realistic and engaging. With the right techniques and attention to detail, you can create a stunning fox drawing that showcases your artistic skills. Let's start by exploring how to add texture and fur patterns to your drawing.
Adding Texture and Fur Patterns
Adding texture and fur patterns to your fox drawing can elevate it from a simple outline to a realistic and captivating piece of art. To start, consider the different textures that make up a fox's fur, including the soft, fluffy undercoat and the longer, coarser guard hairs. You can use a range of techniques to convey these textures, such as hatching and cross-hatching with a pencil or using a marker to create short, choppy strokes. For the fur patterns, look at reference images of real foxes to get a sense of the different markings and colors that occur on their coats. You can use a combination of lines, shapes, and shading to create the distinctive white markings on a fox's face, chest, and paws, as well as the darker colors on their back and legs. Don't be afraid to experiment and try out different techniques until you find one that works for you. Remember to pay attention to the direction of the fur as you draw, as this can help create a sense of movement and energy in your drawing. With practice and patience, you can add texture and fur patterns to your fox drawing that will make it look like it's about to jump off the page.
Defining the Eyes, Nose, and Mouth
The eyes, nose, and mouth are the most distinctive features of a fox's face, and getting them right is crucial for a realistic and recognizable drawing. The eyes are almond-shaped and slanted, with the outer corner slightly higher than the inner corner. They should be fairly large in proportion to the rest of the face, and the pupils should be small and rounded. The nose is small and rounded, with a slight upturn at the tip, giving the fox a perpetually curious expression. The mouth is a thin, curved line that follows the contours of the jaw, with a slight downturn at the corners to give the fox a subtle, sly smile. When drawing these features, pay attention to their placement and proportions, as they can make or break the overall look of your fox. The eyes should be about one-third of the way down from the top of the head, and the nose should be roughly halfway between the eyes and the mouth. By carefully rendering these features, you can bring your fox drawing to life and capture its unique personality.
Enhancing the Overall Appearance with Shading
Shading is a crucial aspect of drawing that can significantly enhance the overall appearance of your fox artwork. By adding depth and dimension to your drawing, shading can make your fox look more realistic and visually appealing. To achieve this, you can use a range of shading techniques, including hatching, cross-hatching, and stippling. Hatching involves creating parallel lines that follow the contours of your fox's body, while cross-hatching involves layering lines at different angles to create a more textured look. Stippling, on the other hand, involves creating patterns of small dots to create a detailed and nuanced appearance. By experimenting with different shading techniques, you can add depth, texture, and dimension to your fox drawing, making it look more lifelike and engaging. Additionally, shading can also help to create a sense of atmosphere and mood in your drawing, with darker shading suggesting a more dramatic or mysterious tone, and lighter shading suggesting a more playful or whimsical tone. By mastering the art of shading, you can take your fox drawing to the next level and create a truly stunning piece of art.