How To Draw A Daisy
Drawing a daisy can be a fun and creative activity, but it requires some understanding of the flower's basic structure and some simple drawing techniques. To create a realistic and beautiful daisy, you'll need to start by understanding the basic structure of the flower, including the shape and arrangement of its petals, center, and stem. From there, you can begin sketching the daisy step by step, using simple shapes and lines to build up the flower's form. As you add more details and texture to the daisy, you'll want to pay attention to the realistic petal edges and veins, as well as the texture of the center of the flower. Finally, you can enhance the stem and leaves with shading to give your daisy some depth and dimension. In this article, we'll take a closer look at the process of drawing a daisy, starting with the basics of the flower's structure. Understanding the Basic Structure of a Daisy is the first step in creating a beautiful and realistic drawing of this iconic flower.
Understanding the Basic Structure of a Daisy
The daisy is a classic and iconic flower that is easily recognizable, but have you ever stopped to think about its basic structure? Understanding the different parts of a daisy can help you appreciate its beauty and complexity. To start, it's essential to identify the center of the daisy, which is made up of tiny flowers that are often overlooked. Additionally, recognizing the petal arrangement is crucial in understanding the overall shape and symmetry of the flower. Finally, noting the stem and leaves provides insight into the daisy's growth habits and how it interacts with its environment. By examining these three key components, you'll gain a deeper understanding of the daisy's structure and appreciate its unique characteristics. Let's begin by taking a closer look at the center of the daisy.
Identifying the Center of the Daisy
The center of the daisy is a crucial element in drawing a realistic and visually appealing flower. To identify the center, look for the cluster of tiny yellow or brown florets that are tightly packed together. These florets are actually tiny flowers that make up the center of the daisy, and they are often surrounded by a ring of larger, white petals. The center of the daisy is usually slightly raised and may be slightly indented, giving it a subtle dome shape. When drawing the center of the daisy, pay attention to the texture and detail of the florets, as they can add depth and dimension to your drawing. You can use short, curved lines to suggest the shape and texture of the florets, and a small circle or oval can help to define the center of the daisy. By accurately capturing the center of the daisy, you can create a beautiful and realistic drawing that showcases the flower's unique charm.
Recognizing the Petal Arrangement
Recognizing the petal arrangement is a crucial step in drawing a realistic daisy. The typical daisy has two types of petals: the ray florets, which are the large, outer petals, and the disc florets, which are the small, inner petals. The ray florets are usually white, but can also be found in shades of pink, yellow, and red, while the disc florets are typically yellow. To draw a daisy, start by sketching the center of the flower, where the disc florets are located. Then, draw the ray florets around the center, making sure to space them evenly apart. The number of ray florets can vary, but most daisies have between 13 and 34. The petals should be slightly curved and tapered, with the tips pointing outwards. The arrangement of the petals is usually symmetrical, with the ray florets arranged in a spiral pattern around the center of the flower. By paying attention to the petal arrangement, you can create a realistic and visually appealing daisy drawing.
Noting the Stem and Leaves
When drawing a daisy, it's essential to note the stem and leaves, as they provide a foundation for the entire flower. The stem of a daisy is typically long and slender, with a gentle curve that supports the flower head. It's usually a light green color, gradually transitioning to a slightly darker shade towards the base. The leaves, on the other hand, are typically oval-shaped with a pointed tip, and they grow alternately along the stem. They can be a vibrant green color, with a smooth texture and a subtle sheen. When drawing the stem and leaves, pay attention to their proportions and placement, as they should be in harmony with the rest of the flower. The stem should be roughly the same length as the diameter of the flower head, and the leaves should be spaced evenly apart, with the largest leaves at the base of the stem. By accurately depicting the stem and leaves, you'll create a sense of balance and stability in your drawing, allowing the flower head to take center stage.
Sketching the Daisy Step by Step
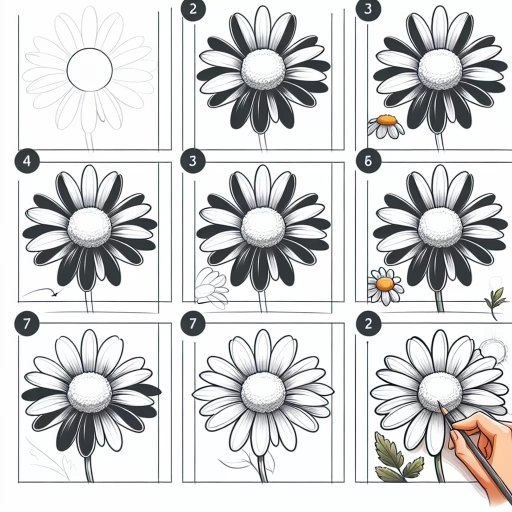
Sketching a daisy can be a fun and creative activity, allowing you to express your artistic side and bring a touch of nature to your artwork. To create a beautiful and realistic daisy, it's essential to break down the process into manageable steps. In this article, we'll guide you through the process of sketching a daisy, starting with the center of the flower, where the magic begins. We'll then explore how to add the petals in a spiral pattern, creating a sense of movement and life. Finally, we'll define the stem and add leaves, completing the overall structure of the flower. By following these steps, you'll be able to create a stunning and detailed daisy sketch that showcases your artistic skills. So, let's get started and begin with the foundation of our daisy – the center of the flower.
Starting with the Center of the Flower
Starting with the center of the flower is a great way to begin drawing a daisy. The center of a daisy is typically a cluster of tiny flowers, which are often yellow in color. To draw the center, start by creating a small circle in the middle of your paper. This circle will serve as the base of the center of the flower. Next, draw a series of small, curved lines extending out from the circle, each one slightly overlapping the one before it. These lines should be fairly close together, and should give the appearance of a cluster of tiny flowers. As you add more lines, you can begin to shape the center of the flower into a more rounded, three-dimensional shape. Be sure to vary the length and curvature of the lines to give the center some texture and visual interest. Finally, add some gentle shading to the center of the flower to give it some depth and dimension. By starting with the center of the flower, you'll be able to build a strong foundation for the rest of your daisy drawing.
Adding the Petals in a Spiral Pattern
To add the petals in a spiral pattern, start by drawing a small petal at the center of the flower, slightly curved and tapered at the tip. Then, move your pencil in a gentle, sweeping motion to create the next petal, positioning it about one-third of the way around the center of the flower. Continue this process, adding each petal in a spiral pattern, overlapping the edges of the previous petal slightly as you go. As you work your way around the flower, gradually increase the size of the petals, making sure to maintain a consistent shape and curve. To achieve a natural, organic look, vary the size and shape of the petals slightly, and don't be afraid to add a few imperfections or irregularities to give your daisy some character. As you add the final petals, pay attention to the overall shape of the flower, making sure it remains balanced and symmetrical. With a little patience and practice, you should be able to create a beautiful, realistic daisy with a stunning spiral pattern of petals.
Defining the Stem and Adding Leaves
The stem of a daisy is typically long and slender, connecting the flower to the roots. To draw the stem, start by creating a gentle, curved line that extends from the base of the flower. The stem should be slightly thicker at the base and taper off as it reaches the top. You can add some gentle, wavy lines to the stem to give it a more organic and natural look. The leaves of a daisy are typically oval-shaped and pointed at the tip, with a smooth, curved edge. To draw the leaves, start by creating a teardrop shape with a pointed tip, making sure to leave a small gap between each leaf. The leaves should be arranged in a staggered pattern along the stem, with the largest leaves at the base and the smallest at the top. You can add some gentle, curved lines to the leaves to give them a more natural and relaxed look. To add some depth and dimension to the leaves, you can add some gentle shading and texture, using short, curved lines to suggest the veins and texture of the leaves.
Adding Details and Texture to the Daisy
Creating Realistic Petal Edges and Veins
Adding Texture to the Center of the Flower
Enhancing the Stem and Leaves with Shading
To add details and texture to a daisy, it's essential to focus on the intricate features that make this flower unique. One of the key aspects to consider is creating realistic petal edges and veins, which can be achieved through subtle shading and texture techniques. Additionally, adding texture to the center of the flower can help create a more realistic and dimensional appearance. Finally, enhancing the stem and leaves with shading can help bring the entire piece together and create a sense of depth and dimension. By incorporating these details, artists can take their daisy artwork to the next level and create a truly stunning piece. In this article, we will explore these techniques in more depth, starting with creating realistic petal edges and veins. Creating Realistic Petal Edges and Veins The delicate edges and veins of a daisy petal are what give this flower its signature look. To create realistic petal edges, artists can use a combination of gentle shading and texture techniques. One approach is to use a soft brush to create a subtle gradient of color along the edge of the petal, gradually deepening the shade towards the center. This can help create a sense of depth and dimension, and can also help to define the shape of the petal. To add veins to the petal, artists can use a fine-tip brush to create delicate lines that follow the natural curve of the petal. By varying the thickness and texture of these lines, artists can create a more realistic and organic appearance. Adding Texture to the Center of the Flower The center of a daisy is a complex and intricate part of the flower, featuring a cluster of tiny florets and a prominent center disk. To add texture to this area, artists can use a combination of shading and texture techniques. One approach is to use a small brush to create a series of tiny, rounded shapes that follow the natural curve of the florets. By varying the size and texture of these shapes, artists can create a more realistic and dimensional appearance. Additionally, artists can use a fine-tip brush to create delicate lines that follow the natural curve of the center disk, helping to define its shape and texture. Enhancing the Stem and Leaves with Shading The stem and leaves of a daisy are often overlooked, but they play a crucial role in creating a sense of depth and dimension in the overall piece. To enhance the stem and leaves with shading, artists can use a combination of gentle shading and texture techniques. One approach is to use a soft brush to create a subtle gradient of color along the
Creating Realistic Petal Edges and Veins
Adding Texture to the Center of the Flower
Enhancing the Stem and Leaves with Shading
Creating Realistic Petal Edges and Veins
Creating realistic petal edges and veins is a crucial step in adding depth and dimension to your daisy drawing. To achieve this, start by using a fine-tip pen or a small brush to draw the edges of the petals. Vary the line width and texture to create a natural, organic look. For the edges, use short, gentle strokes to suggest the soft, curved shape of the petals. As you work your way around the flower, pay attention to the way the petals overlap and curve, using this to inform the placement and shape of your lines. To add veins to the petals, use a slightly thicker line and a more deliberate stroke, following the natural curve of the petal. Start at the base of the petal and work your way outwards, using gentle, sweeping motions to suggest the flow of the veins. Be sure to vary the thickness and texture of the veins to create a sense of depth and dimension. By adding these details, you'll be able to create a realistic and visually appealing daisy that captures the beauty of this iconic flower.
Adding Texture to the Center of the Flower
Adding texture to the center of the flower can elevate the overall realism and visual appeal of your daisy drawing. To achieve this, start by adding a series of small, curved lines that radiate from the center of the flower, mimicking the texture of the daisy's disc florets. Vary the length and thickness of these lines to create a sense of depth and dimension. Next, add a few scattered, short lines that resemble the texture of the flower's receptacle, the base of the flower head. These lines should be slightly thicker and more irregular than the previous ones. Finally, use a range of hatching and cross-hatching techniques to create a soft, rounded texture that suggests the delicate, fuzzy appearance of the daisy's center. By adding these textures, you'll create a more nuanced and engaging drawing that invites the viewer to explore the intricate details of the flower.