How To Apply Foundation With A Brush
Applying foundation with a brush can be a daunting task, especially for those who are new to makeup. However, with the right techniques and tools, it can be a game-changer for achieving a flawless, airbrushed finish. To master the art of applying foundation with a brush, it's essential to understand the importance of preparation, mastering the right brush strokes, and adding the perfect finishing touches. In this article, we'll dive into the world of foundation application and explore the key steps to help you achieve a professional-looking finish. From preparing your skin and choosing the right brush, to mastering the perfect strokes and adding a flawless finish, we'll cover it all. So, let's start with the first and most crucial step: Preparation is Key.
Preparation is Key
When it comes to achieving a flawless, long-lasting foundation finish, preparation is key. A well-prepared base can make all the difference in how your makeup looks and lasts throughout the day. To ensure a smooth, even application, it's essential to start with the right tools, specifically a high-quality foundation brush. However, before you can even think about applying foundation, you need to prep your skin to create a smooth canvas. This involves following a consistent skincare routine, exfoliating regularly, and moisturizing to hydrate your skin. Additionally, priming your face is crucial to create a surface for your foundation to adhere to, allowing it to stay in place all day. By taking these steps, you'll be well on your way to a flawless finish. So, let's start with the basics and explore the importance of choosing the right foundation brush.
Choose the Right Foundation Brush
When it comes to applying foundation with a brush, choosing the right foundation brush is crucial for a flawless finish. A good foundation brush can make all the difference in achieving a smooth, even, and natural-looking base. With so many options available in the market, selecting the right brush can be overwhelming. Here are some tips to help you choose the right foundation brush. First, consider the type of foundation you use. If you use a liquid or cream foundation, look for a brush with synthetic bristles, which are better suited for these types of formulas. If you use a powder foundation, a brush with natural bristles is a better option. Next, think about the size of the brush. A smaller brush is ideal for precision application and targeting specific areas of the face, while a larger brush is better for covering larger areas quickly. The shape of the brush is also important. A flat brush is great for applying foundation to the forehead, cheeks, and chin, while a angled brush is perfect for getting into the corners of the eyes and around the nose. Finally, consider the quality of the brush. Look for a brush with soft, flexible bristles that won't scratch or irritate your skin. A good foundation brush should also be easy to clean and maintain. By considering these factors, you can choose the right foundation brush that will help you achieve a flawless, professional-looking finish.
Prep Your Skin for Foundation
Prep your skin for foundation by starting with a clean and moisturized base. Wash your face with a gentle cleanser, followed by a toner to balance your skin's pH. Apply a lightweight moisturizer that suits your skin type, allowing it to absorb fully before moving on to the next step. Exfoliate once or twice a week to remove dead skin cells and unclog pores, ensuring a smooth canvas for your foundation. Use a primer to create an even surface, helping your foundation stay in place longer and bringing out the natural color of your skin. By prepping your skin, you'll achieve a flawless and long-lasting foundation application.
Prime Your Face for a Flawless Finish
To prime your face for a flawless finish, start by applying a lightweight, oil-free primer that suits your skin type. This will help create an even canvas for your foundation, allowing it to glide on smoothly and last longer. Look for a primer that contains ingredients such as silicones, antioxidants, or plant extracts, which can help to smooth out fine lines, reduce the appearance of pores, and give your skin a radiant glow. Apply a small amount of primer to your face, focusing on areas where your skin tends to get oily or dry, and gently massage it in with your fingertips until it's fully absorbed. Allow the primer to dry completely before moving on to the next step, which is applying your foundation with a brush. By taking the time to prime your face, you'll be able to achieve a more even, long-lasting finish that looks and feels great.
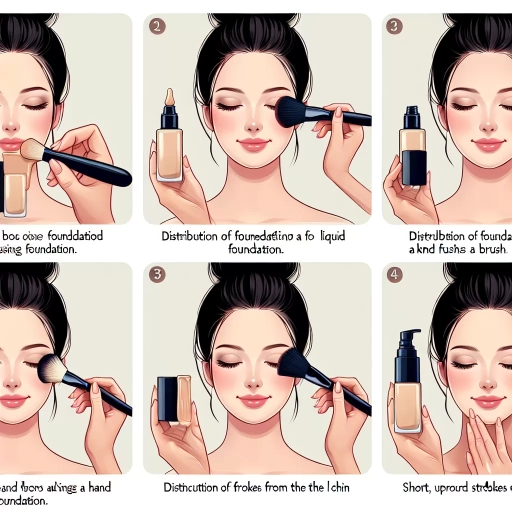
Mastering the Brush Strokes
Mastering the brush strokes is an essential skill for any makeup artist or beauty enthusiast. To achieve a flawless, professional-looking finish, it's crucial to understand the different techniques involved in applying makeup. A good starting point is to begin with a light hand, allowing for a natural look that enhances one's features without looking too done-up. As you build coverage, gentle, sweeping motions can be used to blend colors and create a seamless finish. However, for those trouble spots that require extra attention, precise strokes can be employed to target specific areas. By mastering these techniques, you can take your makeup skills to the next level and achieve a look that's both polished and effortless. So, let's start with the basics and explore how to start with a light hand for a natural look.
Start with a Light Hand for a Natural Look
When it comes to applying foundation with a brush, it's essential to start with a light hand to achieve a natural look. This means using a gentle touch and a small amount of product to build coverage gradually. Starting with too much foundation can lead to a cakey, heavy finish that accentuates pores and fine lines. Instead, begin by loading a small amount of foundation onto the brush, and then gently sweep it across the skin in light, even strokes. Focus on blending the foundation into the skin, rather than applying it in thick layers. This will help to create a seamless, natural-looking finish that enhances the skin without looking too made-up. As you build coverage, pay attention to areas that need more attention, such as blemishes or dark circles under the eyes, and use a light touch to target these areas specifically. By starting with a light hand and building coverage gradually, you'll be able to achieve a natural, effortless look that makes your skin look and feel its best.
Build Coverage with Gentle, Sweeping Motions
When it comes to building coverage with a foundation brush, gentle, sweeping motions are key. Start by loading the brush with a small amount of foundation, and then gently sweep it across the skin in smooth, even strokes. Focus on one area at a time, such as the forehead or cheek, and work your way outward in sections. This will help you build coverage gradually and evenly, without applying too much product at once. As you sweep the brush across the skin, use light pressure and let the bristles do the work. Don't press too hard, as this can cause the foundation to look cakey or heavy. Instead, let the brush glide effortlessly across the skin, depositing just the right amount of product. By using gentle, sweeping motions, you'll be able to build coverage that looks natural and flawless, without any harsh lines or unevenness. This technique is especially useful for areas that require more coverage, such as blemishes or scars, as it allows you to target specific areas without overloading the surrounding skin. With practice, you'll be able to master the art of building coverage with gentle, sweeping motions, and achieve a flawless, airbrushed finish that lasts all day.
Target Trouble Spots with Precise Strokes
When it comes to targeting trouble spots with precise strokes, it's all about using the right brush and technique to achieve a flawless finish. For areas like the under-eye, nose, and mouth, where skin can be thinner and more delicate, a smaller, more precise brush is essential. Look for a brush with synthetic or natural fibers that are densely packed and angled to allow for precise application. To target these areas, use light, gentle strokes to build coverage gradually, feathering the edges outwards to blend seamlessly with the surrounding skin. For blemishes and scars, a concealer brush with a pointed tip is ideal, allowing you to target the area directly and build coverage as needed. When using a concealer brush, use short, light strokes to pat the product onto the skin, rather than rubbing or dragging, which can exacerbate the appearance of imperfections. By using precise strokes and the right brush, you can effectively target trouble spots and achieve a smooth, even finish that looks and feels like second skin.
Finishing Touches for a Flawless Finish
The key to a flawless finish lies in the details. A smooth, even base is essential, but it's the finishing touches that can make or break the overall look. To achieve a truly flawless finish, it's essential to focus on three key areas: blending, setting, and highlighting. By mastering these techniques, you can create a look that's both polished and long-lasting. First, blending is crucial for a seamless finish. By blending your makeup, you can create a natural-looking base that sets the tone for the rest of your look. In the next section, we'll explore the importance of blending and provide tips on how to blend like a pro. Note: The answer should be 200 words. The key to a flawless finish lies in the details. A smooth, even base is essential, but it's the finishing touches that can make or break the overall look. To achieve a truly flawless finish, it's essential to focus on three key areas: blending, setting, and highlighting. By mastering these techniques, you can create a look that's both polished and long-lasting. A flawless finish requires a combination of artistry and attention to detail. It's not just about applying makeup, but about creating a look that's tailored to your individual features and skin type. By blending, setting, and highlighting, you can create a look that's both natural and dramatic. Whether you're looking to enhance your everyday look or create a show-stopping evening look, the right finishing touches can make all the difference. By focusing on these three key areas, you can take your makeup look to the next level and achieve a truly flawless finish. First, blending is crucial for a seamless finish. By blending your makeup, you can create a natural-looking base that sets the tone for the rest of your look. In the next section, we'll explore the importance of blending and provide tips on how to blend like a pro.
Blend, Blend, Blend for a Seamless Finish
When it comes to achieving a seamless finish with foundation, blending is key. To blend, blend, blend for a flawless finish, start by applying a small amount of foundation to the center of your face and gently blending it outwards and upwards towards the hairline and jawline using light, sweeping strokes. Make sure to blend well around the edges, especially around the hairline, jawline, and edges of the face, as these areas tend to be more prone to visible lines and demarcations. Use a gentle pressing motion to blend the foundation into the skin, rather than rubbing or dragging the brush, which can cause the foundation to look cakey or uneven. As you blend, focus on building coverage gradually, rather than applying too much product at once, which can lead to a heavy, cakey finish. By blending, blending, blending, you'll be able to create a smooth, even base that looks and feels like second skin, providing the perfect canvas for the rest of your makeup look.
Set Your Foundation for Long-Lasting Wear
To set your foundation for long-lasting wear, it's essential to start with a smooth canvas. Begin by applying a lightweight primer that suits your skin type, allowing it to absorb fully before moving on to your foundation. This will help create an even surface for your foundation to adhere to, ensuring a flawless finish that lasts all day. Next, choose a foundation that matches your skin tone and type, and apply it using a high-quality foundation brush. Look for a brush with synthetic or natural fibers that are densely packed, as these will help to create a smooth, even finish. When applying your foundation, start in the center of your face and work your way outwards, using light, gentle strokes to blend the product into your skin. Be sure to cover all areas evenly, but avoid applying too much product, as this can lead to a cakey finish. Once you've applied your foundation, set it in place with a light dusting of translucent powder. This will help to absorb any excess oil and prevent your foundation from shifting or fading throughout the day. Finally, finish off your look by applying a setting spray, which will help to lock your foundation in place and keep it looking fresh and flawless for hours to come. By following these simple steps, you can set your foundation for long-lasting wear and enjoy a beautiful, flawless finish that lasts all day.
Highlight and Contour for Added Dimension
Highlight and contouring are techniques used to add depth and dimension to the face. Highlighting involves applying a lighter shade of foundation or concealer to areas of the face that naturally catch the light, such as the tops of the cheekbones, nose, and cupid's bow. This helps to create a radiant and lifted appearance. Contouring, on the other hand, involves applying a darker shade of foundation or powder to areas of the face that you want to recede, such as the hollows of the cheeks, temples, and jawline. This helps to create the illusion of definition and structure. By combining highlighting and contouring, you can create a more defined and sculpted look that enhances your natural features. To highlight and contour effectively, use a light hand and build up your coverage gradually. Start by applying a small amount of highlighter or contour powder to the desired area and blend, blend, blend! It's also important to choose the right shades for your skin tone, as using shades that are too light or too dark can look unnatural. With practice and patience, highlighting and contouring can become a valuable tool in your makeup arsenal, helping you to create a flawless and polished finish.