How To Draw A Pumpkin
Understanding the Art Fundamentals
Starting with Basic Shapes
Before diving into the intricacies of drawing a pumpkin, a basic understanding of geometric forms is essential. A Pumpkin is not merely an orange blob but a composed series of spherical forms. Practice drawing spheres, ellipses and cylinders beforehand will play a significant role in sketching a realistic pumpkin. Understand how shading and highlighting these simple shapes will help in your final drawing.
Mastering Perspective
Another critical aspect of drawing a pumpkin is understanding perspective. It's essential to learn how objects appear when seen from different angles. For example, a pumpkin viewed from the top seems more like a circle, while the side view will appear as an ellipse. Learning about how perspective works, the rules of one, two, or three-point perspective can dramatically improve the quality and realism of your pumpkin drawing.
Importance of Light and Shadow
The final fundamental to understand before drawing a pumpkin is the concept of light and shadow. Wonder why some drawings seem flat, while others portray depth? That's all due to the right application of light and shadow. The way light interacts with an object helps define its form, texture, and depth. Hence, learning the basics of shadow, highlights, and understanding the direction of light will add a level of realism to your pumpkin sketch.
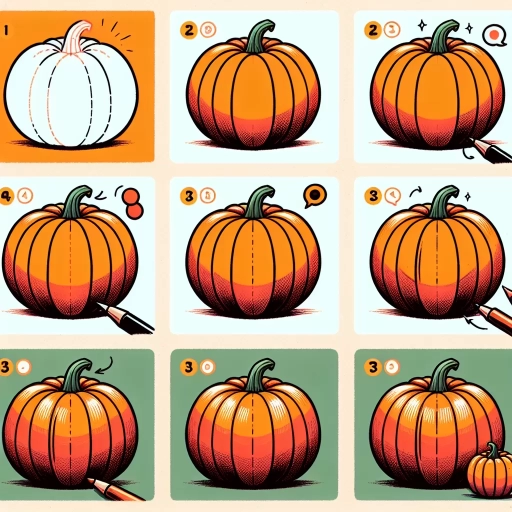
Step-by-step Guide to Drawing a Pumpkin
Sketching Out the Basic Form
Start by sketching a simple sphere for the pumpkin's body. Create a slightly flattened circle, not a perfect one. Add the upper and lower ellipse slightly tilted, implying the pumpkin’s ribbed structure. Add the stalk by sketching a small cylinder at the top. Remember, the initial sketch should be light and rough, allowing corrections in later stages.
Defining the Pumpkin's Features
Once your basic form is sketched, start adding the pumpkin's defining features - its ribs. Carving the pumpkin, segment by segment, with simple curved lines would start bringing out the pumpkin's character. Draw lines from the stalk to the bottom, following the curvature of initial sphere. These lines become the pumpkin's ribs, giving it its distinctive, ribbed look.
Add Texture and Details
With the primary form defined, focus on adding texture and smaller details. Add some subtle lines on the pumpkin's surface and around the stalk to represent the texture of the bark. At this stage, fix any disproportionate aspects or bumps that don't serve the pumpkin's overall form.
Perfecting the Pumpkin with Shading and Highlighting
Identify the Light Source
Before proceeding with shading, identify your light source direction. This will determine where to place highlights and shadows. Typically, lighter areas will be opposite the light source while darker areas would be on the same side.
Shading the Pumpkin
Begin by shading the pumpkin lightly and gradually build up darker values. Remember, each segment of the pumpkin is like a miniature version of the whole pumpkin. Hence, apply the same shading logic to each segment separately. Understand, the contours of the pumpkin, the bending and twisting ribs and the stubby ends will all have different shading values.
Adding Highlights
Highlights are the lightest parts of the pumpkin, and they produce an intense, reflective quality. Generally, highlights fall on the areas directly facing the light source. Carefully observe your pumpkin or reference, identify these areas, and leave them unshaded, creating the illusion of reflected light, and hence, a plumper, more dimensional pumpkin.