How To Make A Lectern In Minecraft
 Tapping into the intricate world of Minecraft, this article explores the step-by-step process of crafting a lectern - an essential item for bibliophiles, scholars, and casual players alike. More than just a decorative block, a lectern holds more than meets the eye; acting as a podium for your enchanting books or simply sprucing up your in-game library. To make this task more manageable, we've divided it into three main sections – 'Designing Your Lectern', 'Building the Base', and 'Adding the Top and Shelves'. Each part is meticulously detailed, ensuring you can bring your lectern to life with ease. As we enter the world of pixelated craftsmanship, our first port of call is 'Designing Your Lectern' – a phase where your ideas take a tangible form. But before we delve into the creative process, let's mine deep into the fundamentals of Minecraft lecterns.
Designing Your Lectern
Designing your lectern should be a strategic process that goes beyond aesthetics. It involves careful considerations on the right materials, the size and shape of the lectern, as well as the decorative elements. Choosing the right materials for your lectern is not just about durability but also incorporates elements of style. A right material choice brings a distinction, establishes the tone, and determines how functional your lectern is over time. The second aspect to consider is the size and shape of the lectern. This can be influenced by a variety of factors including the space available, the height of the person using it, and the overall design of the room. Thirdly, adding decorative elements ensures your lectern not only serves its functional purposes but also enhances the surrounding decor. These elements can range from carved designs to distinct color choices and fittings. With these three key points in mind, let's delve into the first aspect; choosing the right materials for your lectern.
Choosing the Right Materials
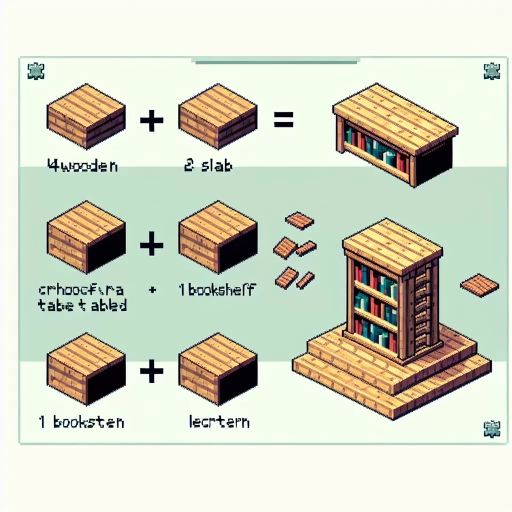
Choosing the right materials is a crucial element when designing your lectern in the virtual world of Minecraft Bedrock Edition. The ingenuity of this game allows players to architect various structures utilizing a wide array of materials that differ in texture, durability, and aesthetic appeal. The materials you select can affect not only the functionality of your lectern but also its overall look, which can reflect your personal style or the theme of your other structures within the game. Therefore, it is advisable to choose wisely to build an impressive lectern synergizing with the surroundings while meeting your functional needs. Primarily, the lectern in Minecraft is fabricated using four wooden slabs and a bookshelf. You may use any variety of wooden slabs accessible in the game such as Oak, Spruce, Birch, Jungle, Acacia, or Dark Oak. Each type offers a diverse range of grain patterns and shades, allowing you to choose a color that blends well with or stands out in your structure. It's crucial to remember that all wood types have the same durability, determinant on Minecraft's code, so your selection should rest primarily on aesthetic considerations. Furthermore, to make the bookshelf, you will need to collect a total of six wooden planks and three books, again with a choice among varying wood types. Obtaining books in Minecraft involves harvesting leather and paper, forging a touch of realism in the game. The lectern's feature, allowing you to place a book and quill or a written book on it for other players to read while it remains on the stand, encourages communication in multiplayer modes. Thus, one must view material selection not only from an aesthetics standpoint but also for practical purposes. To maximize the wood texture chosen, lighting may prove beneficial. Certain Minecraft blocks such as glowstone or redstone lamps could enhance your lectern's appearance, highlighting the wood grain and shades. Additionally, these blocks will provide a gentle light, adding a soothing ambiance while you or other players read from the lectern. Moreover, while designing your lectern, consider incorporating some materials to complement the context where the lectern will be placed. For instance, adding some stone or metal elements nearby can heighten the design aesthetics, making the lectern one of the focal points in your build. In conclusion, the choice of materials and their arranged combinations play a significant role in creating a lectern in Minecraft that is not only functional but visually stimulating. Therefore, be creative, experimental, and above all, have fun in the process! This virtual construction experience promotes strategic thinking, resource management, and architectural creativity.
Considering the Size and Shape
When designing your lectern in Minecraft Bedrock, considering the size and shape is vital. You must keep in mind the spatial limitations of your game environment and design accordingly. Selecting the correct dimension can greatly impact the usability and visual appeal of your lectern. Firstly, the size of your lectern should be proportionate to your character in the game. A lectern that's too large or too small can appear out of place within your game environment. Typically, the ideal height of the lectern in Minecraft is around 1.6 blocks, which morphologically matches the scale of player characters. Just as the size, the shape of the lectern also warrants consideration. The traditional design of a lectern is a slanted flat-top on a stand, which is perfect for laying a book. However, in Minecraft, you can get creative and modify this standard design to add personal touches. The basic shape could include the combination of a polygon base with a sloping top for placing books. However, you may incorporate various geometric elements to make the design more intricate. Remember, combining different shapes and forms might enhance the aesthetic value of your lectern. Selecting the right wood block type can influence the overall shape and size of your lectern. For instance, oak wood planks can give your lectern a classic and rustic look, while birch wood can help you achieve a lighter and more modern design. Also, consider incorporating additional elements like bookshelves or torch holders to your lectern which can enhance the functionality and visually amplify your design, making it more engaging for you and other players. Furthermore, the space where you want to position your lectern comes into play. If you're setting it up in a small room, a slender, taller design might be more fitting. In comparison, a larger, grander lectern might be prominent for a big hall or library in your Minecraft world. Creating a lectern with an ideal size and shape may seem insignificant, but it adds to the realism and aesthetics of your virtual space. It makes your gameplay more engaging and ensures an enjoyable building experience. Consider these aspects carefully when designing your lectern, as an appropriately sized and designed lectern can transform the ambiance of your Minecraft world and enhance your gaming experience. With Minecraft offering the freedom to your creativity, considering the size and shape of your lectern will ensure you maximize this liberty. Not only will it reflect in the aesthetics of your perfect lectern but also increase its functionality and usage. So, deliberate these factors wisely to create a versatile and visually appealing lectern for your Minecraft Bedrock world.
Adding Decorative Elements
When designing your lectern in Minecraft Bedrock, adding decorative elements can greatly enhance the visual appeal and overall aesthetics of your creation. Details matter in the art of design, especially when you are trying to create an impactful look. Decorative features can come in the form of simple enhancements like banners, plants, bookshelves, or torches. Banners, for instance, can provide a splash of color to your lectern, reflecting your personal taste while also serving to identify the function of the space it occupies. Alternatively, adding potted plants or vines draping over the lectern introduces a natural element to the design, giving the structure a calm and serene ambiance. Moreover, incorporating bookshelves around your lectern suggests an atmosphere of knowledge and learning. It's not only visually pleasing but also practical, allowing quick access to books during gameplay. Equally important are lighting elements like torches or glowstones; they not only brighten the area around your lectern, making it easier to find and see but also add a warm, inviting tone to the area. Additionally, Minecraft offers a wide variety of blocks to choose from, meaning that you can experiment with different materials and colors for your lectern. Mixing and matching different textures and shades can result in a unique, eye-catching design, which will take the aesthetic value of your lectern to the next level. However, when adding these elements, it's important to consider the harmony of the overall design. Decorative features should work in tandem with your lectern, rather than overpowering it or seeming out of place. The aim is to create an upgraded, standout piece that serves its purpose while seamlessly blending in with the surroundings. Play around with various options—move things around, test different combinations, swap out one item for another—until you land upon a composition that works just right. In conclusion, decorative elements can significantly contribute to the visual pull of your lectern, making it a focal point in the space. It's all about fine-tuning these enhancements to your preference and ensuring they complement the overall design of your lectern rather than detract from it. In the world of Minecraft, the possibilities are nearly endless. So, let your creativity flow, and create the perfectly designed lectern that speaks volumes about your design sensibilities.
Building the Base
Building a base requires careful planning and careful selection of materials. In this full-fledged guide on "Building the Base," we will explore three essential steps - using blocks for stability, creating a flat surface, and adding supports for the top. Each of these steps are remarkably important in the construction process, adding value to the overall structural integrity of any build, be it a simple garden shed or a multi-story apartment. In our first section, we dive into the foundational aspect of using blocks for stability. But before we delve into that, it's pivotal to understand the why and how of each step. Stability is crucial for any construction; it prevents unnecessary movement and potential damage. Blocks, especially those made of durable materials like concrete, offer this stability. When combined with a flat surface, it ensures that the overall structure can bear the weight of the building. Add to this some sturdy supports for the top, and you've got yourself a solid base ready to support a superstructure. So, how exactly do we use blocks for stability? Let's move on to explore this in detail.
Using Blocks for Stability
Using block materials for stability is an essential aspect of craftsmanship when constructing a lectern in Minecraft Bedrock version. This proficiency involves utilizing various block substances accessible to ensure the robustness and stability of the base structure, which is elemental for the lectern as a whole. A well-built base is more than an aesthetic feature; it ensures that the structures on top remain intact and secured. The effectiveness of using blocks for stability lies primarily in the strength and reliability of the base they provide. In Minecraft, the base of every structure is its cornerstone; without it, the entire design can crumble. This speaks volumes about the significance of block materials used for the base. The type of block one chooses to employ directly impacts the stability of the lectern. Some blocks offer more stability than others for various reasons including the quality and rigidity of the block. For instance, solid blocks such as stone, wooden planks, or even bricks boast commendable resilience against pressure and impact, making them suitable for a lectern’s base. It not only solidifies the base but protects it from potential damages that may arise from Minecraft’s dynamic environment. More than just stability, there's an element of strategy involved in block selection for the base. Depending on the environment you plan to place your lectern, the block type selection might vary. Certain block types respond differently to specific environments. For instance, if you're building near water, using wood for the base might not be ideal due to its exposure to potential deterioration from water damage. The technique of placing the blocks also matters significantly. Stabilizing the foundation entails thoughtful placement and arrangement of blocks, ensuring that they support each other and distribute weight evenly. By doing so, it reinforces balance, keeps the lectern upright, and increases resistance against falling or tipping over. One can leverage the dimensions and shape of the blocks to achieve a perfectly balanced base construction. Furthermore, the blocks' arrangement necessitates strategic layering, maximizing stability by dispersing the strain across the base. This process includes using stacks or rows of blocks, stacking them uniformly, or arranging them in specific patterns to enhance the base's resilience. Moreover, blocks can be reinforced or buffered with other elements in the game to increase stability. The positioning and bridging of blocks with other in-game items like slabs, fences, or rods can go a long way in providing added reinforcement to your base. Such techniques, though seemings insignificant, are crucial when the matter at hand is the stability of your construction. In conclusion, using blocks for stability when building the base of a lectern in Minecraft Bedrock entails thoughtful selection, strategic placement, and smart reinforcement with in-game items. Although it may seem a complex task at first, practicing these techniques and implementing these structures will undoubtedly result in a sturdy and durable lectern. After all, constructing the base is much like the game of Minecraft itself - exciting, strategic, and full of endless creativity.
Creating a Flat Surface
Creating a flat surface is an essential step in building the base for a lectern in Minecraft in the Bedrock version. The reason for this is that a flat surface provides a solid and even foundation, critical for construction. Without an appropriate foundation, the lect?rn could fall apart or malfunction, proving your efforts fruitless. To create a flat surface, you need to first select an appropriate area. Ideally, this should be somewhere level and free of obstructive features such as trees or cliffs. But, if you find such a perfect spot is not available, do not fret; the robust and flexible mechanics of Minecraft allow you to modify and shape your environment to your liking. After you've selected a site, you can start levelling the ground. This can be achieved using different techniques, from simple digging to more sophisticated terraforming. If you opt for the simple approach, equip your avatar with a shovel and manually remove blocks until your intended site is flat. Also, remember to clear away any adjoining blocks at your chosen site's edges to maintain an even cast. On the other hand, if you prefer a more advanced technique, utilize a bucket of water to spread across the surface. In Minecraft, when water interacts with the land, it naturally flows down, filling up depressions and leveling the surface. Afterward, you can remove the excessive water with the same bucket. Ensure the water has levelled the surface to your satisfaction before you remove it. It's worth mentioning that creating a perfectly flat surface is not the end, but it's also equally important to consider the material of the base. A base made out of the dirt could easily degrade or weaken upon usage. Therefore, the base needs to be strong and durable but also easy to work with. Some favourable materials include cobblestones, quick-to-mine toughness, or even wooden planks for aesthetic appeal. After you've successfully created your flat surface and chosen your base material, you're ready to construct your lectern's base. Lay down your chosen blocks one by one until you have a solid platform. The base's size may vary depending on your aesthetic preferences, but a standard size is usually 5 blocks by 5 blocks. Remember, the larger your base, the more stable your lectern will be. To summarize, creating a flat surface is not merely a task but an exciting engagement that tests your creative and imaginative prowess. It involves choosing a suitable site, leveling the ground, and selecting the correct base material. With each of these steps, you are laying the foundation for your lectern, ensuring it will be a robust, resilient, and reliable addition to your Minecraft world.
Adding Supports for the Top
After you have your base for the lectern ready, the next critical step involves adding supports for the top. This ensures the sturdiness of your lectern and its capacity to withstand any weight placed upon it. At this continuation stage of constructing your lectern in Minecraft Bedrock, you will need to use four wooden slabs. First, start by assembling the top mounts. The correct placement of these wooden slabs will help in creating a robust structure that appropriately represents the shape and dimensions of a real life lectern. Place the wooden slabs carefully in such a way that they are attached directly to the middle section of the base. If correctly executed, the wooden slabs should be evenly distributed and give the impression of four legs stemming from the center of the base. Adding these four support slabs will contribute significantly to the overall structure of the lectern. For this reason, precision is key. They should be securely in place before you consider proceeding to the next stages of your build. Keep in mind that without these supports, the top block intended to hold the book or paper, cannot balance on the base properly. At this stage of the build, it is vital to consider the symmetry and equilibrium of the lectern's design. Therefore, be careful to avoid any slanting or misalignment. A simple way to ensure symmetry is by meticulously counting the blocks on each point. Moreover, you should also keep an eye out for the aesthetic perspective. While safety and durability are significant factors in building a lectern, its overall appearance and resemblance to a real-life lectern are similarly important. Choose blocks that match the base or at least compliment it to maintain a generalized theme. Take your time during this stage. Remember, the more attention paid to placement and design precision, the more professional and realistic your lectern will appear. Adding supports for the top is a crucial step because it effectively connects the top to the base, giving the lectern its characteristic shape. Great attention to detail when attaching the slabs sets a solid foundation for the rest of the work in subsequent stages. In conclusion, adding supports to the top of the base is a highly significant step in building a lectern in Minecraft Bedrock. It sets the tone for the remaining stages of construction and determines the stability and aesthetic appearance of the lectern. The important thing is to carefully ensure the most symmetrical and secure placement of the wooden slabs to create a lectern that’s both functional and visually appealing. Now, you are all set to proceed to the next stage of crafting your lectern.
Adding the Top and Shelves
The art of optimizing space cannot be overemphasized in the modern workspace. Central to this is the strategic adding of tops and shelves, which are not just essential in the architectural design, but also work to improve the functional utility of an area. First and foremost, designing the top surface can significantly enhance the aesthetics of a space, providing an appealing creative and working environment. Secondly, adding shelves for storage helps to ensure a clutter-free space by providing additional storage room. This effectively improves the organization as each item fits ideally in its right place. Lastly, these additions should be made with the aim of creating a functional workspace. The design should foster productivity and promote efficiency by generating an environment that is conducive to concentration and work. In this era of minimalism and style, it is vital to consider these factors when designing your workspace. Let's first delve into how to properly design the top surface, a critical facet in this process. A well-designed top can significantly influence the efficiency and productivity of your workspace, proving that a top is more than just a physical attribute.
Designing the Top Surface
After having the base and legs properly constructed, the subsequent phase of creating a lectern in Minecraft Bedrock is adding the top surface and shelves. This step is critical as it adds functionality and aesthetic value to the lectern. Specifically, the top surface, being an essential element, should be designed with utmost consideration. This will actualize the intended purpose and further enhance the appeal of the lectern. More than merely a place where the book will reside, the top surface can be considered as the heart of the lectern, showcasing the object being presented or read from, this could either be a mundane book or a mystical Spellbook. Designing the top surface should be approached practically and creatively. Primarily, it should be big enough to hold a book or any other objects that may be placed on it. Though Minecraft operates on virtual reality logic, strive for a realistic approach when determining the size and proportion. It should not be too big to overshadow the overall design and not too small to limit its functionality. Moreover, the material of the top surface should match with the base and legs of the lectern. Minecraft offers a variety of materials that can be used. From different kinds of wood, stones, and blocks, all offer a unique flair. The wooden top could provide a classic and rustic feel. Stone and block materials, on the other hand, can deliver a more modern and chic style. Irrespective of the materials you choose, it is important to ensure it complements the overall design of the lectern. Implementing the actual design, equip your player with the chosen material for the top surface. You will need four slabs of your chosen material. Position your player in front of the lectern, looking downward at the top of the second block on the front of the lectern. Your cursor should be aimed at the top edge of this block. With accurate positioning, place the four slabs next to each other on the lectern's front, creating an even flat top. Lastly, it is also possible to add personal touches to the design. Although lectures are standard and necessary equipment, exerting creativity and individuality on the lectern can give more satisfaction. Modifying the choice of material or adding ornamentation could be great ways to personalize the lectern while maintaining its functionality. In conclusion, designing the top surface of the lectern is just as important as any other part, if not more. Its practical purpose and contribution to the aesthetic value should always be considered in the design process. Minecraft offers immense opportunities in terms of materials and personalization, ensuring your lectern could be just like you dreamt it to be. Remember, while guidance is available, there's no concrete rule on how you should design your lectern, the one rule is to enjoy and have fun in building and creating because ultimately, that's what Minecraft is truly about.
Adding Shelves for Storage
Adding shelves to your Minecraft Bedrock lectern can not only boost your structure’s aesthetic appeal but also significantly raise its functionality by offering added storage. Incorporate several shelves within your project could be one ideal way to maximize space usage. Following our in-depth guide, you'll discover how to build sturdy, efficient shelves, increasing practicality and bolstering the overall design. The creative process of adding shelves to your Minecraft Bedrock lectern involves various routes and options. You could choose to add corner shelves, floating shelves, or even traditional standalone shelves. Corner shelves, being space-savers, allow you to make the most out of every block within the crafting table. On the other hand, floating shelves offer a more simplistic and minimalist look, taking up zero floor space and making these shelves a favorite among gamers seeking sleek, contemporary styles. And when it comes to standalone shelves, these are by far the most conventional, providing ample storage space and pairing perfectly with any lectern design. Before adding the shelves, it’s crucial to plan your storage space accurately. An understanding of the items you want to store can significantly influence the shelf design, determining the quantity and layout of the shelves. If larger items or quantities are to be stored, then a more substantial shelving section may be required. Conversely, storing smaller items or lesser quantities may justify less space. Once you have the plan laid out, the next step would be creating the shelves. This refined retro, cross-grain texture of wood planks can create an eye-catching aesthetic and provide strength and durability to the shelves. Or, you can opt for stone bricks, known for their unique and stylish patterns and high resistance to blast, adding another element of strategy in your game. An important factor to remember is that your shelves should not obstruct the visibility of the lectern or limit access to it. The challenge lies in striking a balance between aesthetics and utility, and aesthetics should not compromise the functionality and accessibility of the lectern. Finally, for an engaging finish, consider adding some distinctive characteristics to your shelves, such as signs, item frames, or flowers. This decor can enhance the look and personality of your Minecraft bedrock lectern, giving it your unique touch. Creating shelves for your Minecraft Bedrock lectern isn’t just about improving the appearance; it's also about formulating a defined, functional space that caters to storage needs. As you explore various shelf designs and materials, your lectern will evolve, becoming a space that’s visually impressive, practical, and worth every block used in its construction.
Creating a Functional Workspace
Creating a functional workspace for crafting a lectern in Minecraft Bedrock edition relies on the careful installation of a top and shelves. This step is crucial, not just for the aesthetic appeal, but more for its practicality in maintaining a smooth flow of crafting process. To start with, adding the top to your workspace refers to laying out a flat surface upon which you can carry out your crafting activities. This top should be expansive enough to accommodate all the elements involved in making a lectern, including bookshelves and wood slabs. It gives you a generous working space where you can arrange, rearrange, and even mess up without feeling constricted. Apart from contributing to efficiency, this space allocation also helps in minimizing the risk of losing important materials or mixing up the components which may cause delays or mistakes in crafting your lectern. Similarly, shelves play an indispensable role in your workspace's functionality. These are the storage spots for the different materials you'll need for the construction process. A well-organized shelf section saves you from wasting time searching for items as you can easily reach out for any material you need. As you progress in crafting your lectern, you might realize that the number of components increases, making an organized storage solution a necessity. In the context of Minecraft, you should allocate specific spaces for each of the lectern materials you have mined – the bookshelves and different types of wood slabs. Having an individual storage space for each material eases the crafting process because you can visually assess and access your inventory. Also, be mindful to consider the sequence of use of the materials when arranging them on the shelves. Place the materials that you will use first closer to the crafting area and the ones to be used later further away. This linear arrangement guarantees more efficient and faster crafting time. It's advisable to keep rare materials on higher shelves to avoid accidental usage or loss. Keep in mind that a workspace's functionality extends beyond in-game effectiveness. The concept should translate into real-life scenarios where you need a comfortable and conducive environment as you engage in your gaming sessions. This extends to having well a positioned screen, ergonomic gaming chair and keyboard. By thoughtfully setting up your workspace, both the top and shelves, you enhance not only your lectern-making process in Minecraft but also your overall gaming experience. This contributes to an organized, more efficient, satisfying and enjoyable crafting and gaming time. So, invest in creating a functional workspace by properly incorporating a top and shelves, and notice the transformative order and ease it adds to your Minecraft lectern crafting process.