How To Draw A Airplane
Drawing an airplane can be an exciting and rewarding artistic endeavor, whether you're a beginner looking to improve your skills or an experienced artist seeking to capture the majesty of flight on paper. This comprehensive guide will walk you through the process of creating a stunning airplane sketch, from understanding basic shapes to adding intricate details. We'll begin by exploring the fundamental anatomy of an airplane and breaking it down into simple geometric forms, providing a solid foundation for your drawing. Next, we'll delve into the crucial aspects of perspective and proportions, ensuring that your airplane looks realistic and properly scaled. Finally, we'll focus on adding detail and realism to your sketch, bringing your airplane to life with shading, textures, and finishing touches. By following these steps and practicing regularly, you'll soon find yourself creating impressive airplane drawings that capture the essence of these magnificent flying machines. Let's start our artistic journey by first understanding the anatomy of an airplane and the basic shapes that comprise its structure.
Understanding Airplane Anatomy and Basic Shapes
Airplanes have captivated human imagination since their inception, representing a pinnacle of engineering and design that allows us to soar through the skies. Understanding the anatomy and basic shapes of these magnificent machines is not only fascinating but also essential for aspiring aviation enthusiasts, engineers, and artists alike. This article delves into the intricate world of airplane structure, breaking down its complexity into manageable components and simple geometric forms. We'll begin by identifying the key components of an airplane, from the fuselage to the empennage, providing a comprehensive overview of each part's function and importance. Next, we'll explore how these complex machines can be simplified into basic geometric shapes, offering a valuable perspective for both technical understanding and artistic representation. Finally, we'll study different types of airplanes, from commercial jets to military fighters, to gain a broader understanding of how various designs serve specific purposes. By examining these aspects, we'll gain a deeper appreciation for the ingenuity behind airplane design and develop a solid foundation for understanding airplane anatomy and basic shapes.
Identifying key components of an airplane
Identifying the key components of an airplane is essential for accurately capturing its essence in a drawing. When observing an aircraft, several distinct parts stand out and contribute to its overall structure and functionality. The fuselage, often referred to as the body of the plane, is typically a long, cylindrical shape that houses the passengers, crew, and cargo. It serves as the central hub connecting all other components and determines the aircraft's overall length. The wings are perhaps the most crucial and recognizable feature of any airplane. These large, flat surfaces extend outward from the fuselage and provide the lift necessary for flight. Wings come in various shapes and sizes, depending on the aircraft's purpose and design. Some planes have straight wings, while others feature swept-back or delta configurations. Attached to the wings are control surfaces such as ailerons and flaps, which help maneuver the aircraft and adjust its lift during different phases of flight. At the rear of the fuselage, you'll find the empennage, or tail section. This area consists of the vertical stabilizer (also known as the fin) and the horizontal stabilizer. The vertical stabilizer helps maintain directional stability, while the horizontal stabilizer controls the pitch of the aircraft. These surfaces often have smaller movable parts called the rudder and elevator, respectively, which further assist in controlling the plane's movement. The landing gear is another vital component, typically consisting of wheels, struts, and shock absorbers. Most commercial airplanes have a tricycle configuration with two main gear assemblies under the wings and a nose gear at the front. Some aircraft feature retractable landing gear that can be tucked away during flight to reduce drag. Engines are the powerhouses of any airplane, providing the thrust needed for takeoff and sustained flight. Depending on the aircraft type, engines can be mounted on the wings, integrated into the fuselage, or attached to the tail section. Commercial airliners often have two or four large turbofan engines, while smaller planes may use propeller-driven engines. The cockpit, located at the front of the fuselage, is where the pilots control the aircraft. It features a distinctive shape with a curved windshield and side windows, allowing for optimal visibility. On larger aircraft, you may also notice a small bump on top of the fuselage just behind the cockpit, which houses various communication and navigation antennas. By familiarizing yourself with these key components and their relative positions, you'll be better equipped to create accurate and convincing airplane drawings. Remember that different aircraft types may have variations in their designs, so it's always helpful to reference specific models when aiming for authenticity in your artwork.
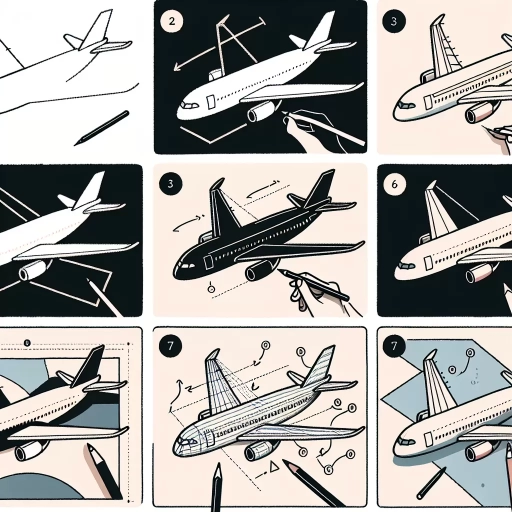
Breaking down the airplane into simple geometric shapes
Breaking down an airplane into simple geometric shapes is a fundamental technique that artists and illustrators use to simplify the complex structure of aircraft. This approach not only makes the drawing process more manageable but also helps in achieving accurate proportions and perspectives. By recognizing and utilizing basic shapes, even novice artists can create convincing representations of airplanes. The fuselage, which forms the main body of the airplane, can be viewed as an elongated cylinder or a series of connected cylinders. This cylindrical shape tapers towards the tail section, creating a streamlined profile. The nose of the aircraft is often represented by a cone or a rounded shape, depending on the specific model. Moving to the wings, these can be simplified into long, thin rectangles or triangles when viewed from above. From the side, wings appear as sleek, aerodynamic airfoils – curved shapes that generate lift. The tail section of an airplane comprises several key components, each reducible to basic geometric forms. The vertical stabilizer, or fin, can be drawn as a triangle or a trapezoid extending upwards from the fuselage. The horizontal stabilizer, which provides pitch control, is essentially a smaller version of the main wings and can be depicted as a narrow rectangle or a flattened triangle when viewed from the side. Engines, whether mounted on the wings or the fuselage, are typically cylindrical in shape. For jet engines, you can start with a simple circle for the intake, followed by a cylindrical body. Propeller-driven aircraft engines often have a more boxy appearance and can be represented by rectangles or squares. The landing gear, when extended, consists of a combination of cylindrical struts and circular wheels. In its retracted state, it's usually hidden within the fuselage or wings, so it may not be visible in all drawings. Cockpit windows can be simplified into a series of rectangles or a single, curved shape on the front of the fuselage. For commercial airliners, the passenger windows along the side of the fuselage can be represented by a row of small rectangles or ovals. By breaking down the airplane into these basic shapes, artists can establish a solid foundation for their drawings. This approach allows for easier manipulation of proportions and perspectives, ensuring that the overall structure of the aircraft is accurate before adding intricate details. As you become more comfortable with these basic shapes, you can gradually introduce more complex forms and details to create increasingly realistic and nuanced depictions of airplanes. Remember, the key to successfully drawing an airplane lies in observing and understanding its fundamental structure. By mastering the art of seeing and reproducing these simple geometric shapes, you'll be well on your way to creating impressive and accurate airplane illustrations.
Studying different types of airplanes for reference
Studying different types of airplanes is an essential step in mastering the art of drawing these magnificent flying machines. By familiarizing yourself with various aircraft designs, you'll gain a deeper understanding of their unique features, proportions, and overall aesthetics. This knowledge will greatly enhance your ability to create realistic and accurate airplane drawings. Commercial airliners, such as the Boeing 747 or Airbus A380, are characterized by their wide bodies, swept-back wings, and multiple engines mounted beneath the wings. These planes are designed for long-distance travel and passenger comfort, often featuring a distinctive hump on the forward section of the fuselage to accommodate a second deck. In contrast, smaller regional jets like the Embraer E-Jet family have sleeker profiles, with engines typically mounted on the rear of the fuselage. Military aircraft offer a diverse range of designs to study. Fighter jets, such as the F-22 Raptor or Eurofighter Typhoon, showcase aerodynamic shapes with swept-back wings, sharp angles, and powerful engines. Bomber aircraft like the B-2 Spirit exhibit unique flying wing designs, emphasizing stealth capabilities. Transport planes like the C-130 Hercules feature high wings and a boxy fuselage, prioritizing cargo capacity and short takeoff and landing capabilities. General aviation aircraft, including single-engine propeller planes like the Cessna 172 or Piper Cherokee, offer simpler designs that are excellent for beginners to practice. These planes typically have straight wings, a single propeller at the nose, and a streamlined fuselage. Studying these aircraft can help you grasp the basic proportions and relationships between different airplane components. Vintage and historical aircraft provide fascinating subjects for drawing enthusiasts. The Wright Flyer, with its unique canard configuration and wire-braced wings, represents the dawn of powered flight. World War II-era planes like the Supermarine Spitfire or P-51 Mustang showcase the elegant lines and distinctive profiles of propeller-driven fighter aircraft. As you explore different airplane types, pay close attention to the variations in wing shapes, engine placements, and fuselage designs. Notice how the placement of the horizontal and vertical stabilizers affects the overall silhouette of the aircraft. Study the positioning of windows, doors, and landing gear, as these details contribute significantly to the plane's character and function. By immersing yourself in the study of various aircraft designs, you'll develop a keen eye for the subtle nuances that make each plane unique. This knowledge will prove invaluable as you progress in your airplane drawing skills, allowing you to create more accurate and diverse representations of these incredible flying machines. Whether you're sketching a sleek fighter jet or a majestic airliner, your understanding of different airplane types will shine through in your artwork, bringing your aviation-inspired creations to life.
Mastering Perspective and Proportions in Airplane Drawing
Mastering the art of airplane drawing requires a keen eye for detail, a solid understanding of perspective, and the ability to maintain accurate proportions. Whether you're an aspiring aircraft illustrator or simply looking to improve your artistic skills, learning to draw airplanes with precision and realism can be a rewarding challenge. This article will guide you through the essential techniques and principles needed to create stunning airplane drawings that capture the elegance and complexity of these magnificent machines. We'll explore three crucial aspects of airplane illustration: applying one-point and two-point perspective techniques, maintaining accurate proportions between airplane parts, and using guidelines and measurement techniques for precision. By mastering these skills, you'll be able to create drawings that not only look realistic but also convey the dynamic nature of aircraft in flight. As we delve into these topics, you'll discover how each element contributes to the overall quality of your artwork and helps bring your airplane illustrations to life. Before we explore these techniques in depth, let's begin by understanding airplane anatomy and basic shapes, which will serve as the foundation for your drawing journey.
Applying one-point and two-point perspective techniques
Applying one-point and two-point perspective techniques is crucial when drawing airplanes, as these methods help create a realistic sense of depth and dimensionality in your artwork. One-point perspective is particularly useful for depicting airplanes head-on or from the rear, while two-point perspective is ideal for showcasing the aircraft at an angle, revealing more of its complex shape and structure. In one-point perspective, all parallel lines converge at a single vanishing point on the horizon line. This technique is perfect for drawing an airplane flying directly towards or away from the viewer. To apply this method, start by establishing your horizon line and vanishing point. Then, sketch the basic shape of the aircraft, ensuring that all lines parallel to the viewer's line of sight converge at the vanishing point. This approach effectively captures the foreshortening of the fuselage, wings, and tail, creating a convincing illusion of depth. Two-point perspective, on the other hand, employs two vanishing points on the horizon line, allowing for a more dynamic representation of the airplane. This technique is particularly effective when drawing the aircraft from a three-quarter view or at an angle. Begin by placing two vanishing points on your horizon line, typically at opposite ends of your drawing space. Sketch the central vertical line of the airplane, which will not converge to either vanishing point. Then, draw the horizontal lines of the aircraft, such as the wings and stabilizers, converging to the appropriate vanishing point based on their orientation. When applying these perspective techniques to airplane drawing, pay close attention to the proportions and relationships between different parts of the aircraft. Use reference lines and measurements to maintain accuracy in the size and placement of elements like the cockpit, engines, and landing gear. Remember that as objects recede into the distance, they appear smaller and less detailed, so adjust your rendering accordingly. To enhance the realism of your perspective drawing, incorporate subtle details that reinforce the sense of depth. For example, add cast shadows beneath the aircraft, ensuring they align with the established perspective. Gradient shading can also help create the illusion of volume and form, particularly on curved surfaces like the fuselage and wings. Mastering these perspective techniques takes practice, but the results are well worth the effort. As you become more comfortable with one-point and two-point perspective, you'll find that your airplane drawings gain a newfound sense of depth, realism, and visual impact. Experiment with different viewpoints and angles to discover the most dynamic and interesting ways to showcase the aircraft's design. With time and dedication, you'll be able to create stunning, professional-quality airplane illustrations that truly capture the essence of flight and the marvel of aviation engineering.
Maintaining accurate proportions between airplane parts
Maintaining accurate proportions between airplane parts is a crucial aspect of creating realistic and visually appealing airplane drawings. This skill not only enhances the overall quality of your artwork but also demonstrates a deep understanding of aircraft design and structure. To achieve proper proportions, artists must pay close attention to the relationships between various components of the airplane, such as the fuselage, wings, tail, and engines. One of the most effective techniques for maintaining accurate proportions is to use reference lines and basic shapes as a foundation. Start by sketching a central line to represent the length of the fuselage, then add perpendicular lines to mark the positions of the wings, tail, and cockpit. This simple framework will serve as a guide for placing and sizing other elements of the aircraft. When drawing the fuselage, consider its length in relation to the wingspan. Generally, the length of the fuselage is about 1.5 to 2 times the wingspan, though this can vary depending on the specific aircraft model. Pay attention to the tapering of the fuselage towards the tail, as well as any curves or contours that define its shape. The wings are another critical element in maintaining proper proportions. Observe how they attach to the fuselage and note their sweep angle, which can significantly impact the overall appearance of the aircraft. The wingspan should be in proportion to the length of the fuselage, and the chord (width) of the wings should gradually decrease from the root to the tip. The tail section, including the vertical stabilizer and horizontal stabilizers, should be sized appropriately in relation to the rest of the aircraft. The height of the vertical stabilizer is typically about one-third to one-half the length of the fuselage, while the span of the horizontal stabilizers is usually about one-third of the main wingspan. Engine placement and size are also crucial for accurate proportions. Whether the aircraft has wing-mounted engines, fuselage-mounted engines, or a combination of both, ensure that their size and position are consistent with the overall design of the airplane. To refine your sense of proportion, practice observing real aircraft or high-quality photographs from various angles. Pay attention to how different viewpoints affect the apparent size and relationship between parts. Additionally, studying technical drawings and blueprints can provide valuable insights into the precise measurements and ratios used in aircraft design. As you progress in your drawing, continuously step back and assess the overall proportions of your work. Compare different parts of the airplane to each other and make adjustments as necessary. Remember that even small discrepancies in proportion can significantly impact the realism and appeal of your drawing. By mastering the art of maintaining accurate proportions between airplane parts, you'll be able to create drawings that not only look visually stunning but also demonstrate a deep appreciation for the intricacies of aircraft design. This skill will elevate your artwork and help you capture the essence of these magnificent flying machines with precision and authenticity.
Using guidelines and measurement techniques for precision
When it comes to mastering perspective and proportions in airplane drawing, using guidelines and measurement techniques for precision is an essential skill that can elevate your artwork to new heights. These techniques not only enhance the accuracy of your drawings but also help create a more realistic and visually appealing representation of aircraft. One of the fundamental principles in achieving precision is the use of vanishing points and horizon lines. By establishing these key elements, you can ensure that all parts of the airplane align correctly with the chosen perspective. For example, when drawing a plane in two-point perspective, you would use two vanishing points on the horizon line to guide the placement of wings, fuselage, and other components. This approach helps maintain consistency throughout the drawing and prevents distortions that might occur when working freehand. Another valuable technique is the use of proportional guidelines. Start by sketching a basic rectangular box that encompasses the entire airplane. Then, divide this box into smaller sections using horizontal and vertical lines. These divisions will serve as reference points for placing various parts of the aircraft, such as the cockpit, wings, and tail section. By using these guidelines, you can maintain accurate proportions between different elements of the plane, ensuring that the overall structure looks balanced and realistic. Measurement techniques also play a crucial role in achieving precision. One effective method is the use of a pencil or ruler as a makeshift measuring tool. Hold the pencil at arm's length, aligning it with the reference object or image you're working from. Use your thumb to mark specific measurements on the pencil, such as the length of the fuselage or the wingspan. You can then transfer these measurements to your drawing, maintaining the correct proportions relative to the overall size of your artwork. For more intricate details, consider employing grid systems. Overlay a grid on your reference image and create a corresponding grid on your drawing paper. This technique allows you to focus on one small section at a time, accurately reproducing the details within each grid square. As you progress through the grid, the individual sections will come together to form a precise representation of the entire aircraft. Digital tools can also enhance precision in airplane drawing. Software like Adobe Illustrator or SketchUp allows you to create precise guidelines, measure angles accurately, and even work with 3D models for reference. These tools can be particularly helpful when dealing with complex aircraft designs or when striving for technical accuracy in your illustrations. Remember that while these guidelines and measurement techniques are invaluable for achieving precision, they should serve as aids rather than rigid constraints. As you gain experience, you'll develop an intuitive sense of proportion and perspective, allowing you to blend technical accuracy with artistic expression. The key is to practice regularly, experiment with different techniques, and find the approach that works best for your unique style of airplane drawing.
Adding Detail and Realism to Your Airplane Sketch
Embarking on the journey of sketching an airplane can be both exhilarating and challenging for artists of all skill levels. While capturing the basic shape of an aircraft is a great starting point, it's the addition of intricate details and realistic elements that truly bring your sketch to life. This article will guide you through the process of elevating your airplane drawing from a simple outline to a dynamic and captivating piece of art. We'll explore three key techniques to enhance your sketch: incorporating shadows and highlights for depth, drawing intricate features like windows, doors, and engines, and enhancing the drawing with background elements and motion effects. By mastering these skills, you'll be able to create airplane sketches that not only accurately represent the aircraft but also convey a sense of movement and atmosphere. Whether you're an aviation enthusiast, a budding artist, or simply looking to improve your drawing skills, these techniques will help you achieve a more realistic and visually striking result. Before diving into these advanced techniques, however, it's essential to have a solid foundation in understanding airplane anatomy and basic shapes, which we'll briefly touch upon to ensure you're well-prepared for the detailed work ahead.
Incorporating shadows and highlights for depth
Incorporating shadows and highlights for depth is a crucial step in elevating your airplane sketch from a basic outline to a realistic, three-dimensional representation. This technique breathes life into your drawing, creating a sense of volume and form that makes the aircraft appear to leap off the page. By strategically placing shadows and highlights, you can emphasize the airplane's contours, textures, and overall structure, ultimately enhancing the visual impact of your artwork. To begin, consider the direction and intensity of your light source. In most cases, it's best to imagine the light coming from above and slightly to one side, as this mimics natural lighting conditions. With this in mind, identify the areas of the airplane that would receive the most direct light, such as the top of the fuselage, wings, and tail. These areas will be your highlights, where you'll leave the paper lighter or add white accents to create a bright, reflective surface. Conversely, the areas that would be shielded from direct light become your shadows. These typically include the underside of the wings, the lower portion of the fuselage, and any recessed areas like wheel wells or cockpit windows. By darkening these sections with various shading techniques, you create depth and dimensionality in your sketch. When applying shadows, use a range of tones to achieve a gradual transition from light to dark. This gradation, known as the "value scale," is essential for creating a realistic sense of form. Start with light, gentle shading and gradually build up to darker tones in the deepest shadow areas. Pay close attention to how shadows wrap around curved surfaces, such as the cylindrical shape of the fuselage or the airfoil of the wings. Highlights can be added using erasers to remove graphite or by leaving areas of the paper untouched. For metallic surfaces, consider adding small, bright highlights to suggest reflections and give the impression of a polished finish. These subtle touches can significantly enhance the realism of your sketch. Remember to observe how different materials on the airplane interact with light. The smooth, reflective surface of the windshield will have different highlights and shadows compared to the matte finish of the painted fuselage or the textured surface of the tires. By accurately representing these variations, you add another layer of detail and authenticity to your drawing. As you work on shadows and highlights, periodically step back from your sketch to assess the overall effect. Ensure that the contrast between light and dark areas is balanced and that the shadows and highlights work together to create a cohesive, three-dimensional appearance. Don't be afraid to make adjustments as needed – art is an iterative process, and refining your work is part of the journey to creating a stunning airplane sketch. By mastering the art of incorporating shadows and highlights, you'll be able to transform your airplane sketches from flat, two-dimensional outlines into dynamic, lifelike representations that capture the essence and beauty of aircraft design.
Drawing intricate features like windows, doors, and engines
Drawing intricate features like windows, doors, and engines is a crucial step in bringing your airplane sketch to life and adding that extra layer of realism. These details not only enhance the overall appearance but also provide a sense of scale and functionality to your drawing. When it comes to windows, consider the type of aircraft you're depicting. Commercial airliners typically have a series of small, oval-shaped windows along the fuselage, while private jets might feature larger, more rectangular ones. Pay attention to the spacing and alignment of these windows, as they often follow a specific pattern based on the aircraft's design. Doors are another essential element to include in your sketch. For passenger planes, focus on the main entry door, which is usually located near the front of the aircraft. You may also want to add emergency exit doors along the sides of the fuselage. Cargo planes will have large loading doors, often positioned at the rear or on the side of the aircraft. When drawing doors, pay attention to their proportions and how they fit into the overall structure of the plane. Engines are perhaps the most complex and challenging features to draw, but they're also crucial for conveying the power and functionality of the aircraft. The number and placement of engines will vary depending on the type of plane you're drawing. For instance, commercial airliners typically have two engines mounted under the wings, while some military aircraft may have engines integrated into the fuselage. When sketching engines, focus on their cylindrical shape and add details like the fan blades visible at the front. Don't forget to include the engine nacelles, which are the housings that surround the engines. To achieve a high level of detail in these features, use varying line weights to create depth and dimension. Lighter lines can be used for subtle details, while darker, bolder lines can emphasize key structures. Shading techniques such as cross-hatching or stippling can add texture and volume to your drawing, particularly when detailing the engine components or the curvature of the fuselage around windows and doors. Remember that accuracy is key when adding these intricate features. Reference photographs or technical diagrams of the specific aircraft you're drawing can be invaluable resources. Pay close attention to the proportions and placement of each element in relation to the overall structure of the plane. By meticulously rendering these details, you'll create a more authentic and visually impressive airplane sketch that captures the complexity and engineering marvel of these flying machines.
Enhancing the drawing with background elements and motion effects
Enhancing your airplane sketch with background elements and motion effects can transform a simple drawing into a dynamic and captivating scene. By incorporating these additional details, you can create a sense of atmosphere, depth, and movement that brings your airplane to life on the page. To begin, consider the environment in which your airplane exists. Is it soaring through a clear blue sky, navigating through storm clouds, or preparing for takeoff on a busy runway? Adding clouds of various shapes and sizes can create depth and texture in the sky. For a more dramatic effect, you might include a sunset or sunrise with vibrant hues streaking across the background. If your airplane is closer to the ground, sketch in elements like mountains, cityscape silhouettes, or an airport terminal to provide context and scale. Motion effects can significantly enhance the sense of movement in your drawing. One effective technique is to add motion lines behind the airplane, particularly near the wings and tail. These lines, varying in length and thickness, can convey the impression of speed and air displacement. For propeller-driven aircraft, you can depict the propeller as a blurred circle to suggest rapid rotation. Similarly, jet engines can be drawn with flame and exhaust trails to indicate thrust. Another way to imply motion is through the positioning of the airplane itself. Tilting the aircraft slightly can suggest banking or turning, while drawing it at an angle can give the impression of climbing or descending. You can also experiment with perspective, such as a view from below or above, to create more dynamic and interesting compositions. Don't forget about the effects of light and shadow. Adding highlights to the airplane's body where sunlight would hit it, and shadows underneath or on one side, can greatly enhance the three-dimensional appearance of your sketch. This also applies to any background elements you've included. For an extra touch of realism, consider adding small details that bring the scene to life. This could include birds flying in the distance, contrails from other aircraft, or even a tiny flag on the airplane's tail fluttering in the wind. If your airplane is on the ground, you might add ground crew, vehicles, or other aircraft in the background. Remember, the key to successful background and motion effects is balance. While these elements can greatly enhance your drawing, be careful not to overwhelm the main subject – the airplane itself. Use these techniques to complement and highlight your aircraft, creating a harmonious and engaging overall composition that tells a story and captures the viewer's imagination.