How To Do Bubble Braids
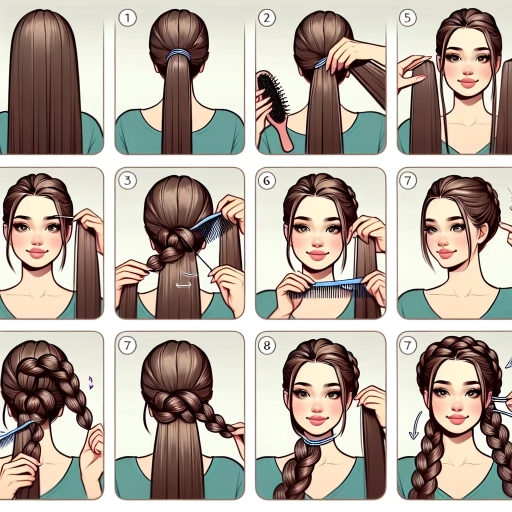
The art of bubble braiding is a timeless and versatile hairstyle that can elevate any look, from casual to formal. To master this technique, it's essential to understand the fundamentals and break it down into manageable steps. In this article, we'll explore the key elements of creating stunning bubble braids, starting with the importance of preparation. We'll delve into the techniques required to master the bubble braid, including the crucial steps to achieve the perfect braid. Additionally, we'll discuss how to add volume and texture to your bubble braid, taking it from a simple hairstyle to a show-stopping look. By the end of this article, you'll be equipped with the knowledge and skills to create beautiful bubble braids that turn heads. So, let's begin by emphasizing the significance of preparation, as it lays the foundation for a successful bubble braid.
Preparation is Key
Preparation is key to achieving a great hairstyle. Before you start styling, it's essential to prepare your hair properly to ensure a smooth and successful process. This involves choosing the right hair type, prepping your hair with the right products, and brushing your hair to prevent tangles. By doing so, you'll be able to achieve a hairstyle that looks great and lasts all day. In this article, we'll explore the importance of preparation in hairstyling and provide tips on how to do it right. First, let's start with the basics - choosing the right hair type.
Choose the Right Hair Type
Choosing the right hair type is crucial for achieving the perfect bubble braids. If you have fine or thin hair, it's best to use a texturizing spray or dry shampoo to add volume and texture before braiding. This will help create a more defined braid and prevent it from looking flat. For those with curly or wavy hair, it's essential to use a curl-defining cream or a light hold styling product to enhance natural texture and reduce frizz. If you have straight hair, you can use a hair serum or oil to add shine and protect your locks from heat styling tools. Additionally, if you have damaged or brittle hair, consider using a hair mask or deep conditioning treatment before braiding to help repair and nourish your hair. By choosing the right hair type and using the appropriate products, you'll be able to achieve a beautiful, long-lasting bubble braid that looks great all day.
Prep Your Hair with the Right Products
Prep your hair with the right products to achieve the perfect bubble braids. Start by washing your hair with a gentle, sulfate-free shampoo and conditioner. Towel-dry your hair until it's damp, but not soaking wet. Next, apply a leave-in conditioner or hair serum to help detangle and add moisture to your hair. Use a wide-tooth comb or a detangling brush to gently comb out any tangles or knots. For added hold and definition, apply a light hold hairspray or a texturizing spray to your hair. If you have particularly stubborn tangles or knots, consider using a hair mask or deep conditioning treatment before attempting to braid. By prepping your hair with the right products, you'll be able to achieve a sleek, polished look that will make your bubble braids stand out. Additionally, using the right products will help to prevent breakage and frizz, ensuring that your braids last longer and look healthier. With the right products and a little bit of prep work, you'll be well on your way to creating beautiful, long-lasting bubble braids.
Brush Your Hair to Prevent Tangles
Brushing your hair before attempting a bubble braid is crucial in preventing tangles and knots. When your hair is tangled, it can be challenging to achieve a smooth and sleek braid, and it may even lead to breakage. By brushing your hair, you can detangle it and make it more manageable, allowing you to create a beautiful and polished braid. Use a wide-tooth comb or a detangling brush to gently work out any knots or tangles, starting from the ends and working your way up. This will help to prevent any tangles from forming while you braid, making the process much easier and less frustrating. Additionally, brushing your hair can also help to distribute your hair's natural oils, leaving it looking healthy and shiny. By taking the time to brush your hair before braiding, you can ensure that your bubble braid turns out looking its best.
Mastering the Bubble Braid Technique
The bubble braid technique is a popular hairstyle that can add a touch of elegance and sophistication to any look. To master this technique, it's essential to start with the basics and work your way up. One of the key steps in creating a beautiful bubble braid is to start with a small section of hair. This will allow you to control the braid more easily and achieve a neater finish. Once you have your small section of hair, you'll need to divide it into three strands, which will form the foundation of your braid. From there, you can begin the braid by crossing the strands over each other, creating the signature "bubble" effect. By following these simple steps, you'll be well on your way to mastering the bubble braid technique. So, let's get started by taking a closer look at the first step: Start with a Small Section of Hair.
Start with a Small Section of Hair
To master the bubble braid technique, it's essential to start with a small section of hair. This will allow you to get a feel for the braid and make it easier to manage. Take a small section of hair from the crown of your head, just above your forehead. The amount of hair you take will depend on how thick your hair is and how tight you want the braid to be. For a standard bubble braid, take a section about the width of your index finger. If you have very fine or thin hair, you may want to take a smaller section, while thicker hair can handle a slightly larger section. Once you have your section of hair, gently brush it to remove any tangles or knots. This will help the braid lie flat and prevent any bumps or unevenness. With your section of hair in hand, you're now ready to begin the bubble braid technique.
Divide the Section into Three Strands
To master the bubble braid technique, it's essential to divide the section of hair into three strands. This fundamental step sets the foundation for a beautiful, textured braid. Begin by gently brushing the section of hair to remove any tangles or knots, ensuring it's smooth and even. Next, take the section of hair and divide it into three equal parts, from the roots to the ends. You can do this by separating the hair into three strands and gently twisting each strand away from the other two. This will help you maintain even tension and prevent any stray hairs from escaping. As you work with the three strands, remember to keep them taut but not too tight, as this can cause discomfort and even hair breakage. By dividing the section into three strands, you'll be able to create a braid with a soft, romantic texture that's perfect for any occasion.
Begin the Braid by Crossing the Strands
To begin the braid, cross the strands over each other, forming an "X" shape. This initial step is crucial in setting the foundation for the bubble braid. Hold the three strands of hair in one hand, with the ends facing away from you. Cross the right strand over the middle strand, then the left strand over the middle strand. This will create a small, tight braid that will serve as the base of the bubble braid. As you cross the strands, gently pull the hair taut to create a smooth, even surface. This will help the braid lie flat against the head and prevent any bumps or unevenness. By crossing the strands in this way, you'll create a secure and stable foundation for the rest of the braid, allowing you to build upon it and create the signature "bubble" effect.
Adding Volume and Texture to Your Bubble Braid
Adding volume and texture to your bubble braid can elevate this trendy hairstyle from basic to brilliant. To achieve this, there are several techniques you can employ. First, you can use a teasing comb to add volume to your hair, which will give your braid a fuller and more dynamic look. Additionally, gently pulling the strands of your braid can create a relaxed, effortless appearance that adds to the overall texture of the style. Finally, finishing your look with a light hold hairspray will help keep your braid in place while maintaining a natural, piecey texture. By incorporating these methods into your bubble braiding routine, you can add depth and visual interest to your hairstyle. To start, let's take a closer look at how using a teasing comb can add volume to your bubble braid.
Use a Teasing Comb to Add Volume
To add volume to your bubble braid, use a teasing comb to gently tease the roots of your hair. This will help to lift the hair and create a more voluminous look. Start by taking a small section of hair and holding it vertically. Then, place the teasing comb at the roots of the section and gently tease the hair, working your way down to the ends. Be careful not to over-tease, as this can lead to a tangled and messy look. Instead, aim for a subtle lift that adds volume and texture to your braid. As you tease, use your fingers to gently loosen the hair and create a soft, piecey look. This will help to add volume and texture to your braid, while also creating a relaxed, effortless look. By using a teasing comb to add volume to your bubble braid, you can create a more dynamic and eye-catching look that's perfect for any occasion.
Pull the Strands Gently to Create a Relaxed Look
To achieve a relaxed, effortless look with your bubble braid, gently pull the strands of hair apart. This technique will help to loosen the braid and create a softer, more undone appearance. Start by identifying the sections of the braid where you want to add some volume and texture. Then, using your fingers, gently tease out the strands of hair, working from the roots to the ends. Be careful not to pull too hard, as this can cause the braid to come undone. Instead, focus on making small, gentle tugs on the hair to loosen it and create a more relaxed texture. As you work your way through the braid, you'll start to see the strands of hair begin to separate and the braid take on a more effortless, piecey look. This technique is especially effective for adding volume and texture to the roots of the braid, where it can be prone to lying flat. By gently pulling the strands apart, you can create a more lifted, voluminous look that adds depth and dimension to the overall style. With a little practice, you'll be able to achieve a beautiful, relaxed bubble braid that looks like you just rolled out of bed with it.
Finish with a Light Hold Hairspray
Finishing with a light hold hairspray is a crucial step in adding volume and texture to your bubble braid. This type of hairspray provides a gentle hold that sets the style in place without weighing it down or making it look stiff. It's perfect for adding a bit of grit and undone texture to your braid, while also keeping it looking fresh and voluminous all day long. When choosing a light hold hairspray, look for a formula that is labeled as "light" or "flexible" hold, and contains ingredients such as glycerin or panthenol that help to add moisture and shine to the hair. To use, simply spritz the hairspray all over your finished braid, holding the can about 6-8 inches away from your hair. This will help to set the style in place and add a bit of texture and volume, without making it look too done-up or perfect. By finishing with a light hold hairspray, you can add a bit of edge and undone charm to your bubble braid, making it perfect for a casual, everyday look.