How To Draw Iron Man
Here is the introduction paragraph: Drawing Iron Man, one of the most iconic superheroes in the Marvel universe, requires a combination of artistic skills and attention to detail. To create a realistic and impressive drawing of Iron Man, it's essential to understand his character and costume, as well as the intricacies of his armor and the techniques used to bring it to life. In this article, we'll explore the key elements of drawing Iron Man, from understanding his character and costume to sketching his armor and details, and finally, coloring and shading his iconic suit. By breaking down the process into these three key areas, you'll be able to create a drawing of Iron Man that's both accurate and visually stunning. So, let's start by taking a closer look at Understanding Iron Man's Character and Costume.
Understanding Iron Man's Character and Costume
Iron Man, one of the most iconic superheroes in the Marvel universe, is a character that has captivated audiences with his intelligence, wit, and advanced technology. His character and costume are a perfect blend of style, functionality, and symbolism, making him a fascinating subject to analyze. To gain a deeper understanding of Iron Man's character and costume, it's essential to examine three key aspects: his facial structure and expression, armor design and components, and poses and body language. By exploring these elements, we can uncover the intricacies of Iron Man's personality, values, and motivations. Let's start by delving into the first aspect, Iron Man's facial structure and expression, which provides a window into his emotional state and inner workings.
Iron Man's Facial Structure and Expression
Iron Man's facial structure and expression are crucial elements in capturing his character's essence. His face is a masterclass in conveying confidence, intelligence, and wit. The angular jawline, sharp cheekbones, and prominent nose create a strong, chiseled appearance that exudes self-assurance. The eyes, often narrowed and slightly raised at the outer corners, give off a sense of intensity and focus, as if constantly scanning the surroundings for potential threats. The eyebrows, often furrowed, add to the sense of concentration and determination. The mouth, often set in a slight smirk, hints at Tony Stark's quick wit and sarcasm. When drawing Iron Man, it's essential to capture the subtleties of his facial expression, as it can convey a range of emotions, from confidence and determination to concern and vulnerability. The facial structure and expression should be in harmony with the rest of the costume, creating a cohesive and believable representation of the character. By paying attention to these details, artists can bring Iron Man to life and create a compelling visual representation of this iconic superhero.
Iron Man's Armor Design and Components
Iron Man's armor design and components are a testament to Tony Stark's innovative genius and engineering prowess. The armor's sleek and futuristic aesthetic is a result of a combination of advanced materials and technologies, including titanium alloy, ceramic, and advanced polymers. The armor's structure is composed of interlocking plates that provide flexibility and protection, allowing Iron Man to move freely while withstanding extreme temperatures, impacts, and energy attacks. The armor's propulsion system, powered by the Arc Reactor, enables Iron Man to fly and maneuver with incredible agility. The suit's advanced computer system, JARVIS, integrates with the armor's sensors and systems, providing real-time data and strategic support. The armor's repulsor technology, which generates a powerful energy field, is used for propulsion, defense, and offense. The suit's advanced sensors and tracking systems, including infrared, radar, and GPS, enable Iron Man to detect and respond to threats with precision. The armor's design also incorporates a range of tactical features, including missiles, repulsor blasts, and a unibeam projector, making Iron Man a formidable opponent in battle. Overall, Iron Man's armor design and components are a masterclass in innovative engineering and design, reflecting Tony Stark's unwavering commitment to pushing the boundaries of technology and human potential.
Iron Man's Poses and Body Language
Iron Man's poses and body language are a crucial aspect of his character design, conveying his confidence, intelligence, and charisma. When drawing Iron Man, it's essential to capture his signature poses, which often feature him standing tall with his feet shoulder-width apart, his chest out, and his arms akimbo. This pose exudes confidence and authority, showcasing his self-assured personality. His body language also reveals his intelligence and strategic thinking, as he often stands with his hands clasped behind his back or in his pockets, indicating a thoughtful and analytical mind. Additionally, Iron Man's poses frequently incorporate dynamic movement, with his arms and legs in motion, conveying his agility and quick reflexes. His facial expressions also play a significant role in his body language, with his raised eyebrows and smirk suggesting a sense of humor and sarcasm. When drawing Iron Man, it's vital to balance his confident and charismatic poses with his more introspective and thoughtful moments, showcasing the complexity of his character. By mastering Iron Man's poses and body language, artists can bring this iconic superhero to life, capturing his essence and personality in their artwork.
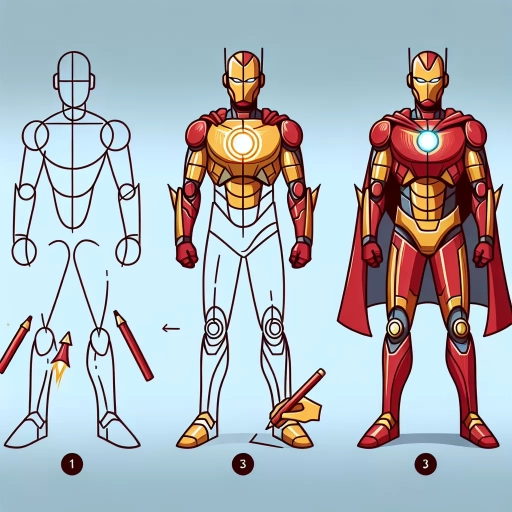
Sketching Iron Man's Armor and Details
Sketching Iron Man's armor and details requires a combination of technical drawing skills and creativity. To bring Tony Stark's iconic suit to life, artists must pay attention to the intricate details that make up the armor's various components. In this article, we will delve into the process of sketching Iron Man's armor, focusing on three key areas: the helmet and faceplate, the chest plate and arc reactor, and the arms and repulsor technology. By breaking down the armor into these sections, artists can better understand the mechanics and aesthetics of the suit, allowing for a more accurate and detailed representation. We will begin by exploring the helmet and faceplate, the most recognizable and iconic part of the Iron Man armor, and discuss the techniques and considerations involved in sketching this complex component.
Sketching the Helmet and Faceplate
Sketching the helmet and faceplate of Iron Man's armor is a crucial step in bringing the character to life. Start by drawing a rough outline of the helmet, paying attention to its shape and proportions. The helmet should be slightly curved and tapered, with a distinctive fin on top. Next, add the faceplate, which should be a smooth, curved surface with a slight indentation for the eyes. The faceplate should also have a subtle curve to it, following the contours of the helmet. Use gentle, flowing lines to suggest the shape of the faceplate, rather than sharp angles or hard edges. Once you have the basic shape of the helmet and faceplate in place, you can start adding details such as the eyes, mouth, and chin. The eyes should be small and angular, with a slight curve to suggest the shape of the lenses. The mouth should be a small, curved line, and the chin should be a smooth, rounded surface. Finally, add some subtle shading and texture to the helmet and faceplate to give them depth and dimension. This can be achieved using a range of techniques, including hatching, cross-hatching, and stippling. By carefully sketching the helmet and faceplate, you can create a convincing and iconic representation of Iron Man's armor.
Sketching the Chest Plate and Arc Reactor
When sketching the chest plate and arc reactor, start by drawing a large, inverted triangle that forms the base of the chest plate. The triangle should be slightly rounded at the edges and have a flat top. Next, draw a smaller triangle within the larger one, creating a sense of depth and dimension. The smaller triangle should be more pointed and have a slight curve to it. This will help to create the illusion of the arc reactor glowing from within. Add some gentle curves to the edges of the chest plate to give it a more organic feel, and make sure to leave a small gap at the top for the arc reactor to protrude from. The arc reactor itself should be drawn as a series of concentric circles, with the largest circle forming the base and the smallest circle at the center. Add some subtle lines to suggest the reactor's energy output, and make sure to keep the overall shape smooth and streamlined. Finally, add some details such as bolts, rivets, and a small Iron Man logo to the chest plate to give it a more finished look. By following these steps, you should be able to create a detailed and accurate sketch of the chest plate and arc reactor, a key component of Iron Man's iconic armor.
Sketching the Arms and Repulsor Technology
When sketching the arms of Iron Man's armor, it's essential to capture the intricate details and mechanical components that make up the suit's repulsor technology. Start by drawing the overall shape of the arm, paying attention to the proportions and the way the armor plates fit together. The repulsor technology is typically located on the palm of the hand, so be sure to include a circular or oval-shaped component in this area. This component should be surrounded by a series of small, intricate details such as wires, circuits, and mechanical components. The repulsor technology is also often accompanied by a series of glowing blue lines or accents, which can be added using a range of blue pencils or markers. When sketching the arms, it's also important to consider the pose and movement of the character, as this can affect the way the armor plates fit together and the overall flow of the drawing. By paying close attention to these details and using a range of sketching techniques, you can create a highly detailed and realistic drawing of Iron Man's arms and repulsor technology.
Coloring and Shading Iron Man's Armor
Coloring and shading Iron Man's armor is a crucial step in bringing the iconic superhero to life in your artwork. To achieve a realistic and visually stunning representation of the armor, it's essential to consider several key factors. Firstly, selecting the right colors for the armor is vital, as it sets the tone for the entire piece. This involves choosing a palette that accurately reflects the armor's metallic surface and its various components. Once the colors are in place, shading and highlighting the armor's surface is necessary to create depth and dimension. This process involves carefully applying different shades and highlights to mimic the way light interacts with the armor's metallic surface. Finally, adding weathering and damage effects to the armor can help to create a more realistic and battle-worn appearance. By mastering these techniques, artists can create a truly impressive and authentic representation of Iron Man's armor. To start, let's dive into the first crucial step: choosing the right colors for Iron Man's armor.
Choosing the Right Colors for Iron Man's Armor
When it comes to choosing the right colors for Iron Man's armor, there are a few key considerations to keep in mind. First and foremost, the iconic red and gold color scheme is a must-have for any Iron Man drawing. The red should be a deep, bold shade, while the gold should be a bright, metallic color. However, it's also important to consider the specific suit of armor you're drawing, as different suits have slightly different color schemes. For example, the Mark I suit has a more muted, bronze-like color, while the Mark XLVII suit has a sleek, silver and red design. Additionally, you'll want to think about the lighting and shading of your drawing, as this can greatly affect the overall appearance of the armor. In general, it's a good idea to use a range of values, from light to dark, to create a sense of depth and dimension. You can also use different colors to suggest different textures and materials, such as the metallic sheen of the armor's surface or the glow of the repulsor technology. Ultimately, the key to choosing the right colors for Iron Man's armor is to strike a balance between accuracy and creativity, and to use your colors to enhance the overall mood and atmosphere of your drawing.
Shading and Highlighting the Armor's Metallic Surface
When it comes to shading and highlighting the armor's metallic surface, it's essential to create a sense of depth and dimensionality. To achieve this, start by identifying the areas where the light source is hitting the armor directly, as these will be the brightest points. Use a light gray or white pencil to create subtle highlights on the raised edges and curves of the armor, taking care not to overdo it, as this can make the armor look too shiny or cartoonish. Next, use a range of grays to create a gradual transition from light to dark, with the darkest shadows typically found in the recessed areas, such as the joints and crevices. To add a sense of texture and realism, use a combination of hatching and cross-hatching techniques to create a series of fine lines that follow the contours of the armor. This will help to create a sense of metallic sheen and reflectivity. Finally, use a black pencil to add deep, rich shadows to the areas where the light is blocked, such as the underside of the armor or the areas around the joints. By carefully balancing highlights and shadows, you can create a sense of depth and dimensionality that makes the armor look like it's jumping off the page.
Adding Weathering and Damage Effects to the Armor
Adding weathering and damage effects to the armor can elevate the overall realism and visual appeal of your Iron Man drawing. To achieve this, start by identifying areas of the armor that would naturally be prone to wear and tear, such as the joints, edges, and surfaces that come into contact with the environment. Use a range of techniques, including hatching, cross-hatching, and stippling, to create subtle texture and shading that suggests the armor's metallic surface has been scratched, dented, or corroded. Consider adding small details like rivets, bolts, or weld seams to give the armor a more industrial, battle-worn look. You can also use a white or light-colored pencil to create highlights that catch the light, giving the armor a sense of depth and dimensionality. To take your weathering effects to the next level, experiment with different media, such as charcoal, ink, or even digital painting tools, to create more dramatic, high-contrast effects that really make the armor pop. By carefully balancing your weathering and damage effects with the overall color and shading of the armor, you can create a truly convincing and visually stunning representation of Iron Man's iconic suit.