How To Make Balloon Arch
Step-by-Step Guide to Making a Balloon Arch
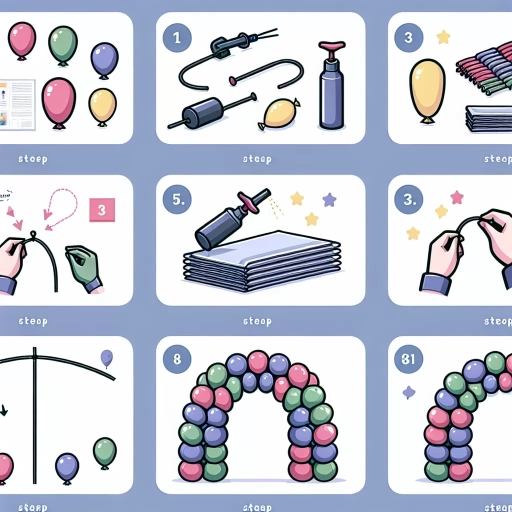
1. Gathering All the Necessary Tools and Balloons.
The first and most critical step in making a balloon arch is to gather all the necessary supplies. As an expert in building balloon arches, you will need to purchase a variety of balloons in different colors, sizes, and shapes. This diversity in balloons will add visual interest to your arch and make it more attractive. Additionally, you will also need a balloon pump, balloon tying tool, fishing line or string, and balloon garland tape or strip. I suggest investing in quality tools as they can significantly trol during the creation process.
- Balloons: It's preferable to buy balloons in various sizes, colors and shapes to add depth and richness to your arch.
- Quality tools: A good balloon pump and tying tool can speed up the creation process and make it much easier, saving you time and effort.
- Additional supplies: Having the right balloon garland tape or strip, as well as fishing line or string, would make the assembly and securing of the arch smoother and more secure.
2. Blowing Up the Balloons and Constructing the Arch
After compiling all your supplies, the next step is to blow up the balloons. Use your balloon pump to inflate them to different sizes, creating depth and variety in your arch. Additionally, using the tying tool can make the task quicker and easier on your fingers. Once all the balloons are inflated and tied, begin constructing your balloon arch. By using the balloon strip or tape and string, you can create the base of your arch, threading the balloons through the holes in the tape. Arranging the balloons in a random pattern of different sizes and colors can make the arch more visually interesting and pleasing.
- Inflate balloons: Use your balloon pump to inflate balloons in different sizes to create depth in your arch.
- Begin Constructing: Use your balloon strip or tape and string to begin threading the balloons and creating the arch base.
- Arrange balloons: Position your balloons in a random order of various sizes and colors for an interesting visual effect.
3. Securing and Displaying the Balloon Arch
Once you've created your balloon arch, the final step is to secure and display it. You need to make sure that the arch is anchored properly to prevent it from falling over or being blown away. This can be done using heavy objects or balloon weights at the base of the arch. After making sure your arch is secure, it's finally time to display it. Depending on your setup location, you can display it either indoors or outdoors. Remember, a well-placed and well-constructed balloon arch can add a festive touch to any event or celebration, instantly elevating the atmosphere.
- Secure Arch: Make sure to anchor your balloon arch properly to ensure it stays upright and in place.
- Display Arch: Show off your hard work by displaying your balloon arch prominently in your event space.