How To Screen Record Iphone
Understanding Screen Recording on iPhone
Basics of Screen Recording
The first step in understanding how to screen record on your iPhone is the knowledge of what it is and what it entails. A screen recorder is a tool or feature that allows you to capture everything happening on your screen, including all your operations. This tool is crucial for product demonstrations, game recordings, presentations, and for creating tutorials like this one. It all happens in real-time and is very easy to use. Knowing how to use this feature effectively can significantly improve your ability to share information and problem-solving strategies in one's iPhone.
Why Use Screen Recording?
Screen recording is an undervalued tool that many iPhone users don't fully utilize. One might question why you should use the screen recording feature in the first place. The reason is simple and straightforward. Screen recording on your iPhone can be a great tool in various situations. For example, if you are having issues with your device and need to show someone the problem or when you want to show someone how to do something on their device. This tool can be used for demonstrating software applications, creating user guides, and sharing gameplay experiences. It's essential to note that this feature records audio input from the microphone, making it even more useful for making instructional videos or recording your conversions.
Importance of Screen Recording in the Tech Era
In today's tech-savvy era, the importance of features like screen recording cannot be overstated. With the surge in virtual meetings, remote work, and digital education, knowing how to screen record on your iPhone can be a lifesaver. It allows professionals to share their work process with others, facilitate remote troubleshooting, and even document processes for future reference. For students and educators, screen recording offers a way to record lectures or tutorials, which can be revisited at any time for review. In entertainment, avid gamers use this feature to record their gameplay and streaming it online. Identifying these reasons for its relevance will go a long way in helping you understand why you must learn how to screen record on your iPhone.
How to Screen Record On iPhone?
Activating and Using the Screen Record Feature
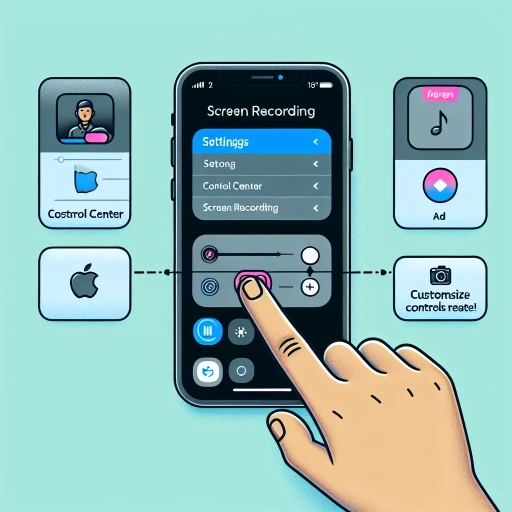
Historically, iPhone users had to rely on third-party apps to record their screen. However, with the introduction of iOS 11, Apple integrated a screen record feature in its control center. Activating your iPhone's screen recording feature is pretty straightforward. First, navigate your way to your phone's 'Settings,' then scroll down to the 'Control Center,' and tap on 'Customize Controls.' Once there, scroll down to find 'Screen Recording' and tap on the '+' sign box to add it to your control center. To start recording, swipe up your control center and tap the 'record' icon. A three-second countdown ensues, after which your screen recording starts. It's important to note that whatever you do on your screen within the recording time gets recorded. Similarly, any sounds or voices caught by your iPhone's mic will also be recorded.
Screen Recording with Audio
Often, iPhone users wonder how to go about screen recording with audio. Luckily, this is something you can do quite easily. After clicking on the record button, just tap and hold before releasing it. This action will give rise to a small window where you'll see an option to turn the Microphone Audio on. Once you're done, simply tap on the record button to start recording. It's essential to remember that all background noises will be captured. It's also important to note that you can stop the recording by either clicking on the stop button that appears at the top left corner of your screen or by tapping on the record button in the control center.
Editing and Saving Your Screen Recording
Once you're done screen recording, you probably want to edit and save your recording. To do that, you'd tap on the 'stop' button or go to your control center to cease the recording. After stopping the recording, a notification pops up at the top of your screen telling you that your screen recording video has been saved to your photos. To edit it, go to your Photos App, click on the recorded video, then click on 'Edit' at the top right corner of your screen. Here, you can trim your video among other alterations before you save it.
Tips and Tricks to Optimize Screen Recording on iPhone
Screen Recording Performance
Even though screen recording is technically a background process, it doesn't come without its set of complications. While recording, you might experience sluggish performance on your iPhone since the process is somewhat resource-intensive. Therefore, if you are planning to record resource-intensive tasks, it can be beneficial to close some apps running in the background. Also, recording at a lower frame rate can be helpful for reducing the resource footprint. Another tip for improving performance is ensuring optimal storage.
Privacy and Screen Recording
Often overlooked, it's crucial to remember that screen recording can inadvertently record sensitive information. If you're planning to share the recording, it's essential to review it and make sure it doesn't contain sensitive data like passwords, email content, or private conversations. For videos that capture such information, consider not sharing them at all or, at least, blur out the sensitive information before you share them.
Use Third-Party Apps for More Features
While the built-in tool serves basic screen recording needs, third-party screen recording apps offer advanced features that the native app lacks. These features include the ability to add filters, special effects, and background music, among other enhanced capabilities. Some of the top-rated screen recording apps include Record it!, TechSmith Capture, and Go Record: Screen Recorder. Exploring and experimenting with such apps can be a great way to unlock potential and get the most out of screen recording on your iPhone.