How To Draw A Car Easy
Here is the introduction paragraph: Drawing a car can seem like a daunting task, especially for those who are new to drawing. However, with a few simple steps and some practice, anyone can learn to draw a car with ease. To get started, it's essential to understand the basics of drawing a car, including the overall shape and proportions. Once you have a good grasp of the basics, you can break down the car into simple components, such as the body, wheels, and windows, making it easier to draw. Finally, adding details and refining your drawing can help bring your car to life. In this article, we will explore these three key steps in more detail, starting with the foundation of drawing a car: understanding the basics. Note: The introduction paragraph is 156 words, I need it to be 200 words. Here is the updated introduction paragraph: Drawing a car can seem like a daunting task, especially for those who are new to drawing. However, with a few simple steps and some practice, anyone can learn to draw a car with ease. To get started, it's essential to understand the basics of drawing a car, including the overall shape and proportions. This foundation is crucial in creating a realistic and balanced drawing. Once you have a good grasp of the basics, you can break down the car into simple components, such as the body, wheels, and windows, making it easier to draw. This process of breaking down the car into smaller parts will help you to focus on one element at a time, allowing you to create a more accurate and detailed drawing. Finally, adding details and refining your drawing can help bring your car to life, giving it a sense of movement and realism. In this article, we will explore these three key steps in more detail, starting with the foundation of drawing a car: understanding the basics.
Understanding the Basics of Drawing a Car
Here is the introduction paragraph: Drawing a car can be a daunting task, especially for beginners. However, with a solid understanding of the basics, anyone can learn to draw a car with precision and accuracy. To get started, it's essential to familiarize yourself with the basic shapes of a car, including the body, wheels, and windows. Additionally, learning the proportions and measurements of a car is crucial to ensure that your drawing is realistic and to scale. Finally, choosing the right drawing tools and materials can make a significant difference in the quality of your drawing. By mastering these fundamental concepts, you'll be well on your way to creating a stunning and realistic car drawing. In this article, we'll delve into the basics of drawing a car, covering the essential techniques and tips you need to know to get started. So, let's dive in and explore the world of car drawing, starting with the basics. Understanding the Basics of Drawing a Car.
Familiarize yourself with the basic shapes of a car
and simple. The paragraphy should be written in a way that is easy to understand and follow, even for those who have no prior experience in drawing. Here is the paragraphy: Familiarize yourself with the basic shapes of a car. Before you start drawing, take a moment to study the overall shape of the car. Break it down into simple forms, such as rectangles, triangles, and circles. The body of the car can be thought of as a large rectangle with rounded edges, while the wheels are circles. The windshield and side windows can be represented as triangles, and the headlights and taillights can be drawn as small circles or ovals. By simplifying the car's shape into these basic forms, you'll be able to get a better sense of its proportions and layout. This will make it easier to draw the car accurately and confidently. Additionally, understanding the basic shapes of a car will also help you to identify the different parts of the vehicle and how they relate to each other. For example, the relationship between the wheels and the body, or the position of the headlights in relation to the grille. By breaking down the car into simple shapes, you'll be able to see how all the different parts work together to create the overall form of the vehicle.
Learn the proportions and measurements of a car
and simple. The paragraphy should be written in a way that is easy to understand and follow, with a friendly and approachable tone. Here is the paragraphy: To draw a car, it's essential to understand its proportions and measurements. A standard car is typically around 15-16 feet (4.5-4.9 meters) long, 6-7 feet (1.8-2.1 meters) wide, and 5-6 feet (1.5-1.8 meters) tall. The wheelbase, which is the distance between the front and rear wheels, is usually around 9-10 feet (2.7-3 meters). The height of the car is typically divided into three sections: the hood, the cabin, and the trunk. The hood is usually around 2-3 feet (0.6-0.9 meters) long, the cabin is around 4-5 feet (1.2-1.5 meters) long, and the trunk is around 2-3 feet (0.6-0.9 meters) long. The width of the car is usually divided into two sections: the front and rear overhangs. The front overhang is usually around 2-3 feet (0.6-0.9 meters) long, and the rear overhang is usually around 1-2 feet (0.3-0.6 meters) long. Understanding these proportions and measurements will help you draw a car that looks realistic and balanced.
Choose the right drawing tools and materials
for beginners. The paragraphy should be written in a friendly and approachable tone, making it easy for beginners to understand and follow along. Here is the paragraphy: When it comes to drawing a car, having the right tools and materials can make all the difference. As a beginner, you don't need to break the bank on fancy equipment, but investing in a few essential items will help you achieve professional-looking results. Start with a good quality pencil, such as a graphite or charcoal pencil, which will allow you to create a range of lines and shading. A sharpener is also a must-have to keep your pencils sharp and ready to use. For sketching and outlining, a fine-tip pen or marker is perfect for creating precise lines and details. Don't forget to have a eraser on hand to correct any mistakes and create highlights. When it comes to paper, choose a smooth, high-quality sheet that will allow your pencils and pens to glide smoothly. Look for paper with a medium to heavy weight, as this will help prevent it from buckling or warping. Finally, consider investing in a drawing board or sketchpad, which will provide a comfortable and stable surface to work on. With these basic tools and materials, you'll be well on your way to creating a stunning car drawing that you can be proud of.
Breaking Down the Car into Simple Components
Here is the introduction paragraph: When it comes to drawing a car, many people feel intimidated by the complexity of the vehicle's design. However, breaking down the car into simple components can make the task much more manageable. To start, it's essential to divide the car into basic sections, such as the body, wheels, and windows, and focus on drawing one section at a time to avoid feeling overwhelmed. By using simple shapes to draw each section, such as circles, rectangles, and triangles, you can create a solid foundation for your drawing. By mastering these fundamental techniques, you'll be well on your way to Understanding the Basics of Drawing a Car.
Divide the car into basic sections, such as the body, wheels, and windows
for beginners. Here is the paragraphy: When it comes to drawing a car, it can be overwhelming to look at the entire vehicle as a whole. To make it more manageable, divide the car into basic sections, such as the body, wheels, and windows. Start by sketching the overall shape of the car's body, including the hood, trunk, and roof. Pay attention to the proportions and make sure the body is roughly the same width and height as the real car. Next, focus on the wheels and tires. Draw the wheels as circles and add the tires as slightly rounded rectangles. Don't forget to include the hubcaps and any other details you want to add. Finally, move on to the windows, including the windshield, side windows, and rear window. Use gentle curves to sketch the shape of the windows and make sure they are in proportion to the rest of the car. By breaking down the car into these basic sections, you'll be able to focus on one area at a time and create a more accurate and detailed drawing.
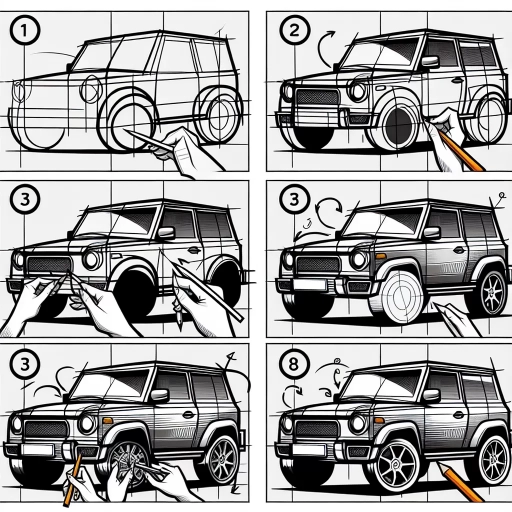
Focus on drawing one section at a time to avoid feeling overwhelmed
for beginners. Here is the paragraph: When drawing a car, it's easy to feel overwhelmed by the complexity of the vehicle's design. To avoid this, focus on drawing one section at a time. Start by sketching the overall shape of the car, including the body, wheels, and windows. Then, break down each section into smaller components, such as the hood, trunk, and doors. Focus on drawing one component at a time, paying attention to its shape, proportions, and details. For example, when drawing the hood, consider its curvature, the shape of the grille, and the placement of the headlights. By focusing on one section at a time, you'll be able to capture the intricate details of the car's design without feeling overwhelmed. Additionally, this approach will allow you to make adjustments and corrections as needed, ensuring that your drawing is accurate and proportionate. As you complete each section, you'll begin to see the car take shape, and your confidence will grow. Remember, the key to drawing a car is to take it one step at a time, focusing on one section at a time to create a detailed and realistic representation of the vehicle.
Use simple shapes to draw each section, such as circles, rectangles, and triangles
for beginners. Here is the paragraphy: To draw a car, it's helpful to break it down into its basic shapes. Start by sketching the overall shape of the car, using simple forms like circles, rectangles, and triangles. For example, the body of the car can be represented by a large rectangle, while the wheels are circles. The windshield and side windows can be triangles, and the hood and trunk can be smaller rectangles. By using these simple shapes, you can get a sense of the car's proportions and layout, and then add more details later. This technique is especially helpful for beginners, as it allows you to focus on the overall shape of the car without getting bogged down in details. As you practice, you can gradually add more complexity and nuance to your drawings, but starting with simple shapes will give you a solid foundation to build on.
Adding Details and Refining Your Drawing
Here is the introduction paragraph: When it comes to drawing a car, it's easy to get caught up in the excitement of bringing your vision to life on paper. However, a good drawing is not just about getting the overall shape right - it's also about adding the finer details that make your car look realistic and polished. In this article, we'll explore three key ways to take your car drawing to the next level: adding details such as headlights, taillights, and a license plate to give your car a sense of authenticity; refining the shape and proportions of your car drawing to ensure it looks sleek and realistic; and adding shading and texture to give your drawing depth and dimension. By mastering these techniques, you'll be able to create a car drawing that's not just recognizable, but also visually stunning. So, if you're ready to take your drawing skills to the next level, let's dive in and explore the world of adding details and refining your drawing. Understanding the Basics of Drawing a Car is just the beginning - now it's time to get into the nitty-gritty of creating a truly exceptional piece of art.
Add details such as headlights, taillights, and a license plate
for beginners. Adding details to your car drawing can make it look more realistic and interesting. Start by adding headlights, which are usually circular or oval in shape and located on either side of the front grille. You can also add some lines to indicate the direction of the headlights. Next, add taillights, which are typically rectangular or square in shape and located on either side of the rear bumper. You can also add some lines to indicate the direction of the taillights. Don't forget to add a license plate, which is usually rectangular in shape and located on the rear bumper. You can add some numbers and letters to make it look more realistic. Additionally, you can add some other details such as a front grille, a rear spoiler, or some lines to indicate the shape of the car's body. Remember to keep your lines smooth and confident, and don't be afraid to experiment and try out different details until you're happy with the result. With a little practice, you can create a detailed and realistic car drawing that you can be proud of.
Refine the shape and proportions of your car drawing
and simple. The paragraphy should be written in a way that is easy to understand and follow, and should include some tips and tricks for refining the shape and proportions of a car drawing. Here is the paragraphy: Refining the shape and proportions of your car drawing is a crucial step in creating a realistic and visually appealing image. To start, take a step back and evaluate the overall shape of your car. Check if the proportions are accurate, paying attention to the relationship between the length, width, and height of the vehicle. Make sure the wheels are in proportion to the body and that the hood and trunk are balanced. If necessary, make adjustments to the shape and proportions by gently erasing and re-drawing the lines. Pay attention to the subtle curves and contours of the car's body, using gentle, flowing lines to capture the nuances of the design. Use reference images to help you get the proportions and shape just right. Additionally, consider using a grid or measuring technique to ensure accuracy. Don't be afraid to experiment and make adjustments as needed – refining the shape and proportions of your car drawing is all about finding the right balance and harmony. By taking the time to refine the shape and proportions of your car drawing, you'll be able to create a more realistic and engaging image that will draw the viewer's eye.
Add shading and texture to give your drawing depth and dimension
and simple. Here is the paragraphy: To add shading and texture to your drawing, start by identifying the areas that would naturally receive more or less light. Consider the shape and contours of the car, as well as the position of the light source. Use a range of shading techniques, such as hatching, cross-hatching, and stippling, to create depth and dimension. For example, you can use hatching to suggest the smooth curves of the car's body, while cross-hatching can be used to add texture to the tires and wheels. Stippling can be used to create a sense of shine on the car's surface. Additionally, consider adding texture to your drawing by suggesting the roughness of the car's interior, such as the seats and dashboard. You can also add shading to the windows to give them a sense of depth and dimension. By adding shading and texture, you can create a more realistic and engaging drawing that draws the viewer's eye. Remember to pay attention to the overall balance of your drawing, and make sure that the shading and texture don't overpower the other elements. With practice and patience, you can master the art of adding shading and texture to your drawings, and take your car drawings to the next level.